Harvester Cloud Provider
Introduction
You can provision RKE2 clusters in Rancher using the built-in Harvester Node Driver. This component provides load balancer and storage passthrough capabilities to guest Kubernetes clusters.
In this page we will learn:
- The main functionality and key configuration parameters of the Harvester Cloud Provider.
- How to deploy the Harvester Cloud Provider in an RKE2 cluster.
- How to use the Harvester load balancer.
Main Functionalities
The Harvester Cloud Provider (also known as Cloud Controller Manager) implements a subset of the cloudprovider interface defined by k8s.io/cloud-provider.
-
Node metadata discovery and reporting: Dynamically discovers and reports node metadata (such as node names, regions, zones, and IP addresses), acting as a critical bootstrap component for the guest cluster.
-
Load balancer provisioning: Automatically provisions and configures load balancers for Kubernetes
Serviceobjects (type:LoadBalancer), routing external traffic to the correct guest nodes.
Strictly Cloud-Native Operation
The Harvester Cloud Provider is built on the Kubernetes Cloud Controller Manager (CCM) framework. It operates natively by querying and managing resources directly through the Harvester Kubernetes API server:
-
API-driven metadata: Retrieves node metadata (such as
ProviderID, region/zone topology, and IP addresses) by observingVirtualMachineInstance(VMI) status directly from the API server, eliminating host-level commands and hard-coded network interfaces or ports. Using the VMI status as the single source of truth guarantees consistent and deterministic metadata reporting across all nodes, providing a reliable foundation for downstream node lifecycle synchronization and load balancer traffic routing. -
Centralized management: Runs as a standard Deployment rather than a per-node DaemonSet, centrally querying and monitoring virtual machine metadata across the guest cluster via standard Kubernetes API interactions.
-
CCM framework alignment: Uses both standard public flags and extended Harvester flags (
--flag) to modularly toggle controllers (standard CCM or custom VMI) and configure networking for complex cluster setups.
Backward Compatibility Notice
For a detailed support matrix, please refer to the Harvester CCM & CSI Driver with RKE2 Releases section of the official website.
Deploying
The Harvester Cloud Provider is packaged as an official Helm chart and is natively integrated into the Rancher and RKE2 ecosystem.
-
Automatic deployment (RKE2): When provisioning an RKE2 guest cluster using the Harvester Node Driver, the Harvester Cloud Provider is automatically deployed to the guest cluster during cluster initialization as an RKE2 bootstrap chart.
-
Manual deployment: You can also manually install, upgrade, or customize the provider's configuration settings using the official Helm chart.
Chart Parameters
The following table lists the most common parameters:
| Parameter | Description | Default Value | First Available Version |
|---|---|---|---|
extraArgs | Additional CLI flags passed to cloud provider container | [] | 0.2.12 |
cloudConfigPath | Legacy host path to cloud-config file | "/var/lib/rancher/rke2/etc/config-files/cloud-provider-config" (Versions 0.2.3 to 0.2.9: "/etc/kubernetes/cloud-config") | 0.2.10 |
cloudConfig.secretName | Name of Kubernetes Secret containing cloud-config data | "" | 0.2.12 |
cloudConfig.secretKey | Key of Kubernetes Secret containing cloud-config data | "cloud-config" | 0.2.12 |
cloudConfig.hostPath | Fallback host path to cloud-config file | "/var/lib/rancher/rke2/etc/config-files/cloud-provider-config" | 0.2.12 |
global.cattle.clusterName | Name of target cluster in Rancher | "" | 0.2.3 |
kube-vip.enabled | Enables embedded kube-vip for load balancer VIPs | true | 0.2.7 |
kube-vip.env.svc_enable | Enables kube-vip service controller | "true" | 0.2.7 |
kube-vip.env.svc_election | Enables leader election for services (required for externalTrafficPolicy: Local) | "false" | 0.2.12 |
For information about other configurable parameters, refer to the chart's values.yaml.
Rancher UI Options
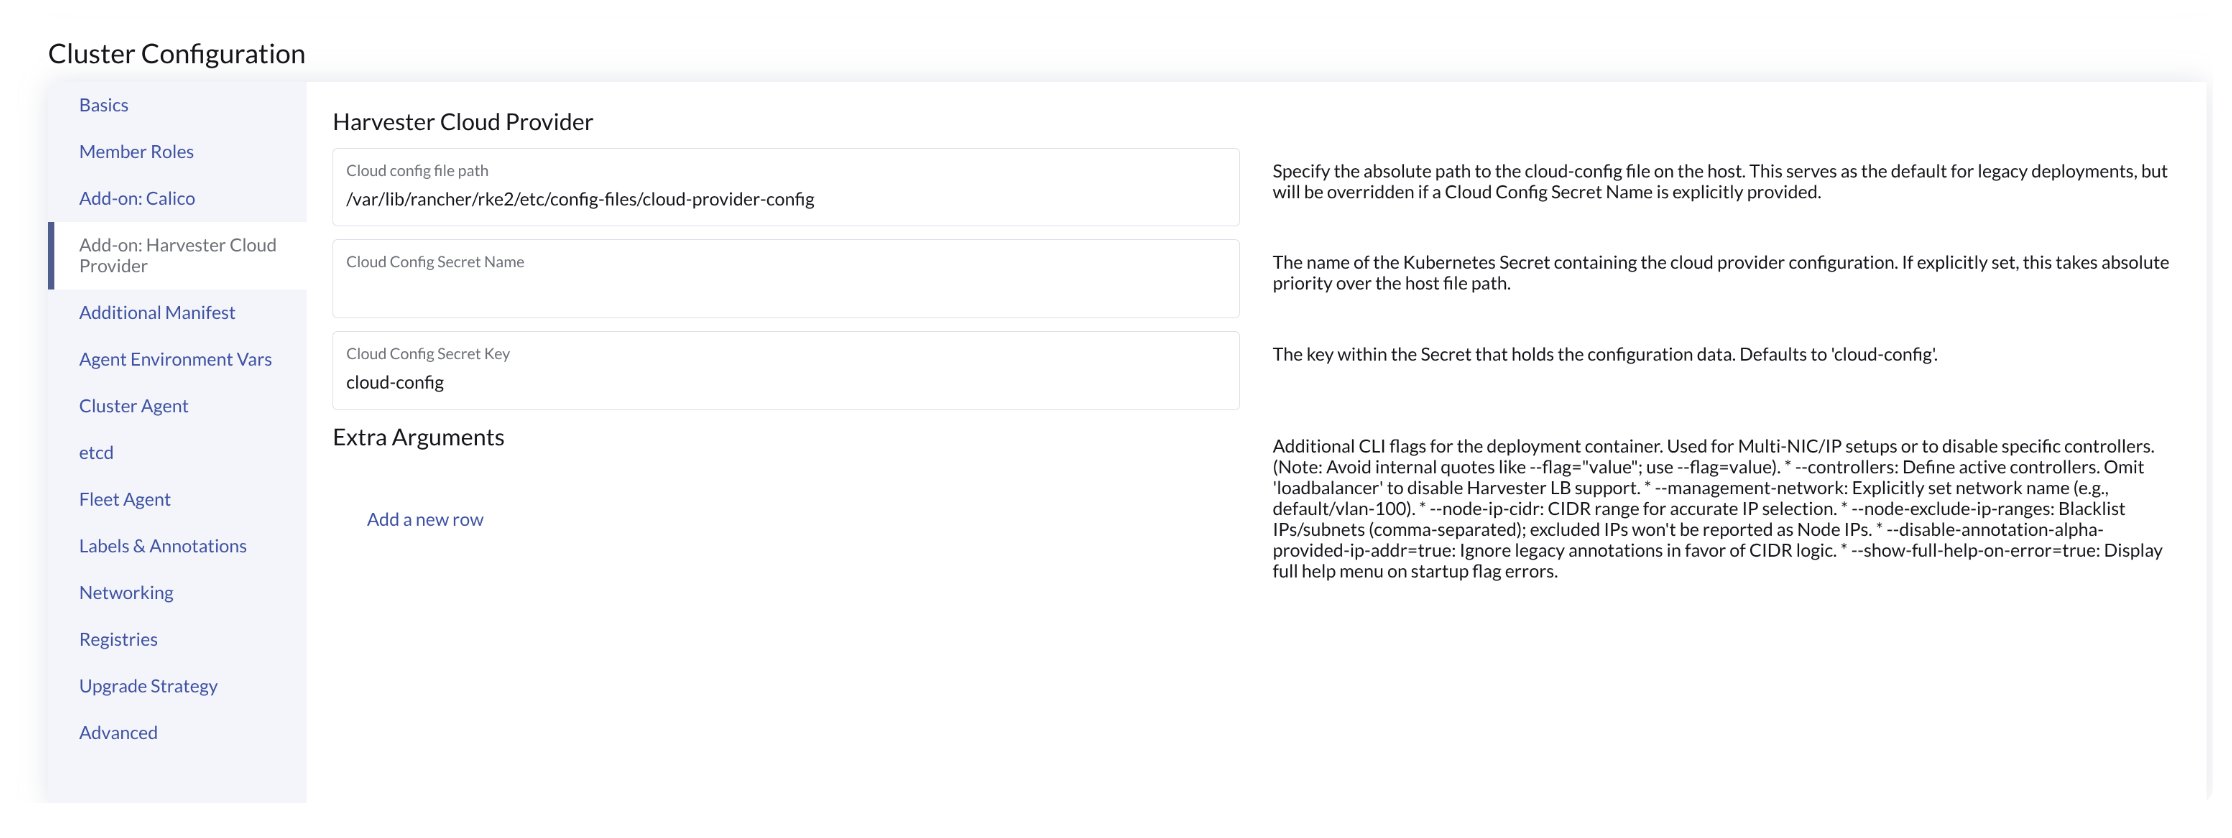
The Rancher UI provides dynamic forms driven by the chart's questions.yaml file. While these forms expose standard settings, you can use the Edit as YAML feature to configure any parameter in values.yaml.
The following image shows the default UI options for Harvester Cloud Provider v0.2.12:
Cluster Identifier Configuration
The global.cattle.clusterName parameter configures a unique cluster identifier that the Harvester Cloud Provider uses to tag and track resources allocated in the Harvester cluster.
global:
  cattle:
    clusterName: "cgc"
How the cluster identifier is set depends on your deployment method:
-
Manual chart deployments: If you deploy or manage the
harvester-cloud-providerchart manually, you must explicitly set a unique name for your cluster. -
Rancher-provisioned clusters: If you deploy an RKE2 guest cluster using the Rancher UI, Rancher automatically injects the cluster's unique name into
global.cattle.clusterName.In addition, Rancher automatically embeds the
harvester-cloud-providerchart configuration in theClustercustom resource (provisioning.cattle.io/v1). You can edit this resource using the Rancher UI.apiVersion: provisioning.cattle.io/v1
kind: Cluster
metadata:
name: cgc
spec:
rkeConfig:
chartValues:
harvester-cloud-provider:
cloudConfigPath: /var/lib/rancher/rke2/etc/config-files/cloud-provider-config
global:
cattle:
clusterName: cgc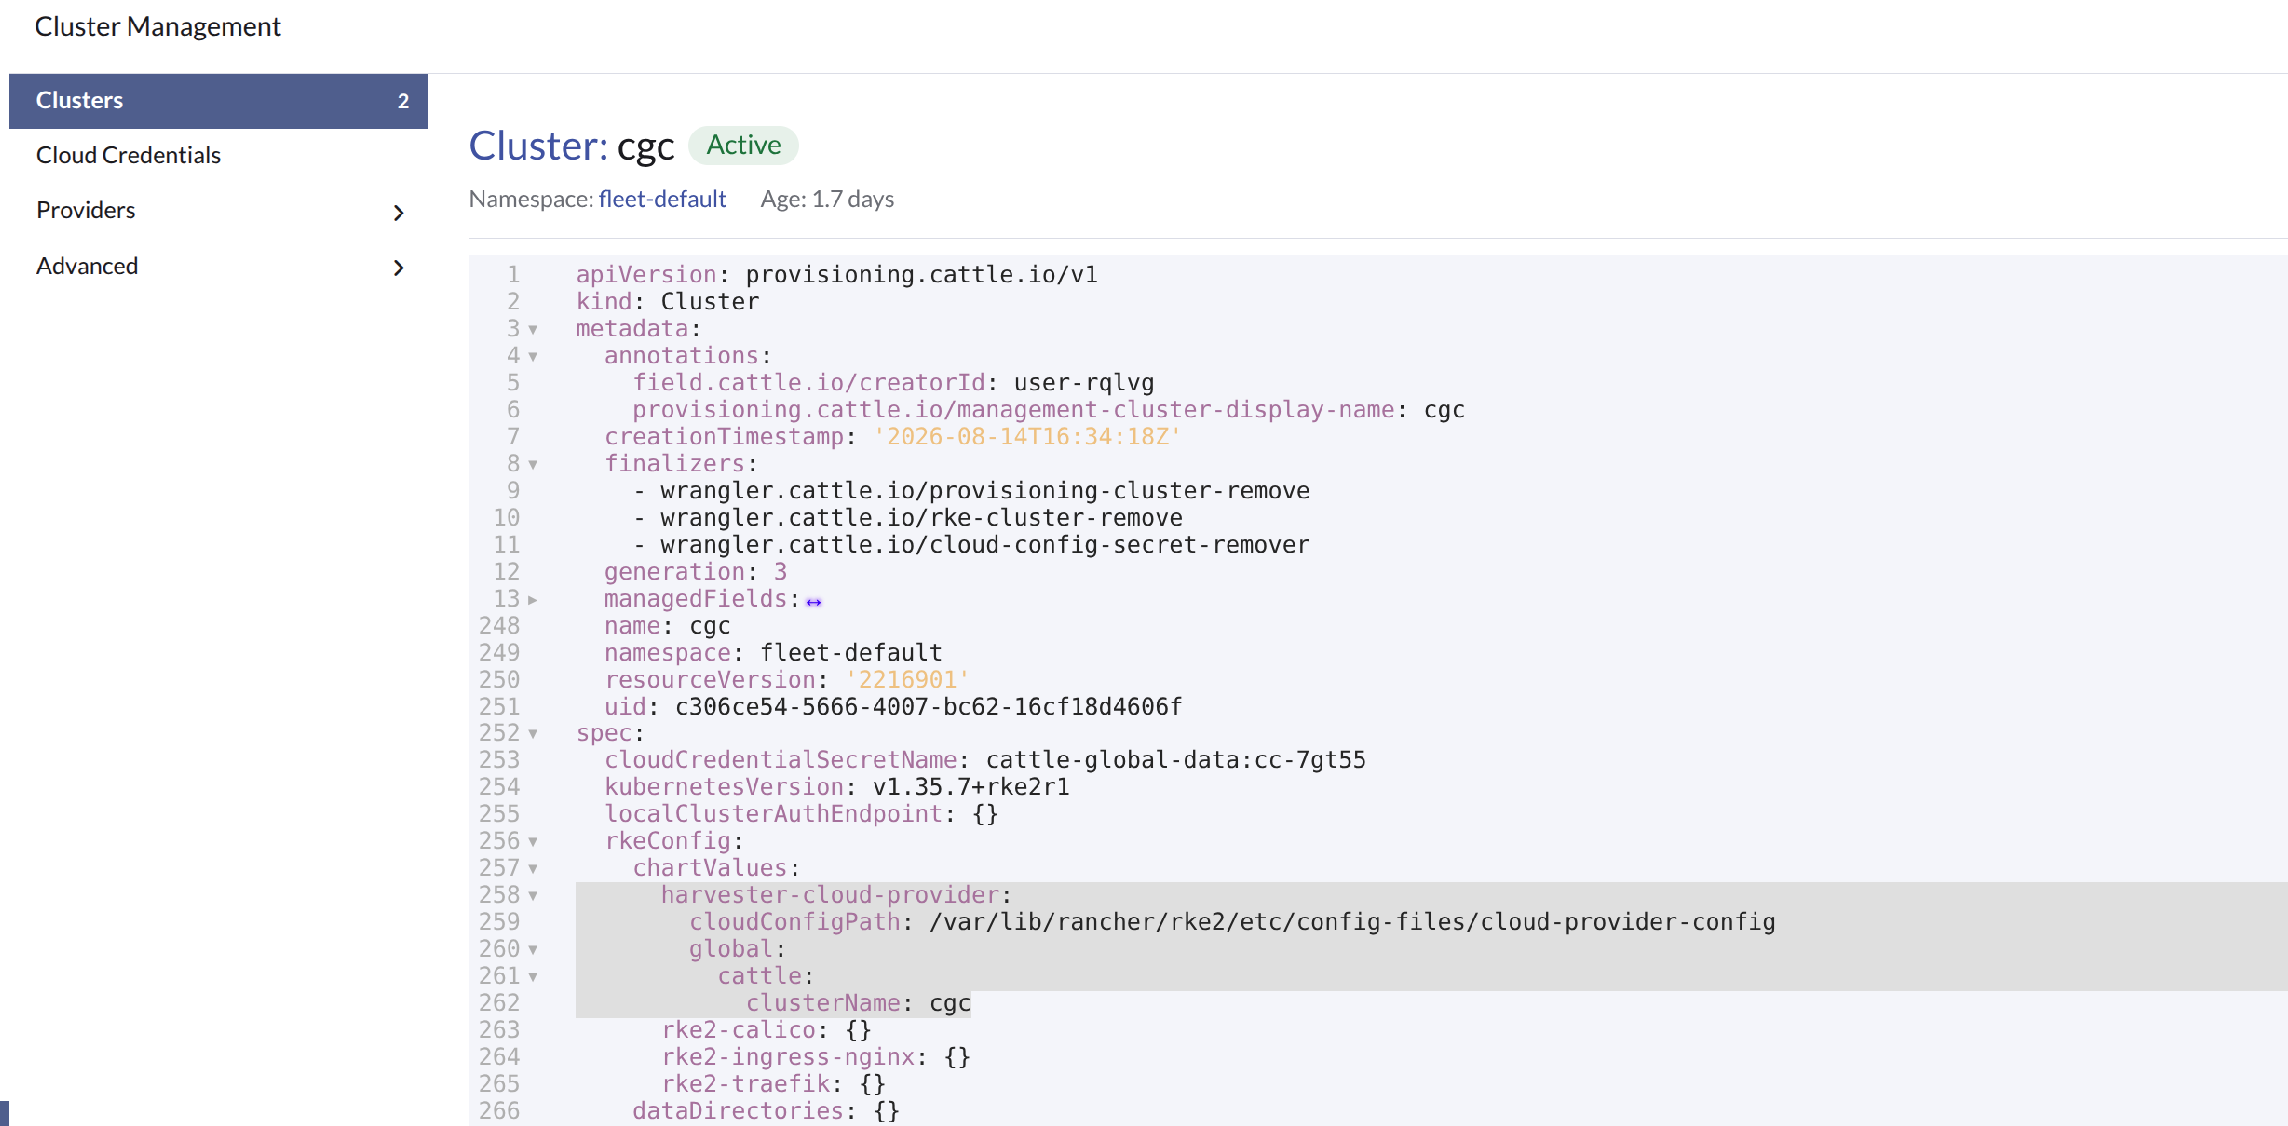 tip
tipAll Harvester Cloud Provider parameters must be nested directly under the
harvester-cloud-providerkey. Pay close attention to YAML indentation, as incorrect formatting can cause Helm to ignore or misinterpret your parameters.When using the Edit as YAML feature on the Rancher UI, the built-in editor automatically checks syntax and highlights indentation errors before you save.
Resource Allocation and Leakage Risks
If the global.cattle.clusterName parameter is missing, the Cloud Controller Manager framework uses kubernetes as the cluster name by default.
Because Harvester manages multi-tenant and multi-cluster environments, using this generic name prevents Harvester from effectively determining which guest cluster owns specific backing resources (such as load balancers). This can cause resource tracking conflicts, resource leaks, or unexpected resource exhaustion across clusters sharing the same Harvester installation.
Starting with Harvester Cloud Provider v0.2.12 and Harvester v1.9.0, both harvester-cloud-provider (running in the guest cluster) and harvester-load-balancer (running in the Harvester cluster) generate warning logs whenever global.cattle.clusterName is missing or kubernetes is used as the cluster name. If you observe these warning logs, inspect and update your Helm chart parameters immediately.
Parameter Alignment & Terminology Mapping
The cluster identifier is represented by different parameter names depending on where it is configured or referenced:
| Context or Location | Parameter | Alignment Notes |
|---|---|---|
| Rancher UI | Cluster Name | Set during guest cluster creation. |
| Harvester Cloud Provider Helm Chart | global.cattle.clusterName | Configured in values.yaml. Injected automatically by the Rancher UI for RKE2 guest clusters; must be set manually in all other cases. |
| Harvester Cloud Provider Deployment Flag | --cluster-name | Internal container argument injected into the Harvester Cloud Provider deployment. The Helm chart template automatically converts global.cattle.clusterName to --cluster-name. When troubleshooting, check the deployment manifest to verify this parameter, but do not edit it directly. |
| Cloud Config Generation | serviceAccountName | Parameter specified when generating the cloud-config payload. |
Critical Alignment Requirement
Although different components use different parameter names, they all represent the exact same cluster identifier and must strictly match. If these values do not match, the Harvester Cloud Provider will fail to authenticate or properly manage resources in Harvester.
Remote Harvester Cloud Configuration
Harvester Cloud Provider requires a cloud-config payload to connect to the remote Harvester cluster for management of virtual machine metadata and load balancers. You can configure this payload using either legacy host-path mounts or Kubernetes Secrets.
File-Based Cloud Configuration (Legacy)
This approach relies on mounting the configuration file directly from the Harvester node's filesystem.
-
Default path (
cloudConfigPath): RKE2 automatically injects the configuration file into/var/lib/rancher/rke2/etc/config-files/cloud-provider-configfor the cloud-provider container to access. -
Configuration syntax:
cloudConfigPath: "/var/lib/rancher/rke2/etc/config-files/cloud-provider-config" -
Host path fallback (
cloudConfig.hostPath): This is maintained for backward compatibility and evaluated only ifcloudConfig.secretNameis empty andcloudConfigPathis omitted.
Secret-Based Cloud Configuration (Recommended)
Available as of Harvester-cloud-provider v0.2.12
This approach uses a Kubernetes Secret to store and manage the configuration payload natively inside the cluster.
cloudConfig:
  secretName: ""
  secretKey: "cloud-config"
  hostPath: "/var/lib/rancher/rke2/etc/config-files/cloud-provider-config"
To configure a Secret-based cloud-config, perform the following steps:
-
Generate and copy the cloud-config content.
You must generate and copy the full string under the
contentkey. This value is already Base64-encoded.importantThe value of
namespacemust match the namespace where the guest cluster is deployed, and the value ofserviceAccountNamemust match the exact cluster name. Mismatched values will prevent the Harvester Cloud Provider from connecting to Harvester.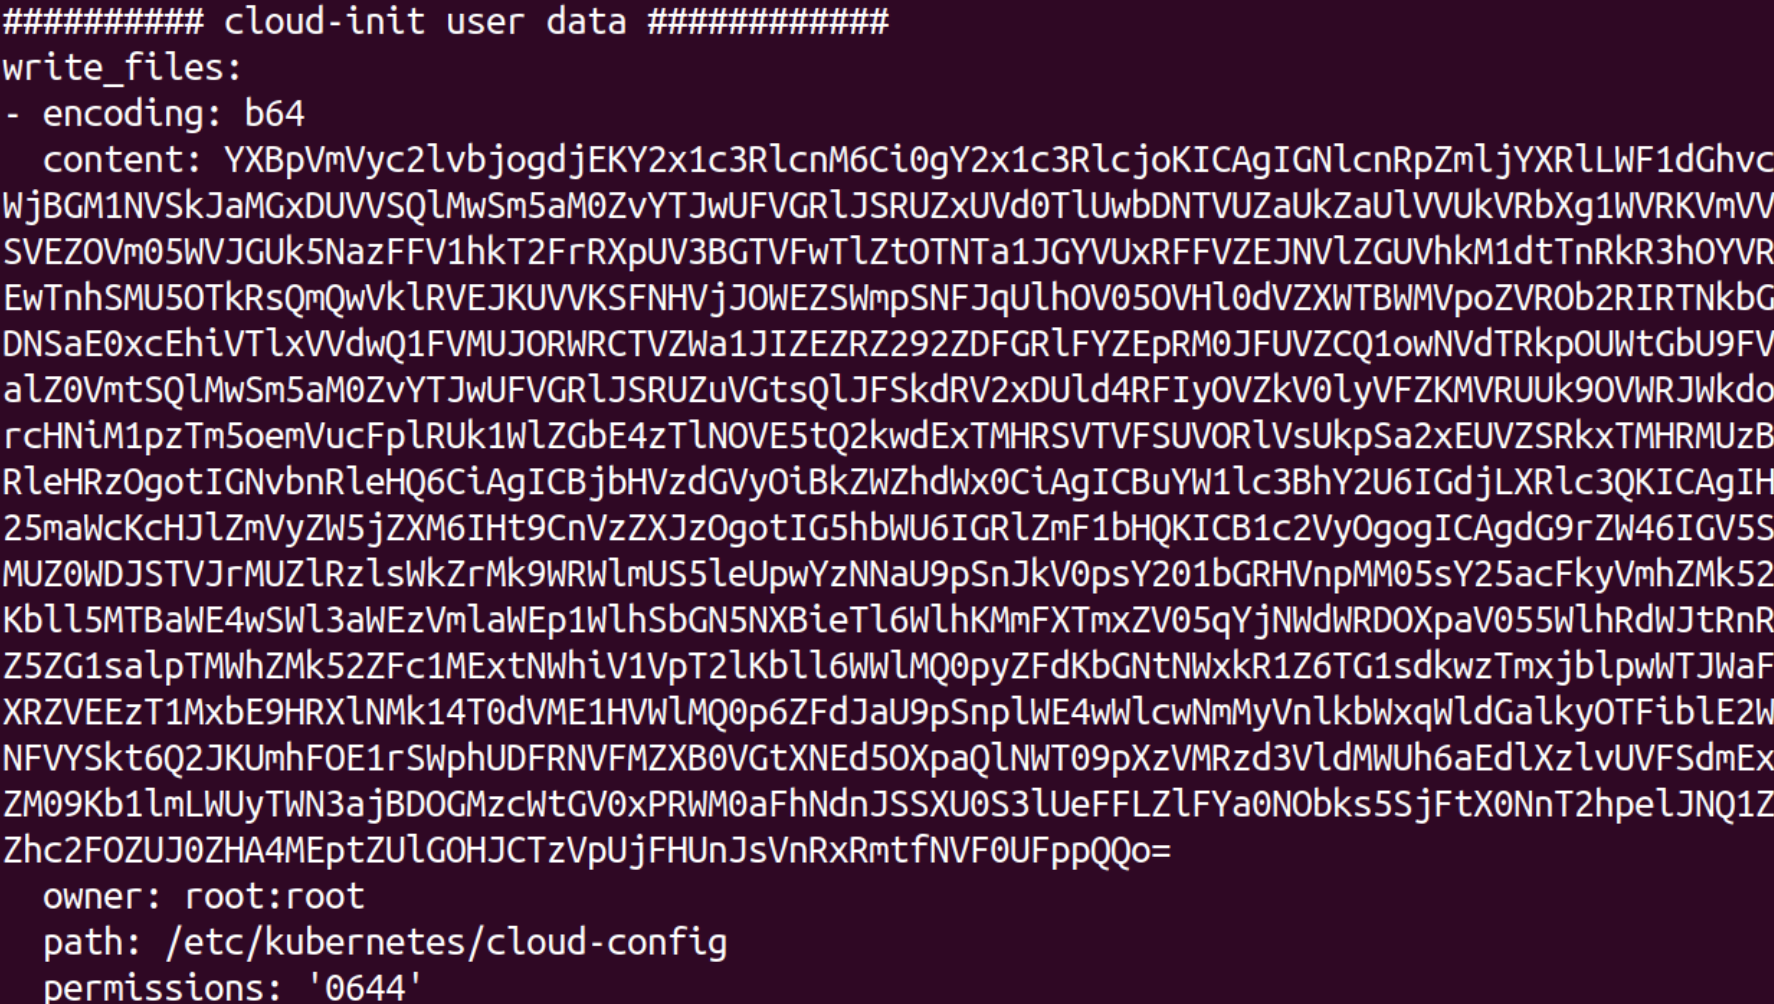
-
Paste the Secret manifest during cluster provisioning.
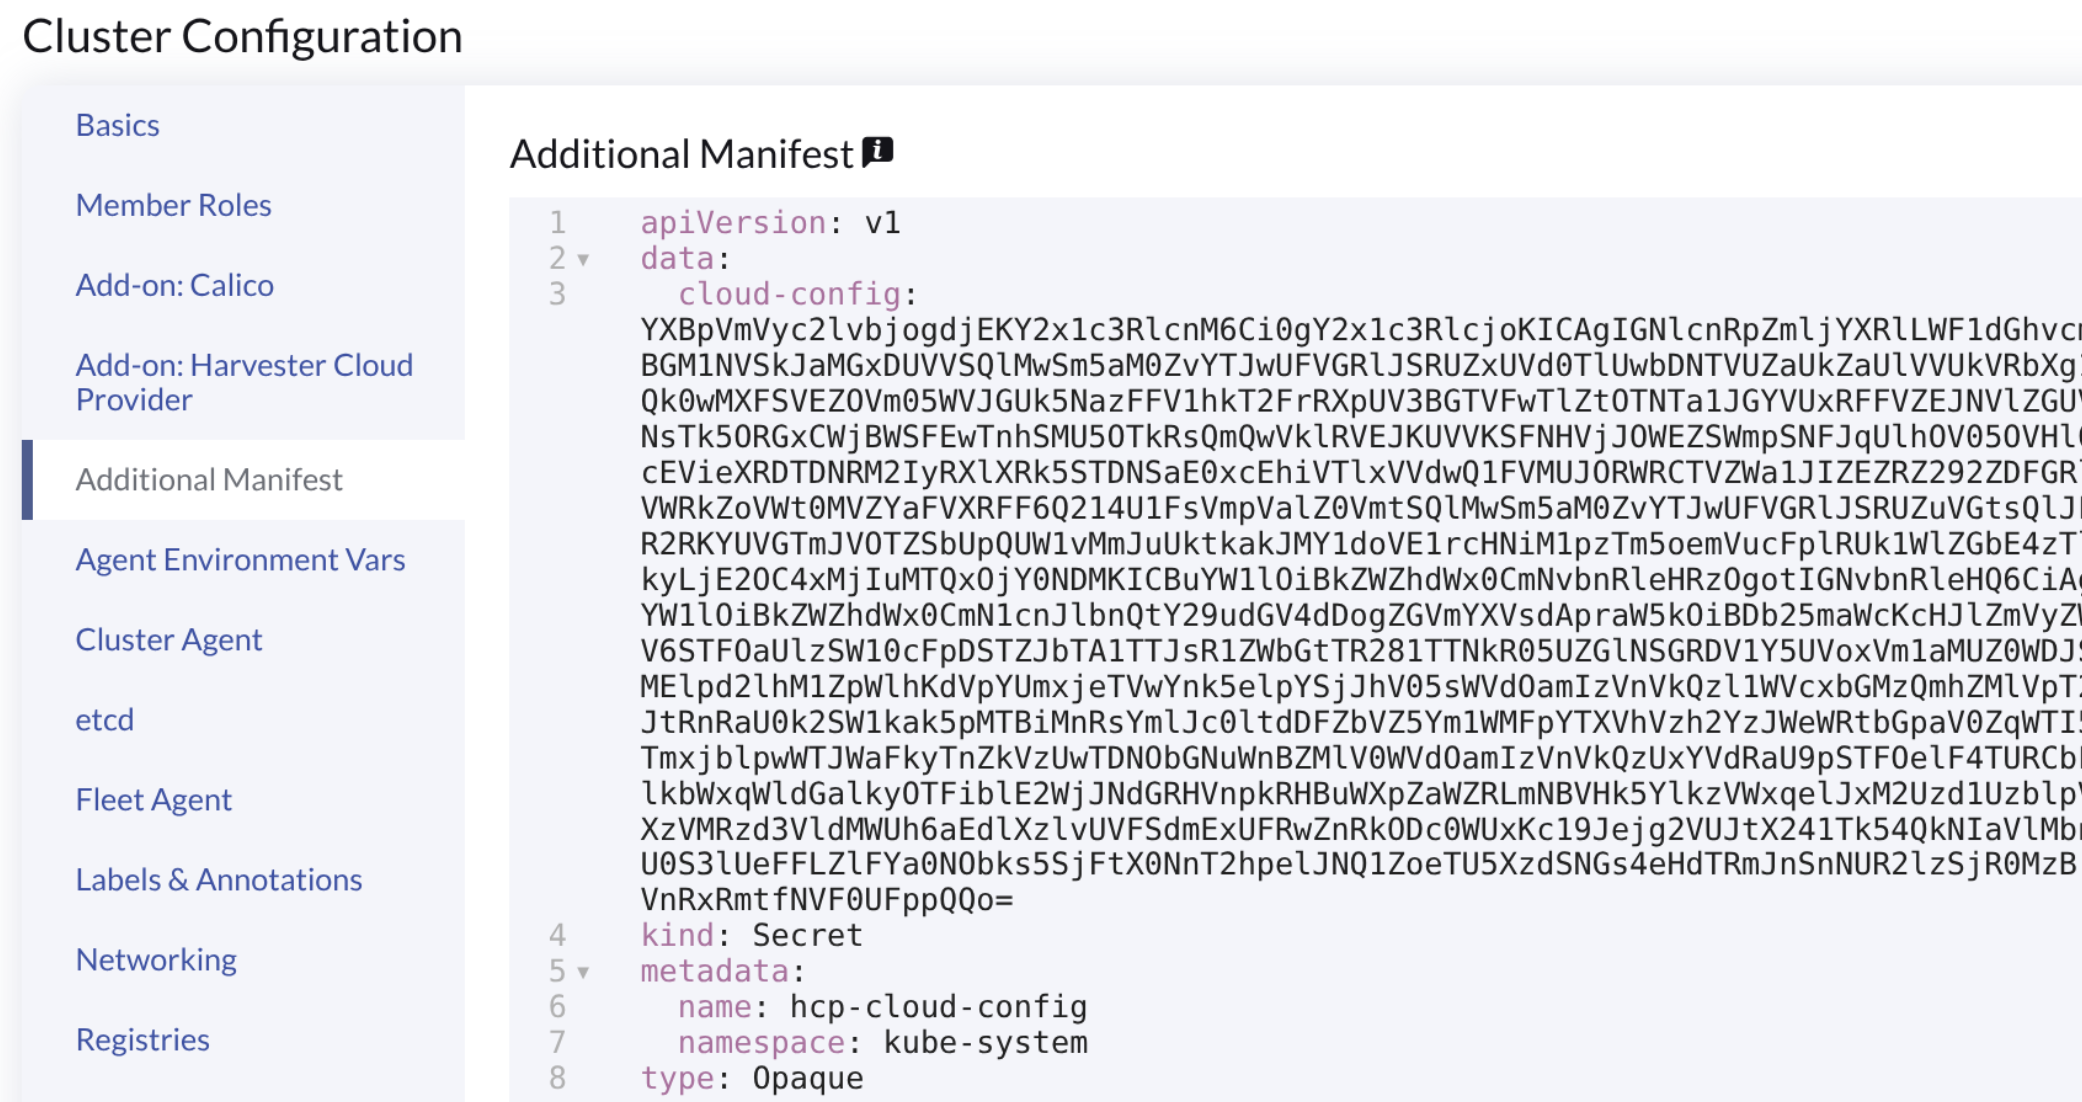
When provisioning the new guest cluster using the Rancher UI, paste the generated Secret definition into the Additional Manifest tab on the Cluster Configuration screen.
apiVersion: v1
kind: Secret
metadata:
  name: hcp-cloud-config
  namespace: kube-system
type: Opaque
data:
  cloud-config: <BASE64_ENCODED_CLOUD_CONFIG>
Consider the following requirements when creating the Secret:
-
Namespace: The Secret must be created in
kube-systemto match the defaultharvester-cloud-providernamespace. -
Secret key: If you use a custom key name instead of the default
cloud-configunderdata, update the Cloud Config Secret Key field on the Addon: Harvester Cloud Provider tab.
-
-
Reference the Secret name in the Harvester Cloud Provider add-on.
Specify the Secret name in the Cloud Config Secret Name field on the Addon: Harvester Cloud Provider tab.
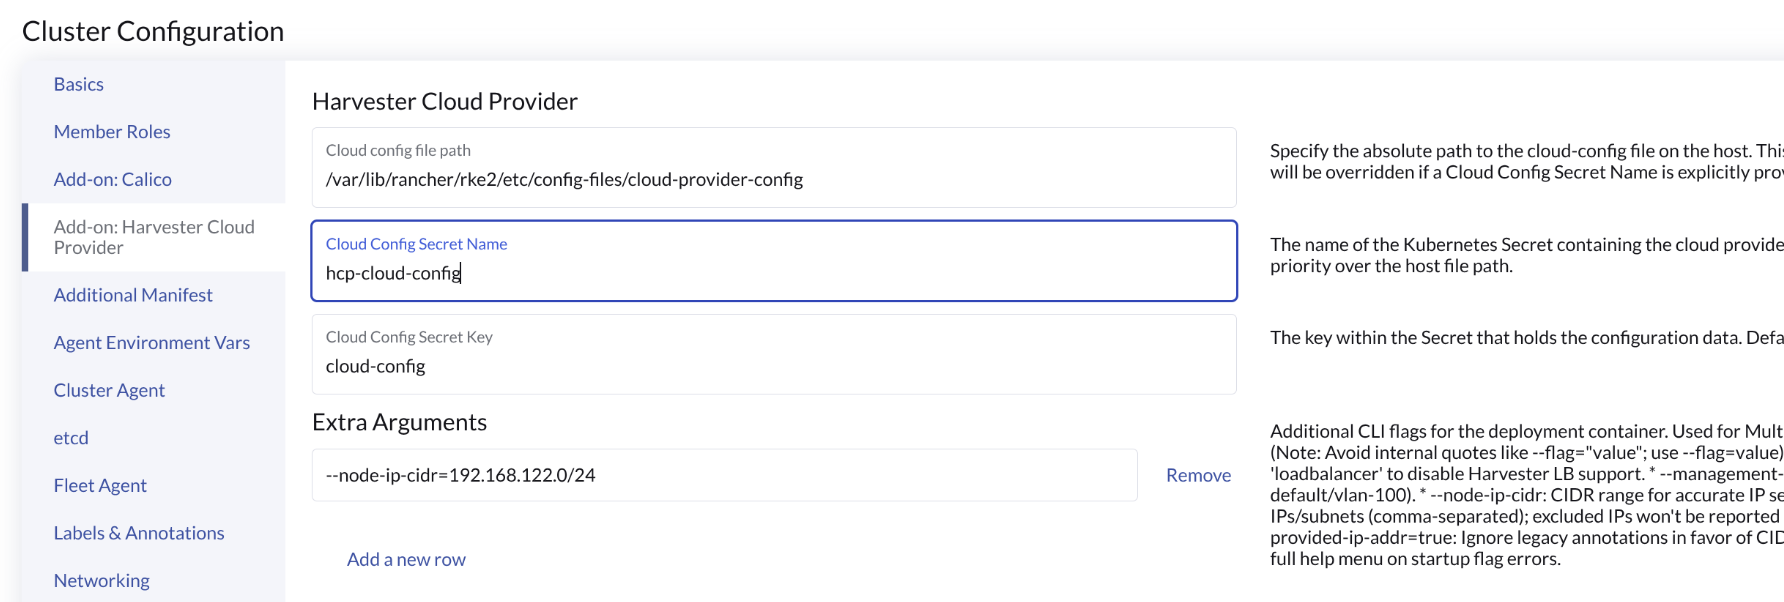
In SELinux-enabled clusters, container runtimes enforce strict security context labeling that blocks the harvester-cloud-provider container from reading host files under /var/lib/rancher/rke2/... (EACCES: Permission denied).
Using a Kubernetes Secret eliminates host path dependencies, allowing the pod to access the configuration natively via Kubernetes volume mounts without SELinux permission violations.
Configuration settings are evaluated in the following order of precedence:
| Parameter | Precedence | Description |
|---|---|---|
cloudConfig.secretName | Highest | Mounts a Kubernetes Secret and overrides all other settings when set. |
cloudConfig.secretKey | N/A | Specifies the key inside the Secret containing the configuration payload (defaults to cloud-config). |
cloudConfigPath | Secondary (legacy default) | Maintained for backward compatibility; evaluated if secretName is empty. |
cloudConfig.hostPath | Fallback | Evaluated only when secretName is empty and cloudConfigPath is explicitly set to "". |
Extra Arguments
Built on top of the Kubernetes Cloud Controller Manager (CCM) framework, the Harvester Cloud Provider supports standard upstream CCM flags as well as Harvester-specific extended runtime flags. These flags allow you to flexibly tune controller features, networking logic, and system behavior.
Available as of Harvester-cloud-provider v0.2.12
Prior to v0.2.12, custom flags added directly to the harvester-cloud-provider deployment or pod specification were non-persistent and overwritten during guest cluster upgrades or redeployments.
Starting with v0.2.12, the Helm chart natively supports flag configuration via extraArgs, ensuring custom arguments persist across upgrades and redeployments.
Supported Flags
The Harvester Cloud Provider supports both standard upstream CCM flags and Harvester-specific extended flags.
| Flag | Category | Description |
|---|---|---|
--controllers | CCM framework | List of CCM controllers to enable (for example, cloud-node-controller and node-route-controller). Omit a controller to disable it. |
--v | CCM framework | Logging verbosity level (for example, --v=5 for debug logging). |
--disable-vmi-controller | Harvester extended | Disables Harvester's custom VMI controller. |
--show-full-help-on-error | Harvester extended | Prints full CLI help if a flag parsing error occurs at startup. |
--management-network | Networking and IP selection | Target virtual machine network name used to allocate load balancer IP addresses and report node IP addresses in multi-network environments. |
--node-ip-cidr | Networking and IP selection | CIDR range for exact node IP selection in multi-IP address environments. |
--node-exclude-ip-ranges | Networking and IP selection | Comma-separated list of IP addresses or subnets to exclude from node status reports. |
--disable-annotation-alpha-provided-ip-addr | Networking and IP selection | Disables legacy alpha annotations, forcing the provider to rely strictly on CIDR logic. |
Consider the following usage notes when configuring complex flags:
-
--disable-vmi-controller: The standard--controllersflag only manages upstream CCM controllers. Harvester uses a dedicated VMI controller to watch VirtualMachineInstance resources and sync topology changes (such as region and zone updates) to guestNodeobjects. Set this flag tofalseto ensure dynamic topology sync works correctly as detailed in Node Instance Metadata Support. -
--show-full-help-on-error: By default, the Harvester Cloud Provider silences the upstream CCM's long help output on startup errors to keep logs clean. Set this flag totrueonly when debugging startup configuration issues. -
--management-network: Essential for environments where guest nodes are attached to multiple VM networks. Setting this flag overrides the default "first-hit" network selection logic.The target Harvester cluster must run Harvester v1.9.0 or later to support the
--management-networkflag forLoadBalancerservices, designating it as the target load balancer network. Earlier Harvester versions fall back tofirst-fitresolution to select the target network. For more information, see Guest Cluster Load Balancer Network Resolution.
Configuration Examples
The following examples demonstrate how to configure extraArgs for various deployment scenarios:
Disabling the Default Load Balancer Controller
Use this configuration when deploying an alternative to the default load balancer controller of the Harvester Cloud Provider.
extraArgs:
  - "--controllers=cloud-node-controller,cloud-node-lifecycle-controller,node-route-controller"
Because kube-vip is embedded within the Harvester Cloud Provider to advertise load balancer IP addresses, disabling the upstream service controller typically requires disabling kube-vip in your Helm values as well.
If you keep kube-vip enabled while using an alternative load balancer controller, ensure the controller is compatible with kube-vip. Integrating third-party load balancer controllers with kube-vip is outside the scope of the Harvester Cloud Provider.
Multi-Network and Multi-IP Configurations (Recommended)
When guest cluster nodes use multiple networks, dual-stack IPs, or secondary IPv4 addresses on a single interface, the default first-hit selection logic can cause non-deterministic IP reporting.
The following scenarios demonstrate how to use extraArgs to handle complex networking setups:
Network Selection in Multi-Network Environments
- Scenario: Nodes are attached to multiple Harvester VM networks (for example,
default/vlan-100anddefault/vlan-200). - Default behavior: The provider selects an interface non-deterministically based on discovery order.
- Goal: Force the provider to allocate load balancer IPs and report node IPs exclusively from a designated network (for example,
default/vlan-100).
extraArgs:
  - "--management-network=default/vlan-100"
Dual-Stack Interfaces in Single-Stack (IPv4-Only) Clusters
- Scenario: Nodes are assigned both IPv4 and IPv6 addresses in an IPv4-only cluster.
- Default behavior: The provider may report both addresses as
InternalIP. - Goal: Ensure the IPv4 address is assigned as the primary
InternalIP, relegating the IPv6 address toExternalIP.
extraArgs:
  - "--node-ip-cidr=192.168.1.0/24"
Excluding Secondary IP Ranges on the Same Network
- Scenario: Nodes have multiple IPv4 addresses on the same management interface (
default/vlan-100), such as192.168.100.0/25for node management and192.168.100.128/25for internal storage. - Default behavior: The provider assigns the first IPv4 address as
InternalIPand automatically publishes the second IPv4 address asExternalIP. - Goal: Enforce network boundaries and prevent secondary internal subnets from leaking into Kubernetes node status as
ExternalIP.
extraArgs:
  - "--management-network=default/vlan-100" # Specifies the target network interface
  - "--node-ip-cidr=192.168.100.0/25" # Locks the primary internal IP selection to the node management subnet range
  - "--node-exclude-ip-ranges=192.168.100.128/25" # Prevents the secondary IP range from being reported as ExternalIP
Production Multi-Network Stack
- Goal: Combine strict network selection, subnet binding, range exclusion, and runtime flags for a deterministic production configuration.
extraArgs:
    - "--management-network=default/vlan-100"
    - "--node-ip-cidr=192.168.100.0/25"
    - "--node-exclude-ip-ranges=192.168.100.128/25"
    - "--disable-annotation-alpha-provided-ip-addr=true"
    - "--show-full-help-on-error=true"
Limitation: Rancher UI IP Synchronization
The Harvester Cloud Provider correctly applies network flags and updates Kubernetes node status (InternalIP or ExternalIP). However, the Rancher UI does not dynamically re-sync node IP changes if they are updated after initial node registration (see issue #10381).
Example: On an IPv4-only cluster where nodes initially report both IPv4 and IPv6 addresses as InternalIP, specifying --node-ip-cidr enables the Harvester Cloud Provider to successfully filter the Kubernetes node status to IPv4 addresses only. However, the Rancher UI may continue displaying the unsynced IP information.
Workaround: Set network flags in extraArgs during initial cluster bootstrapping. Applying these flags to an existing cluster requires a cluster redeployment for the Rancher UI to reflect the updated node metadata.
Embedded kube-vip Integration
The Harvester Cloud Provider integrates with kube-vip to provision and manage virtual IPs for Kubernetes LoadBalancer services.
Disabling the Embedded kube-vip
If you want the Harvester Cloud Provider to retain its load balancer IP allocation logic (such as pool-based IP assignment), but prefer using an external BGP/ARP speaker or alternative tool to handle VIP traffic routing, disable the embedded kube-vip sub-chart:
kube-vip:
  enabled: false
Configuring Support for externalTrafficPolicy: Local
By default, kube-vip runs exclusively on management nodes. To support externalTrafficPolicy: Local for LoadBalancer services, traffic must route directly to nodes hosting active workload pods.
-
Enable service leader election by setting
svc_election: "true"in thekube-vipenvironment configuration. -
Expand
kube-vip.affinityrules sokube-vippods run on both management nodes and worker nodes.kube-vip:
env:
svc_election: "true"
affinity:
nodeAffinity:
requiredDuringSchedulingIgnoredDuringExecution:
nodeSelectorTerms:
- matchExpressions:
- key: node-role.kubernetes.io/control-plane
operator: Exists
- matchExpressions:
- key: node-role.kubernetes.io/worker
operator: Exists
Best Practice: Ensure the node coverage for externalTrafficPolicy: Local.
Best Practice: Ensure Node Coverage for externalTrafficPolicy: Local
Deploying kube-vip across all nodes in the guest cluster is strongly recommended when using externalTrafficPolicy: Local.
Because kube-vip only elects a leader and advertises a VIP on nodes that actively host workload pods, restricting pod scheduling creates the following coverage gaps:
-
No common nodes: If
kube-vipruns only on management nodes while workload pods run exclusively on worker nodes,kube-vipcannot elect a leader and will fail to advertise the VIP for that service. -
Partial overlap: If
kube-vipruns on a subset of worker nodes (for example,node1andnode2) while workload pods run onnode2andnode3, only the overlapping node (node2) can advertise the VIP.
In both scenarios, the high availability aspect of the LoadBalancer service is severely compromised or lost entirely.
Prerequisites
- The guest Kubernetes cluster is built on top of Harvester virtual machines.
- The Harvester virtual machines run as guest Kubernetes nodes are in the same namespace.
If harvester-cloud-provider kube-vip is not disabled explicitly, each Harvester VM must have the macvlan kernel module, which is required for the LoadBalancer services of the DHCP IPAM mode.
To check if the kernel module is available, access the VM and run the following commands:
lsmod | grep macvlan
sudo modprobe macvlan
The kernel module is likely to be missing if the following occur:
$ lsmod | grep macvlandoes not produce output.$ sudo modprobe macvlandisplays an error message similar tomodprobe: FATAL: Module macvlan not found in directory /lib/modules/5.14.21-150400.22-default.
By default, the macvlan kernel module is not included in SUSE Linux Enterprise 15 Service Pack 4/5/6 minimal cloud images (see Issue #6418). Those images contain the kernel-default-base package, which includes only the base modules. However, the macvlan kernel driver becomes available when you install the kernel-default package.
To eliminate the need for manual intervention after the guest cluster is provisioned, build your own cloud images using the openSUSE Build Service (OBS). You must remove the kernel-default-base package and add the kernel-default package in the Minimal.kiwi file to ensure that the resulting cloud image includes the macvlan kernel module. For more information, see Custom SUSE VM Images.
Deploying to the RKE2 Cluster with Harvester Node Driver
When spinning up an RKE2 cluster using the Harvester node driver, select the Harvester cloud provider. The node driver will then help deploy both the CSI driver and CCM automatically.
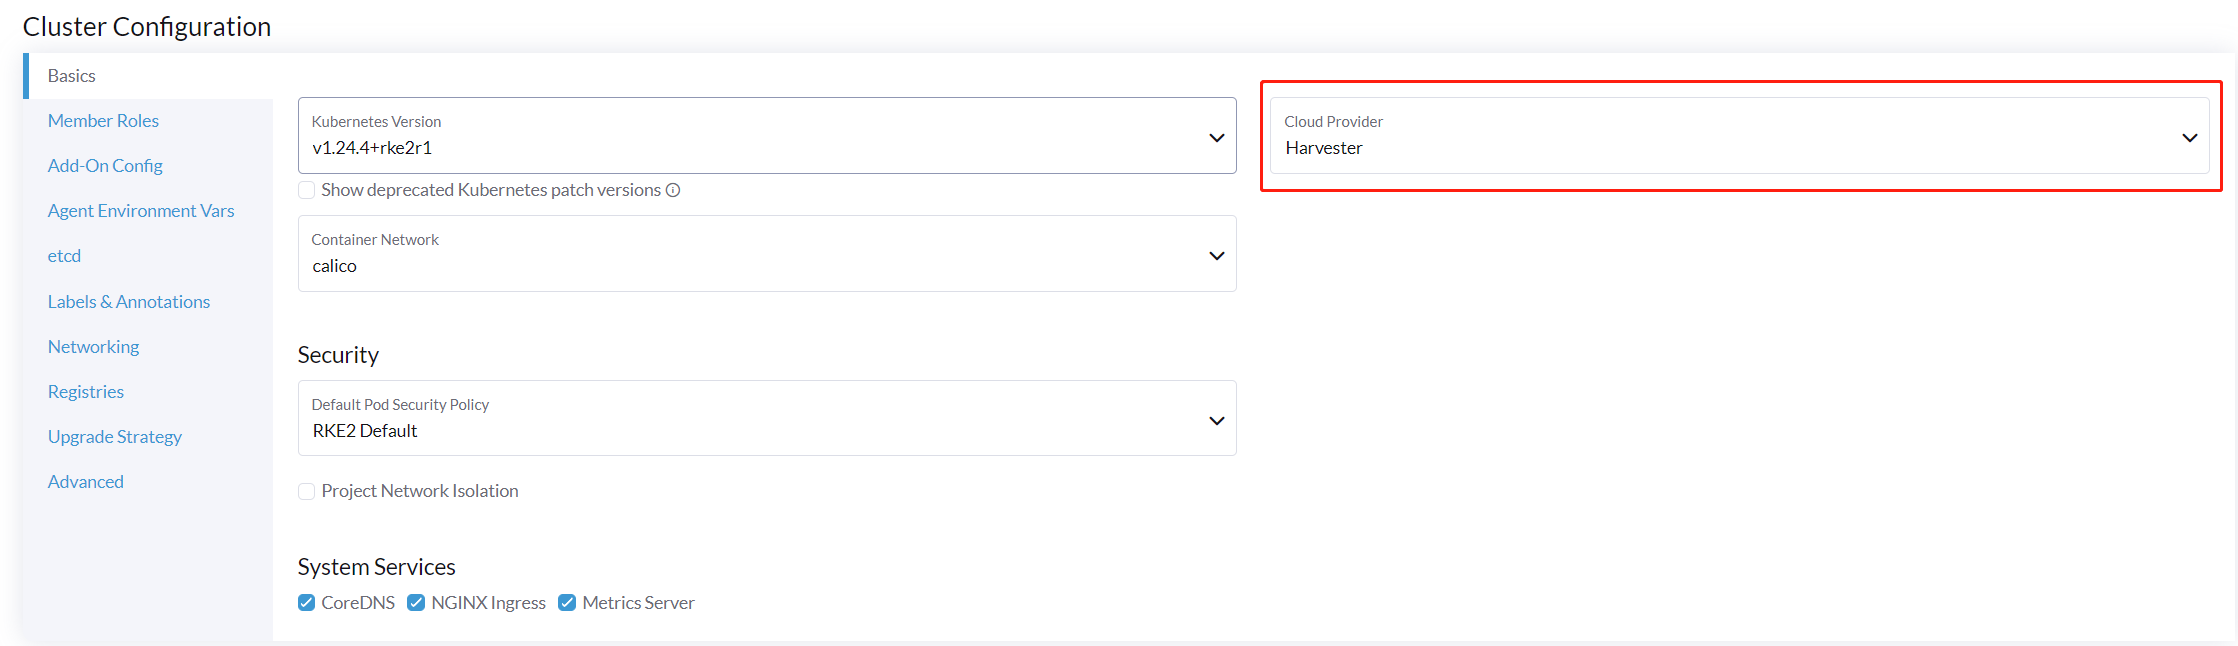
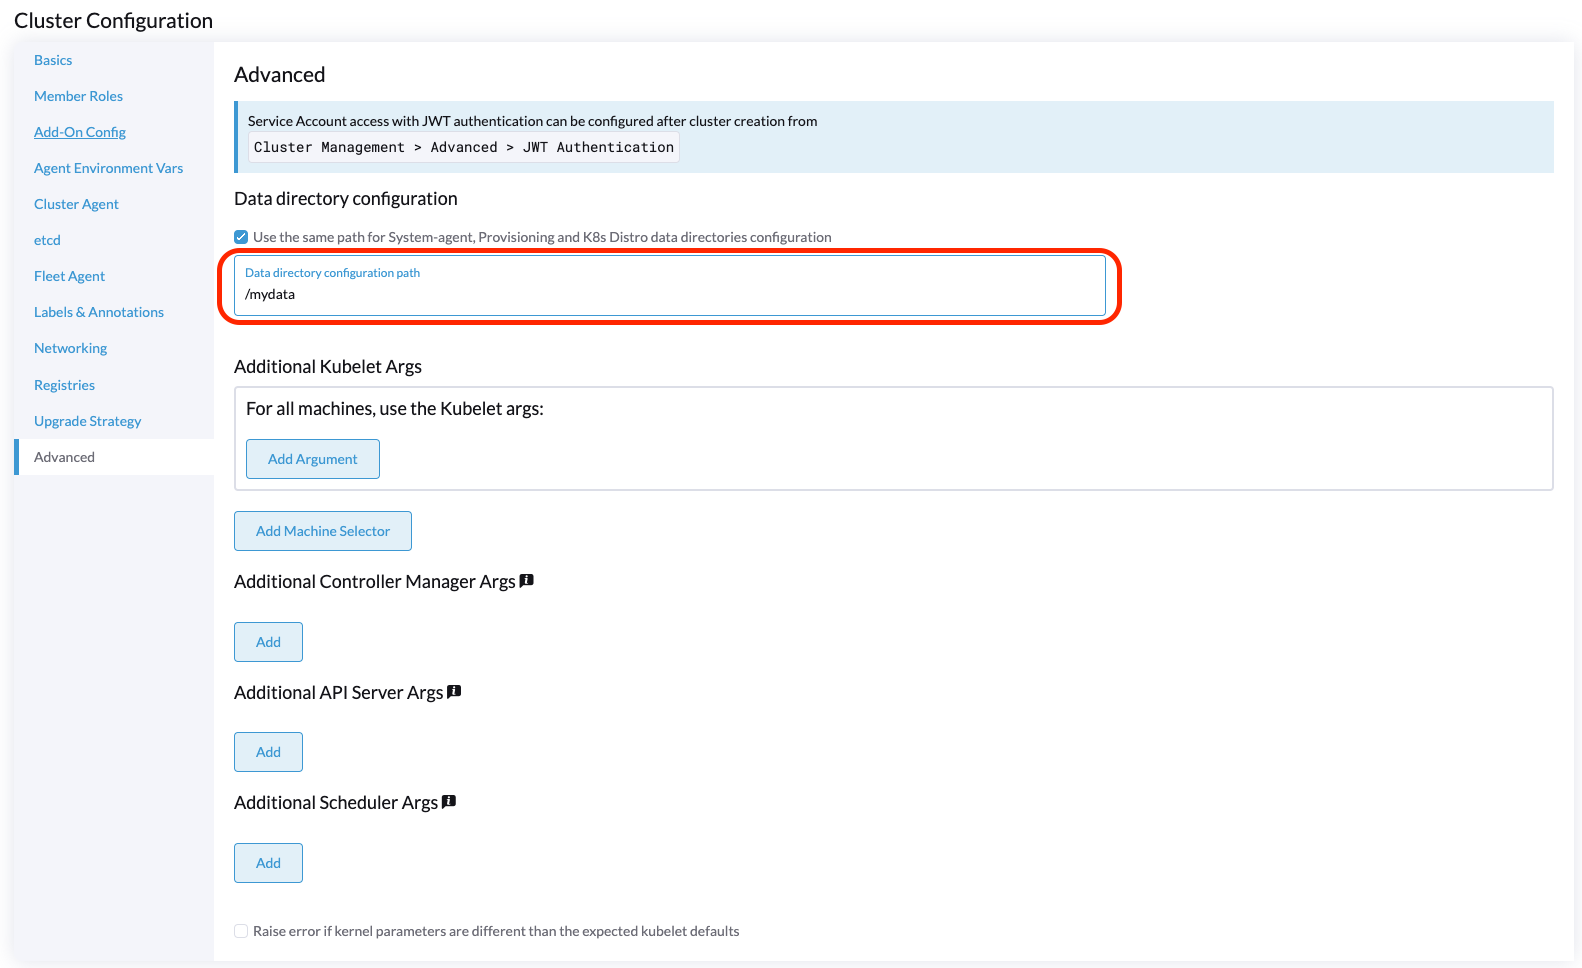
Starting with Rancher v2.9.0, you can configure a specific folder for cloud config data using the Data directory configuration path field.
Manually Deploying to the RKE2 Cluster
-
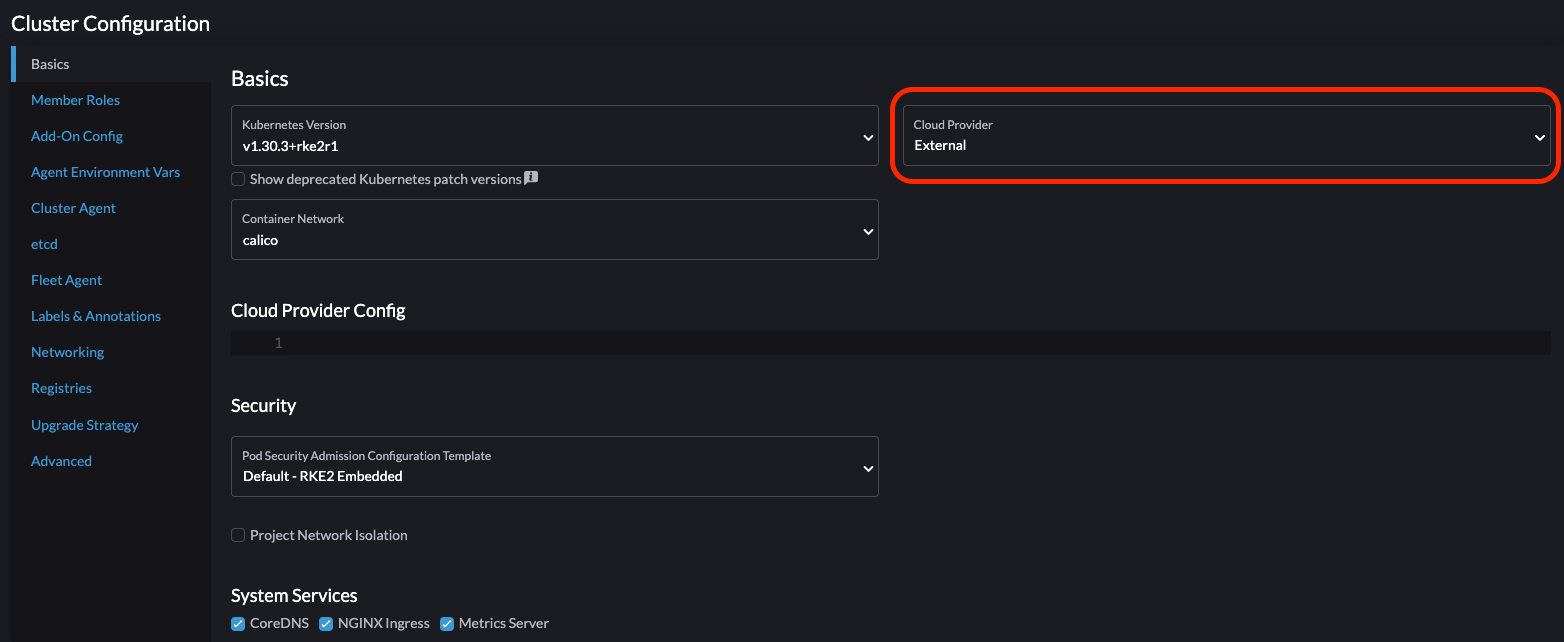
On the RKE2 cluster creation page, go to the Cluster Configuration screen and set the value of Cloud Provider to External.
-
Copy and paste the
cloud-init user datacontent to Machine Pools > Show Advanced > User Data.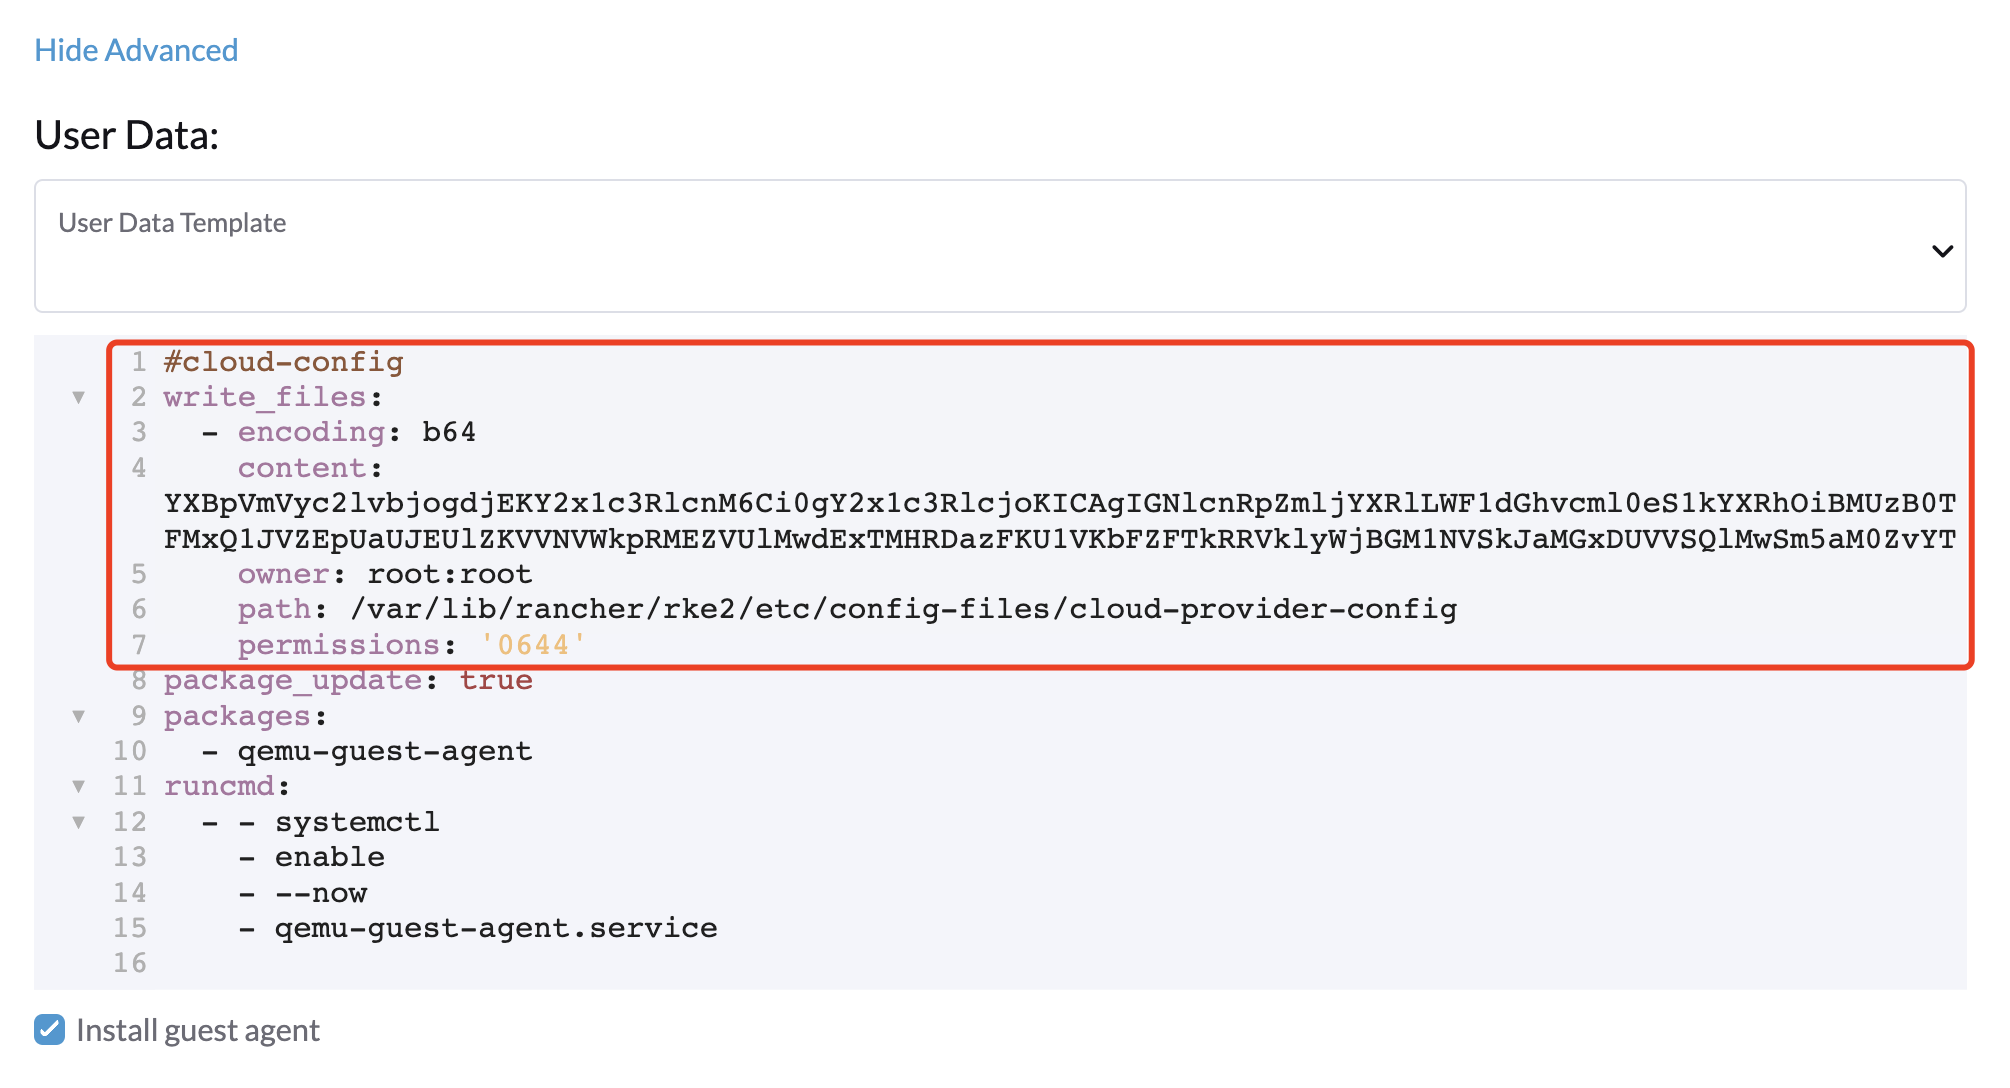
-
Add the
HelmChartCRD forharvester-cloud-providerto Cluster Configuration > Add-On Config > Additional Manifest.You must replace
<cluster-name>with the name of your cluster.apiVersion: helm.cattle.io/v1
kind: HelmChart
metadata:
name: harvester-cloud-provider
namespace: kube-system
spec:
targetNamespace: kube-system
bootstrap: true
repo: https://raw.githubusercontent.com/rancher/charts/dev-v2.9
chart: harvester-cloud-provider
version: 104.0.2+up0.2.6
helmVersion: v3
valuesContent: |-
global:
cattle:
clusterName: <cluster-name>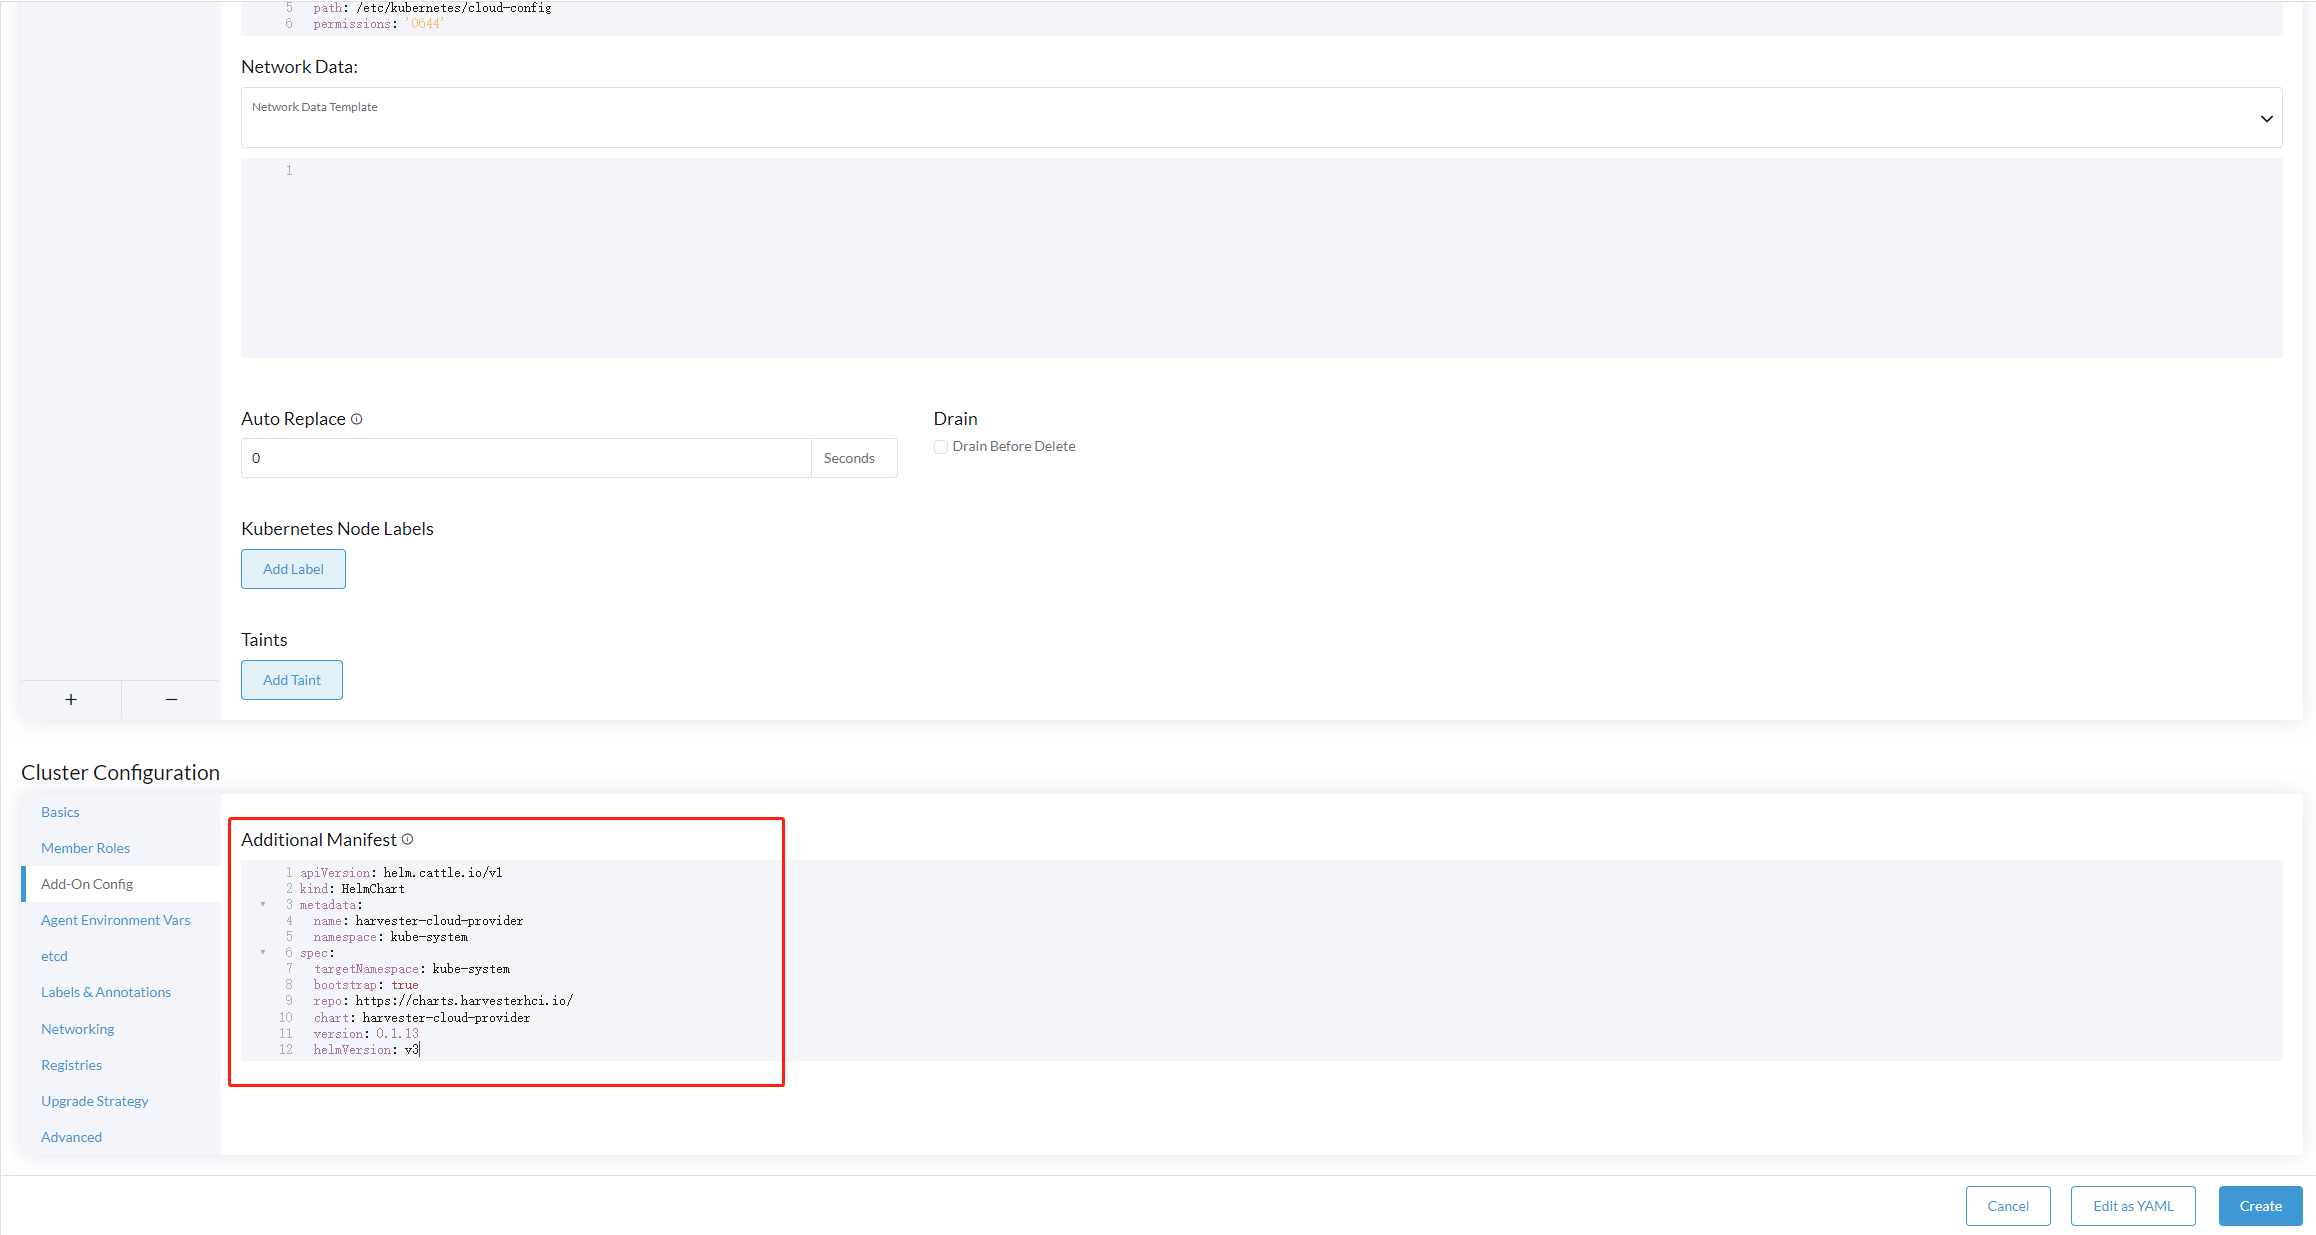
-
To create the load balancer, add the annotation
cloudprovider.harvesterhci.io/ipam: <dhcp|pool>.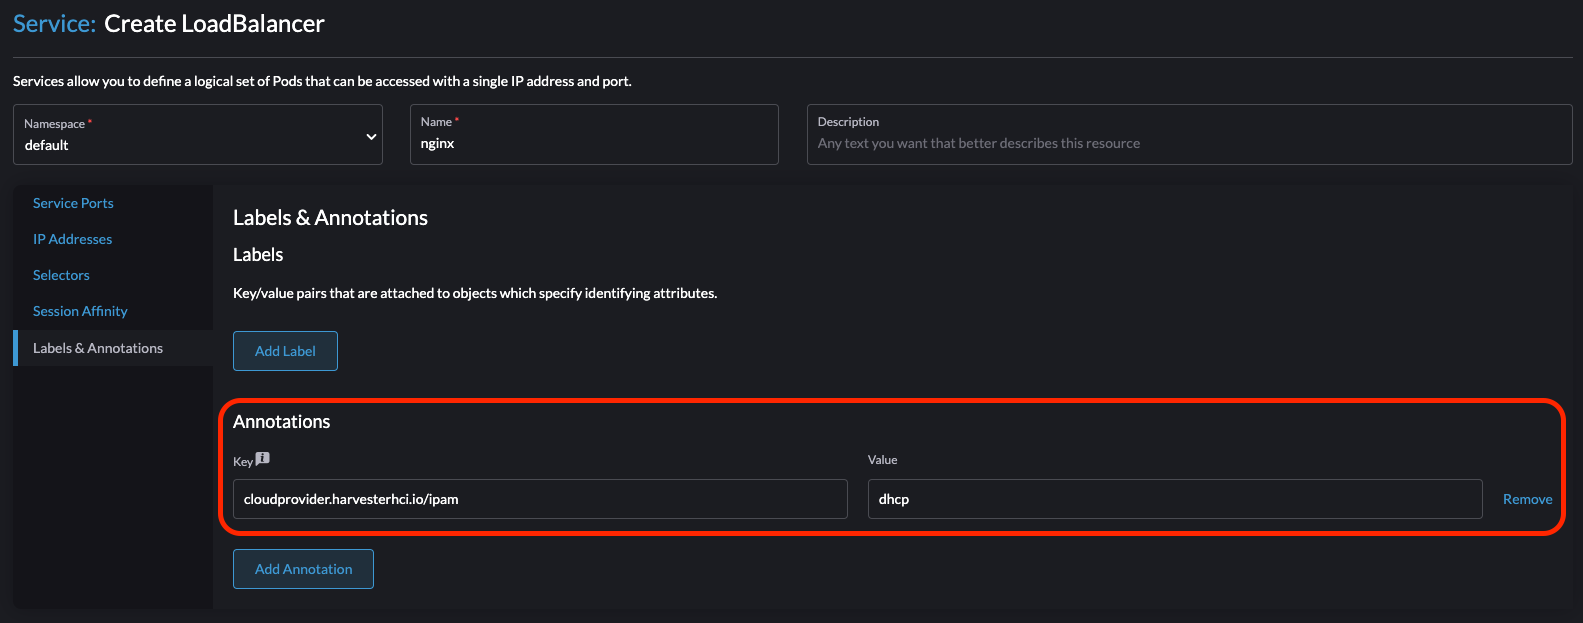
Deploying to the RKE2 custom cluster (experimental)
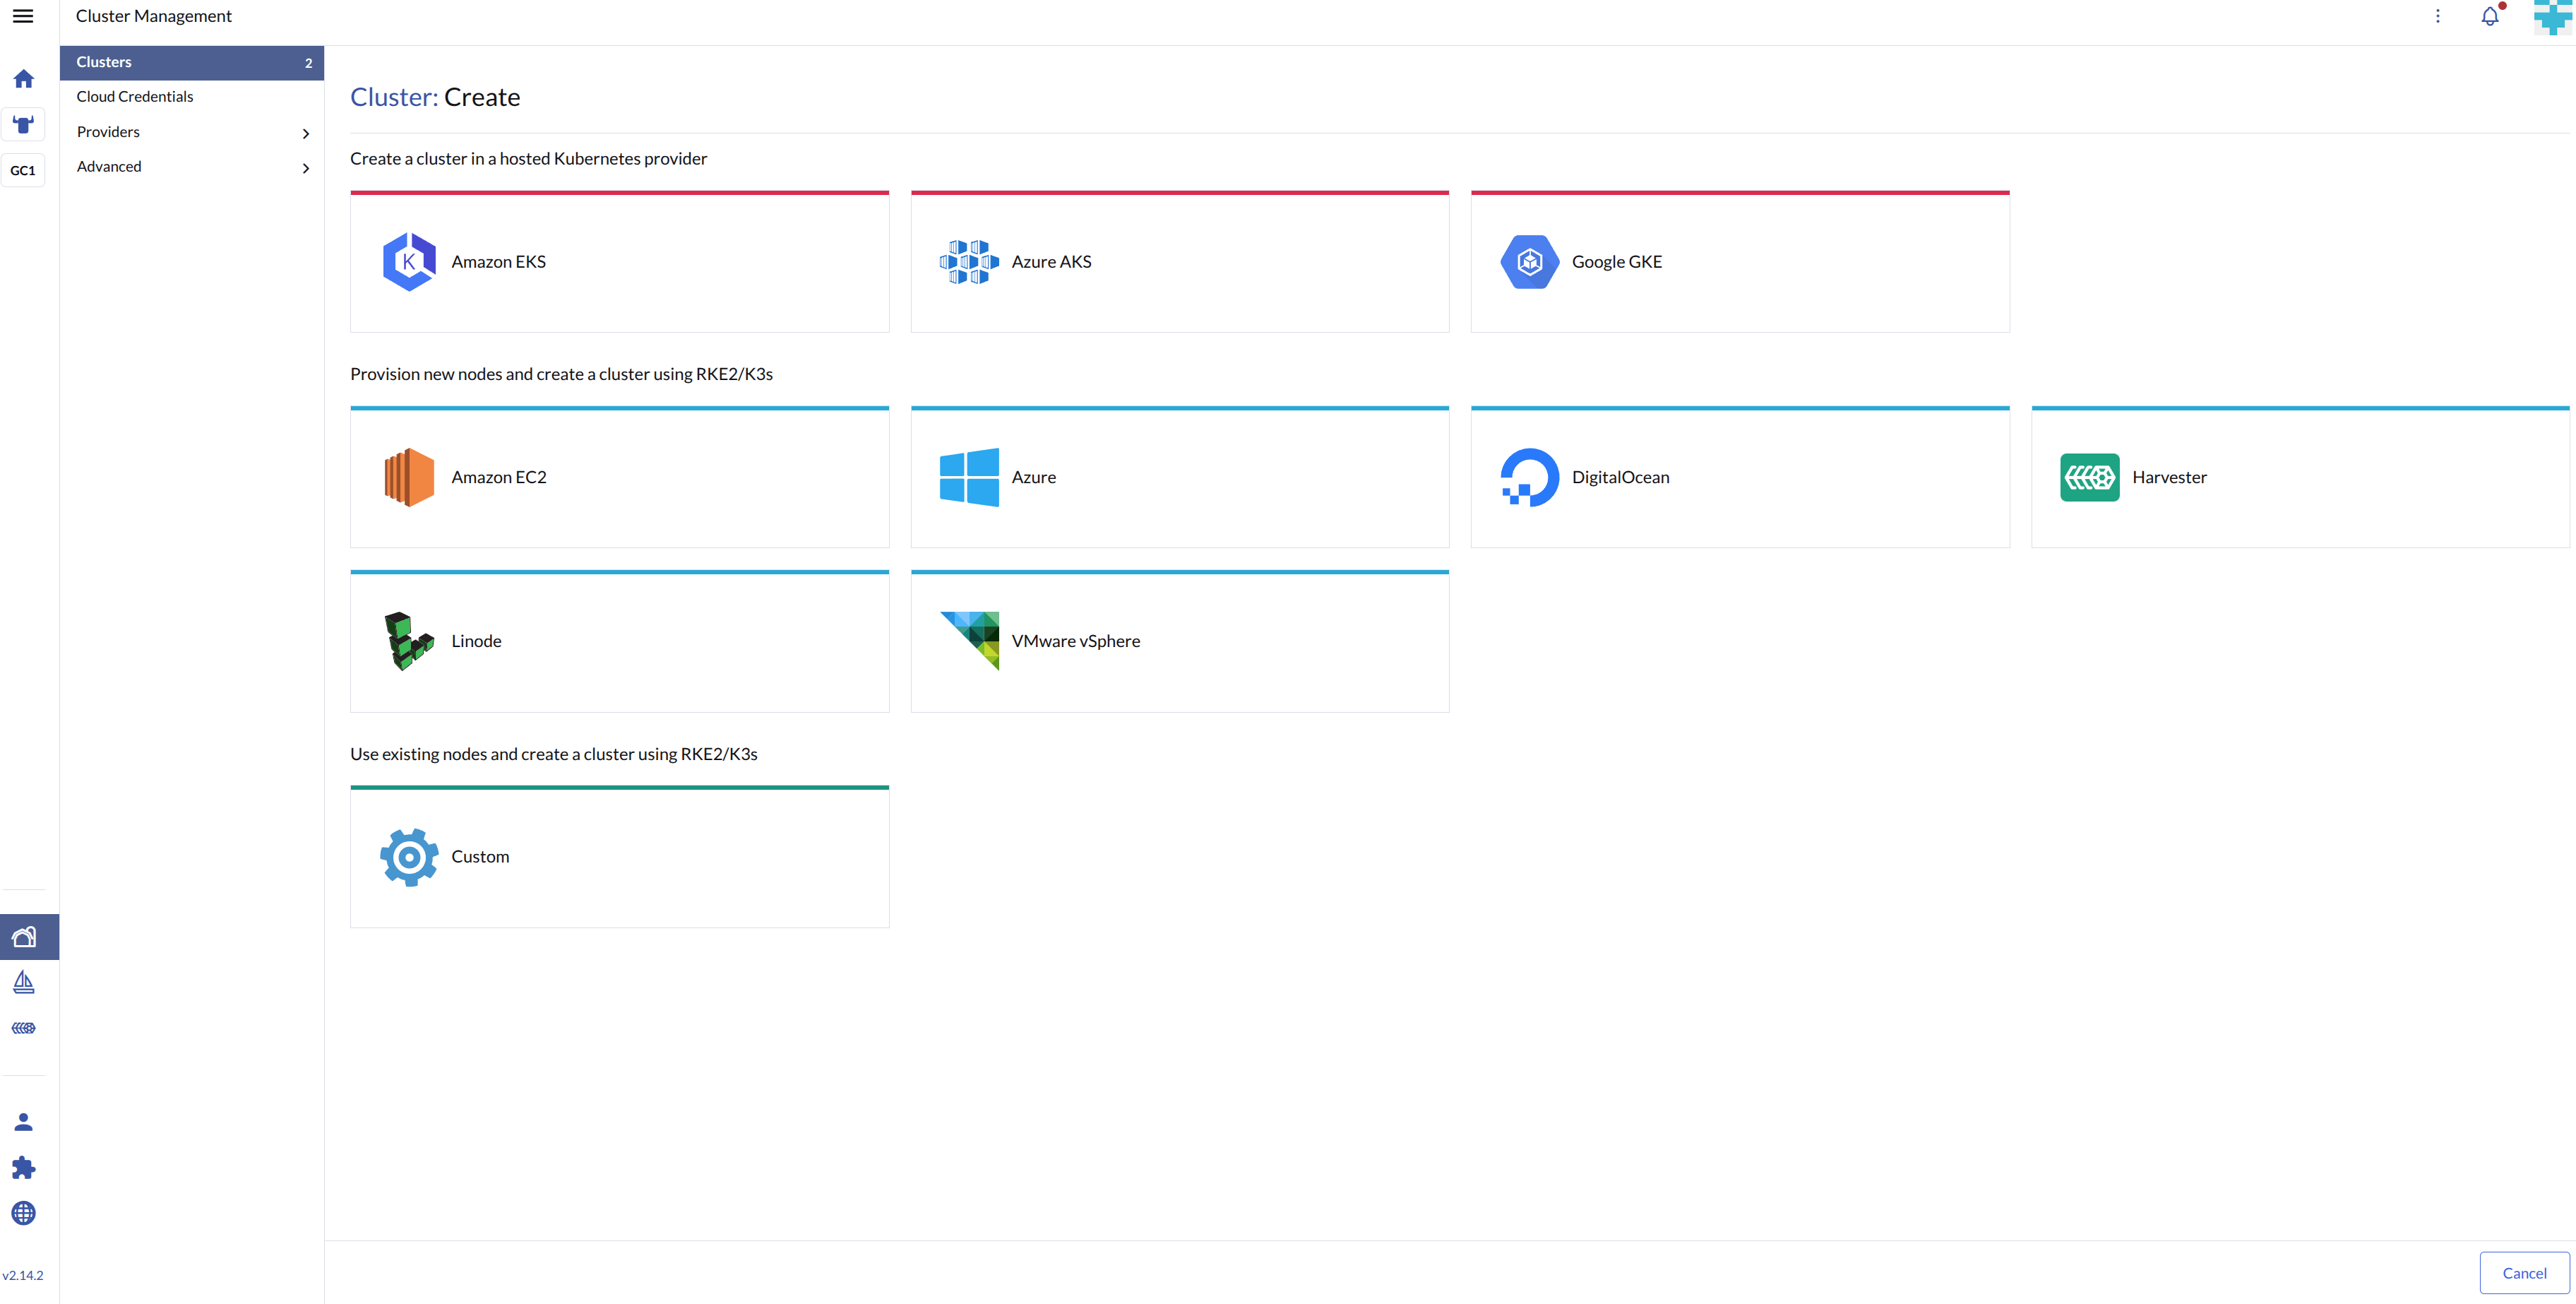
In the Rancher UI, you can create a Custom RKE2 cluster with Harvester Cloud Provider.
-
Create a VM in the Harvester cluster with the following settings:
-
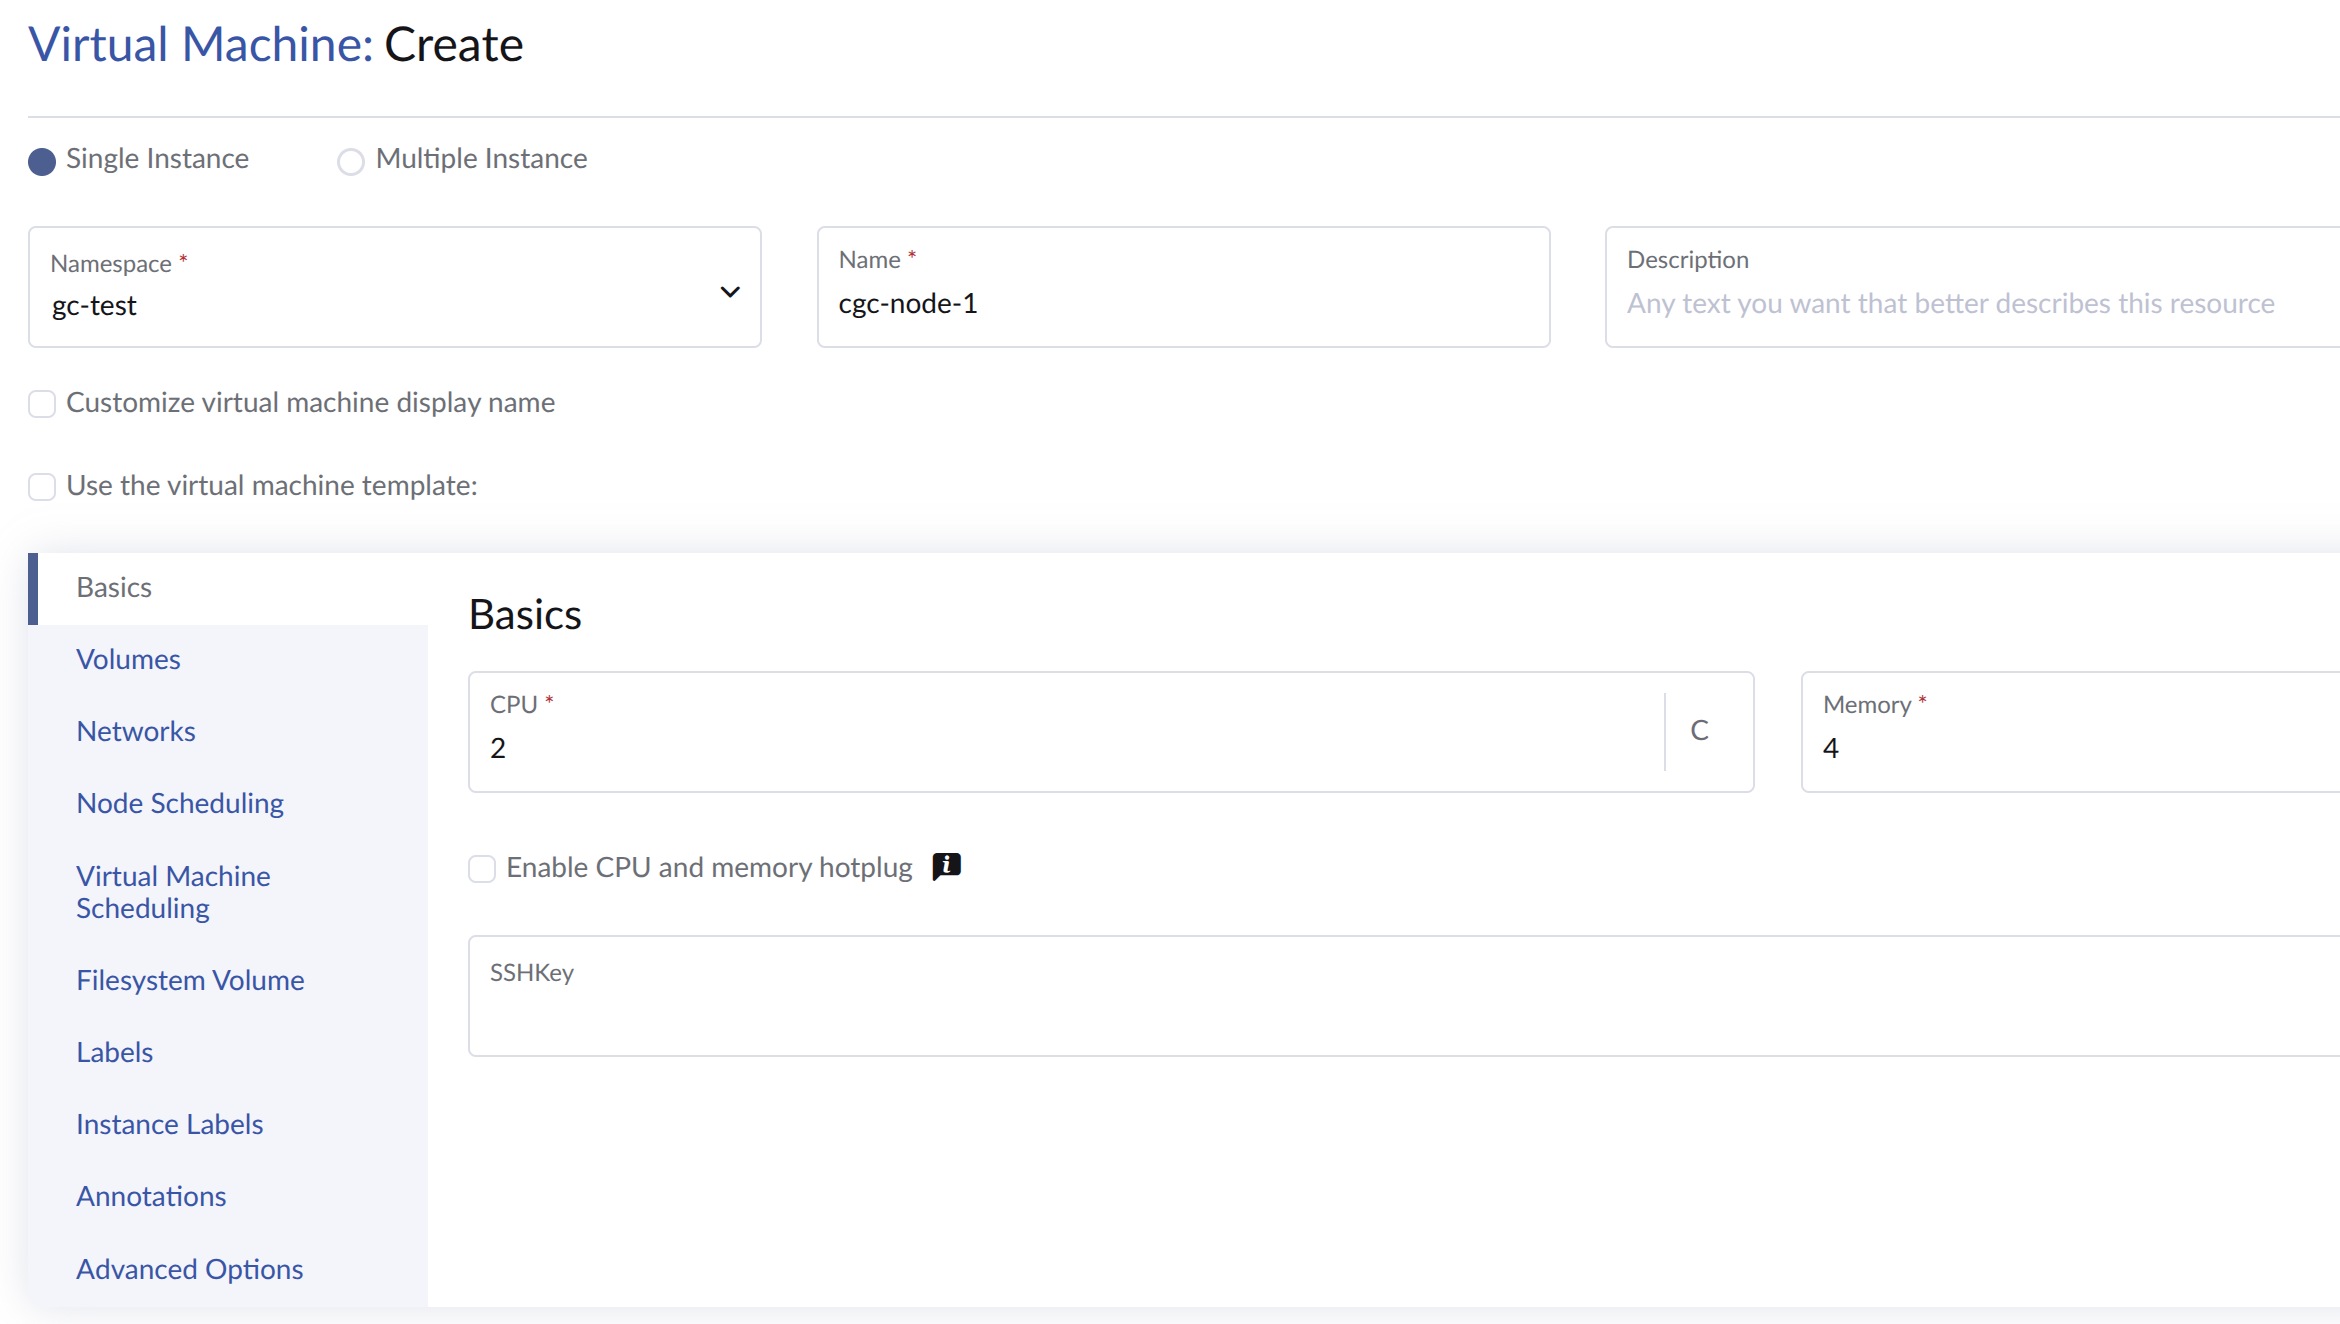
Basics tab: The minimum requirements are 2 CPUs and 4 GiB of RAM. The required disk space depends on the VM image.
-
Networks tab: Specify a network name with the format
nic-<number>.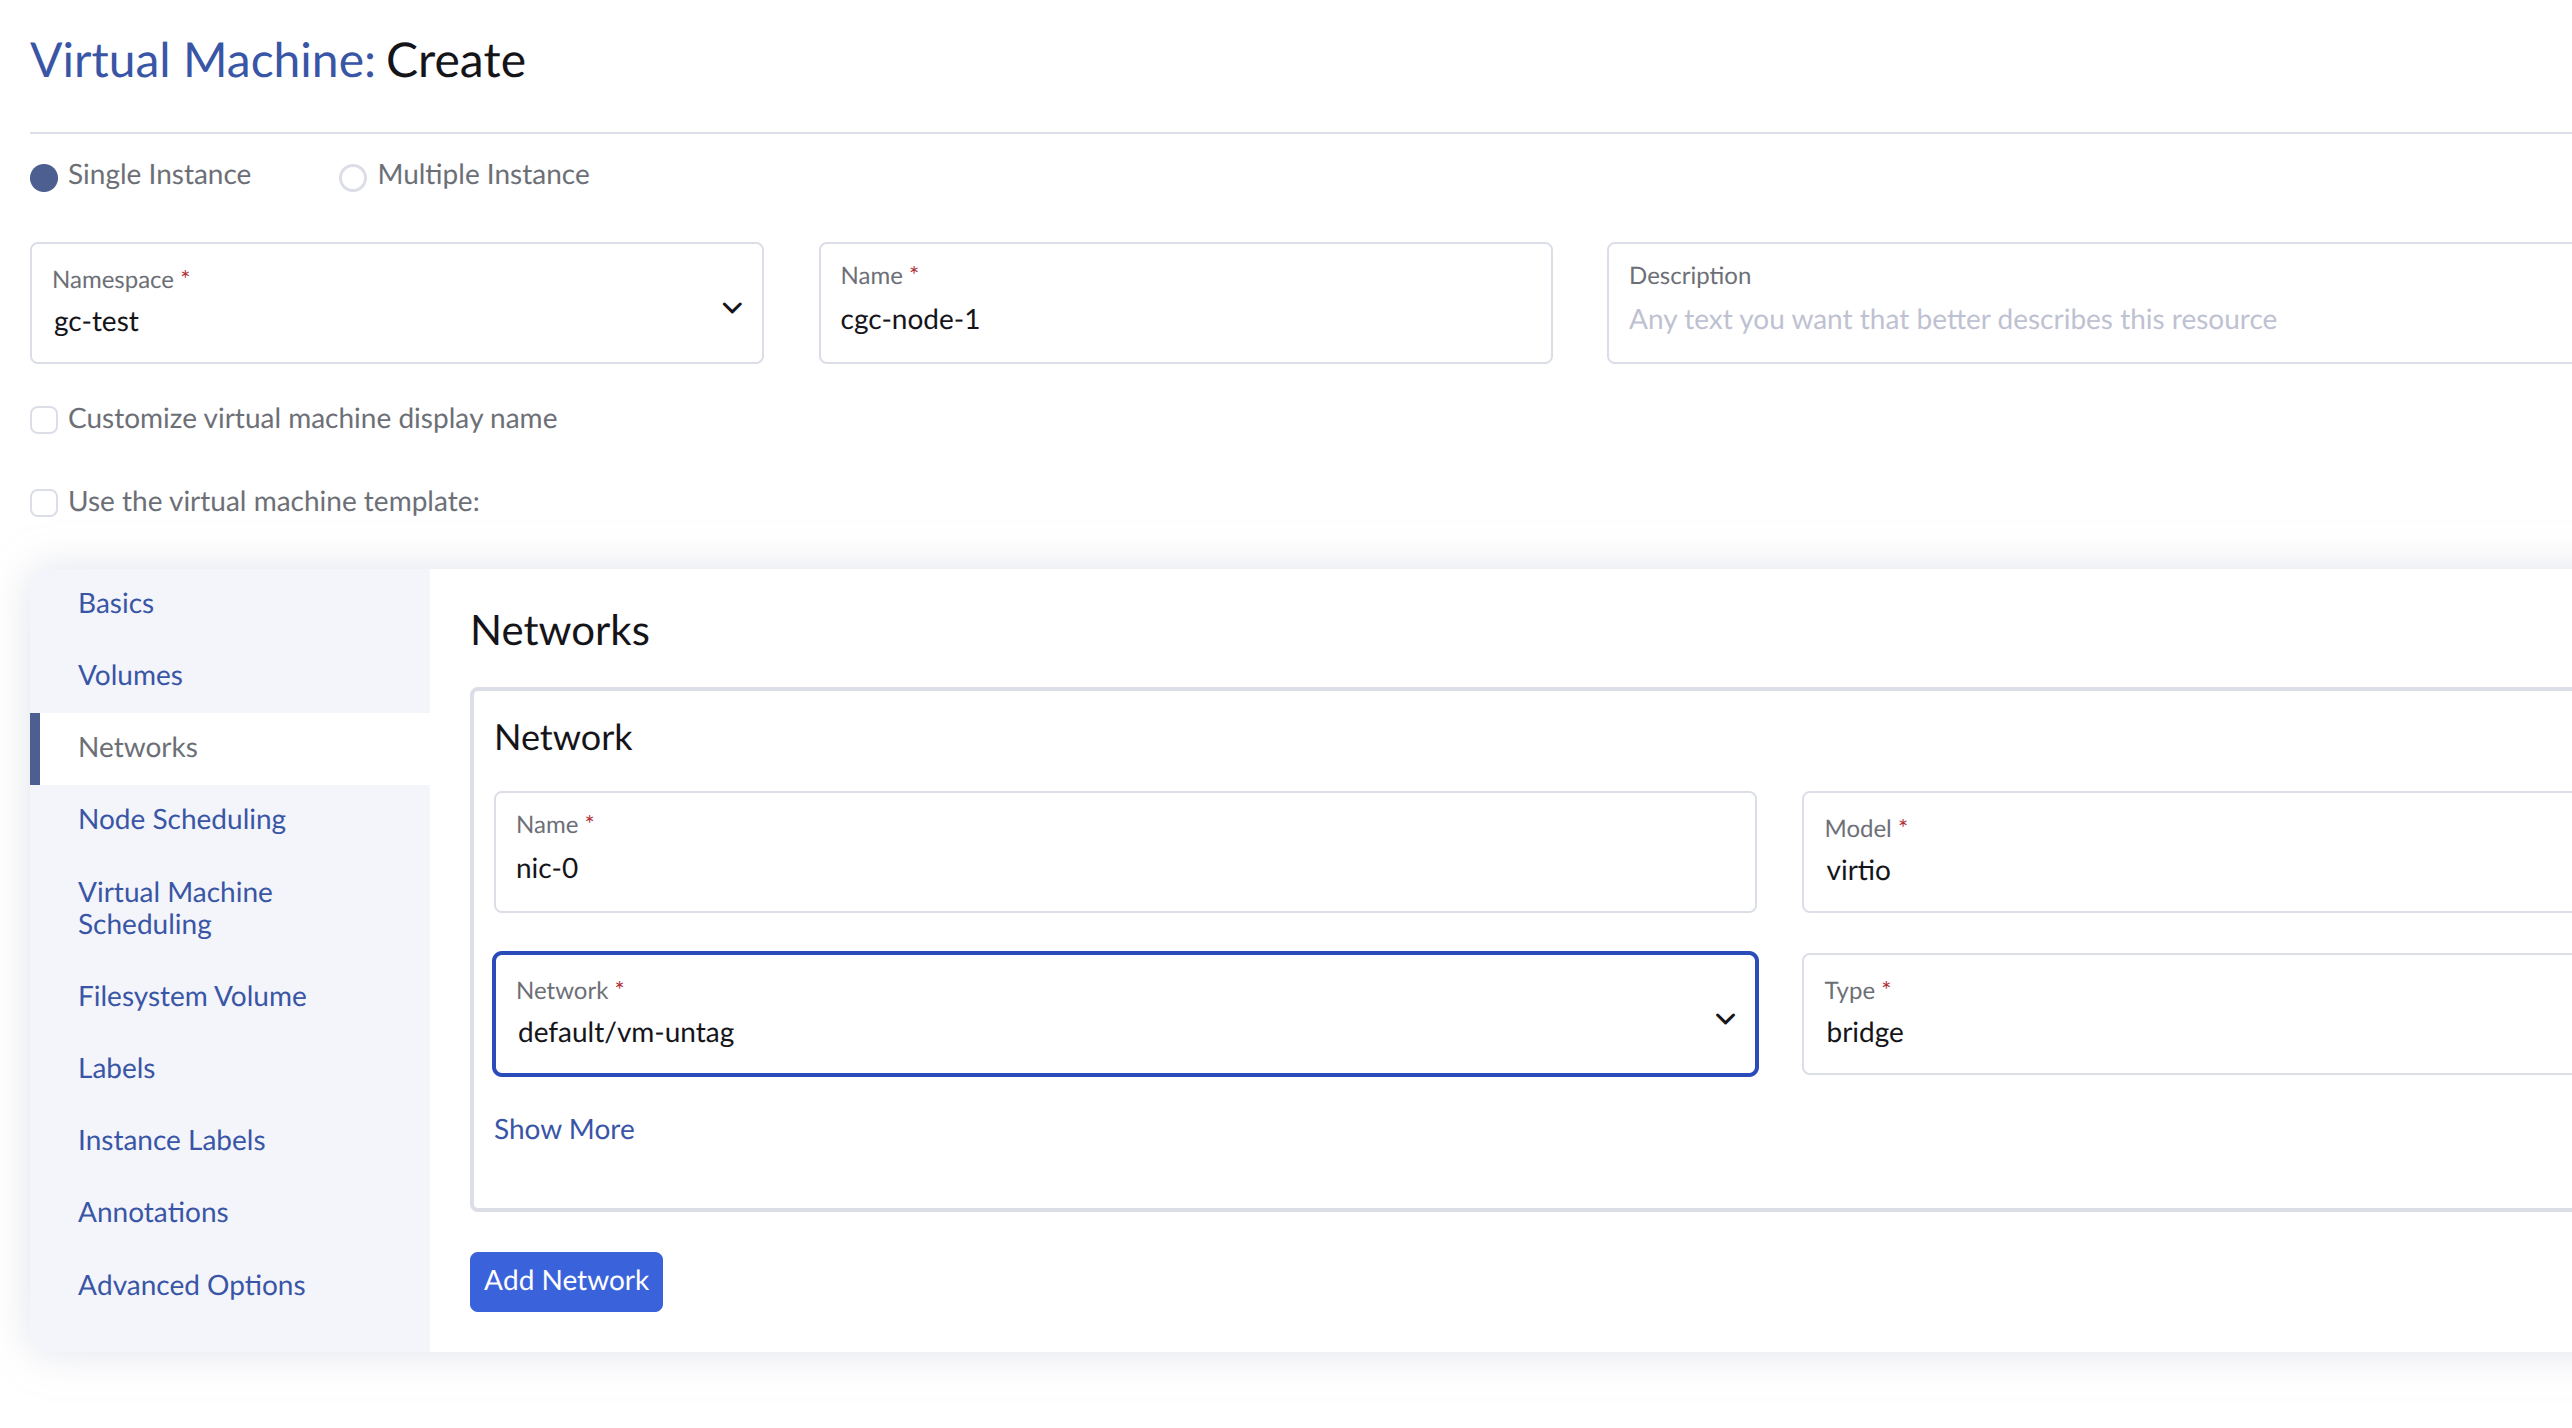
-
Instance Labels tab: Add two required labels:
guestcluster.harvesterhci.io/name: <cluster-name>andharvesterhci.io/creator: docker-machine-driver-harvester.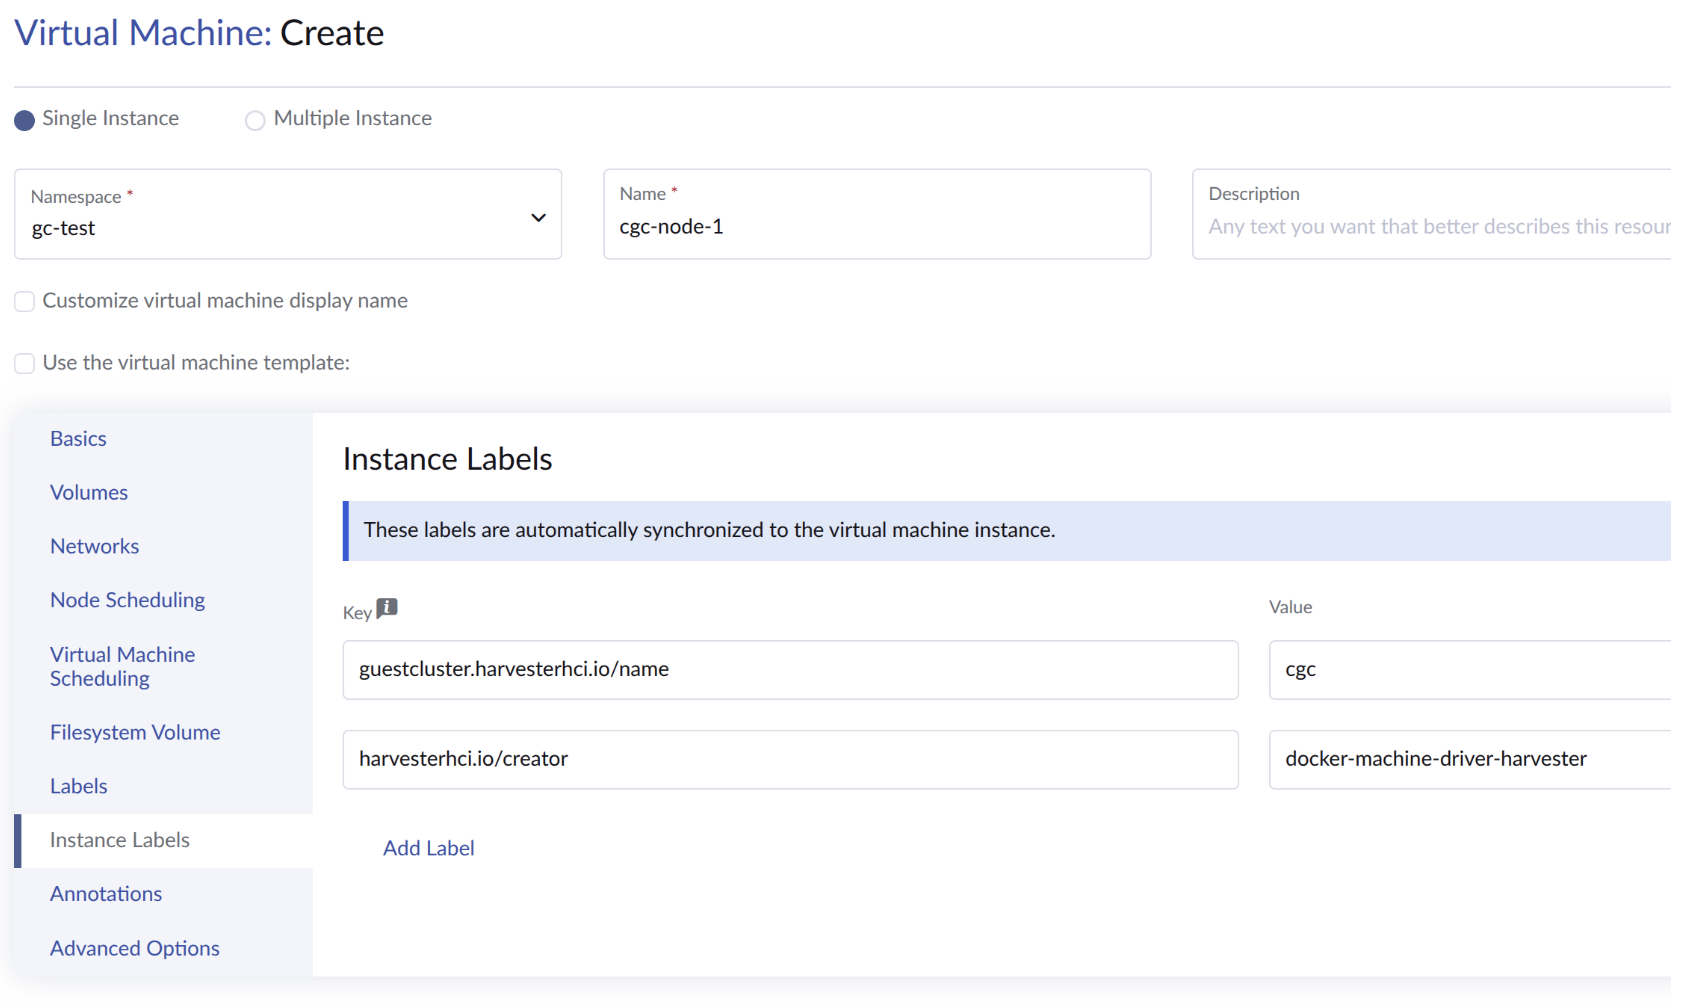
-
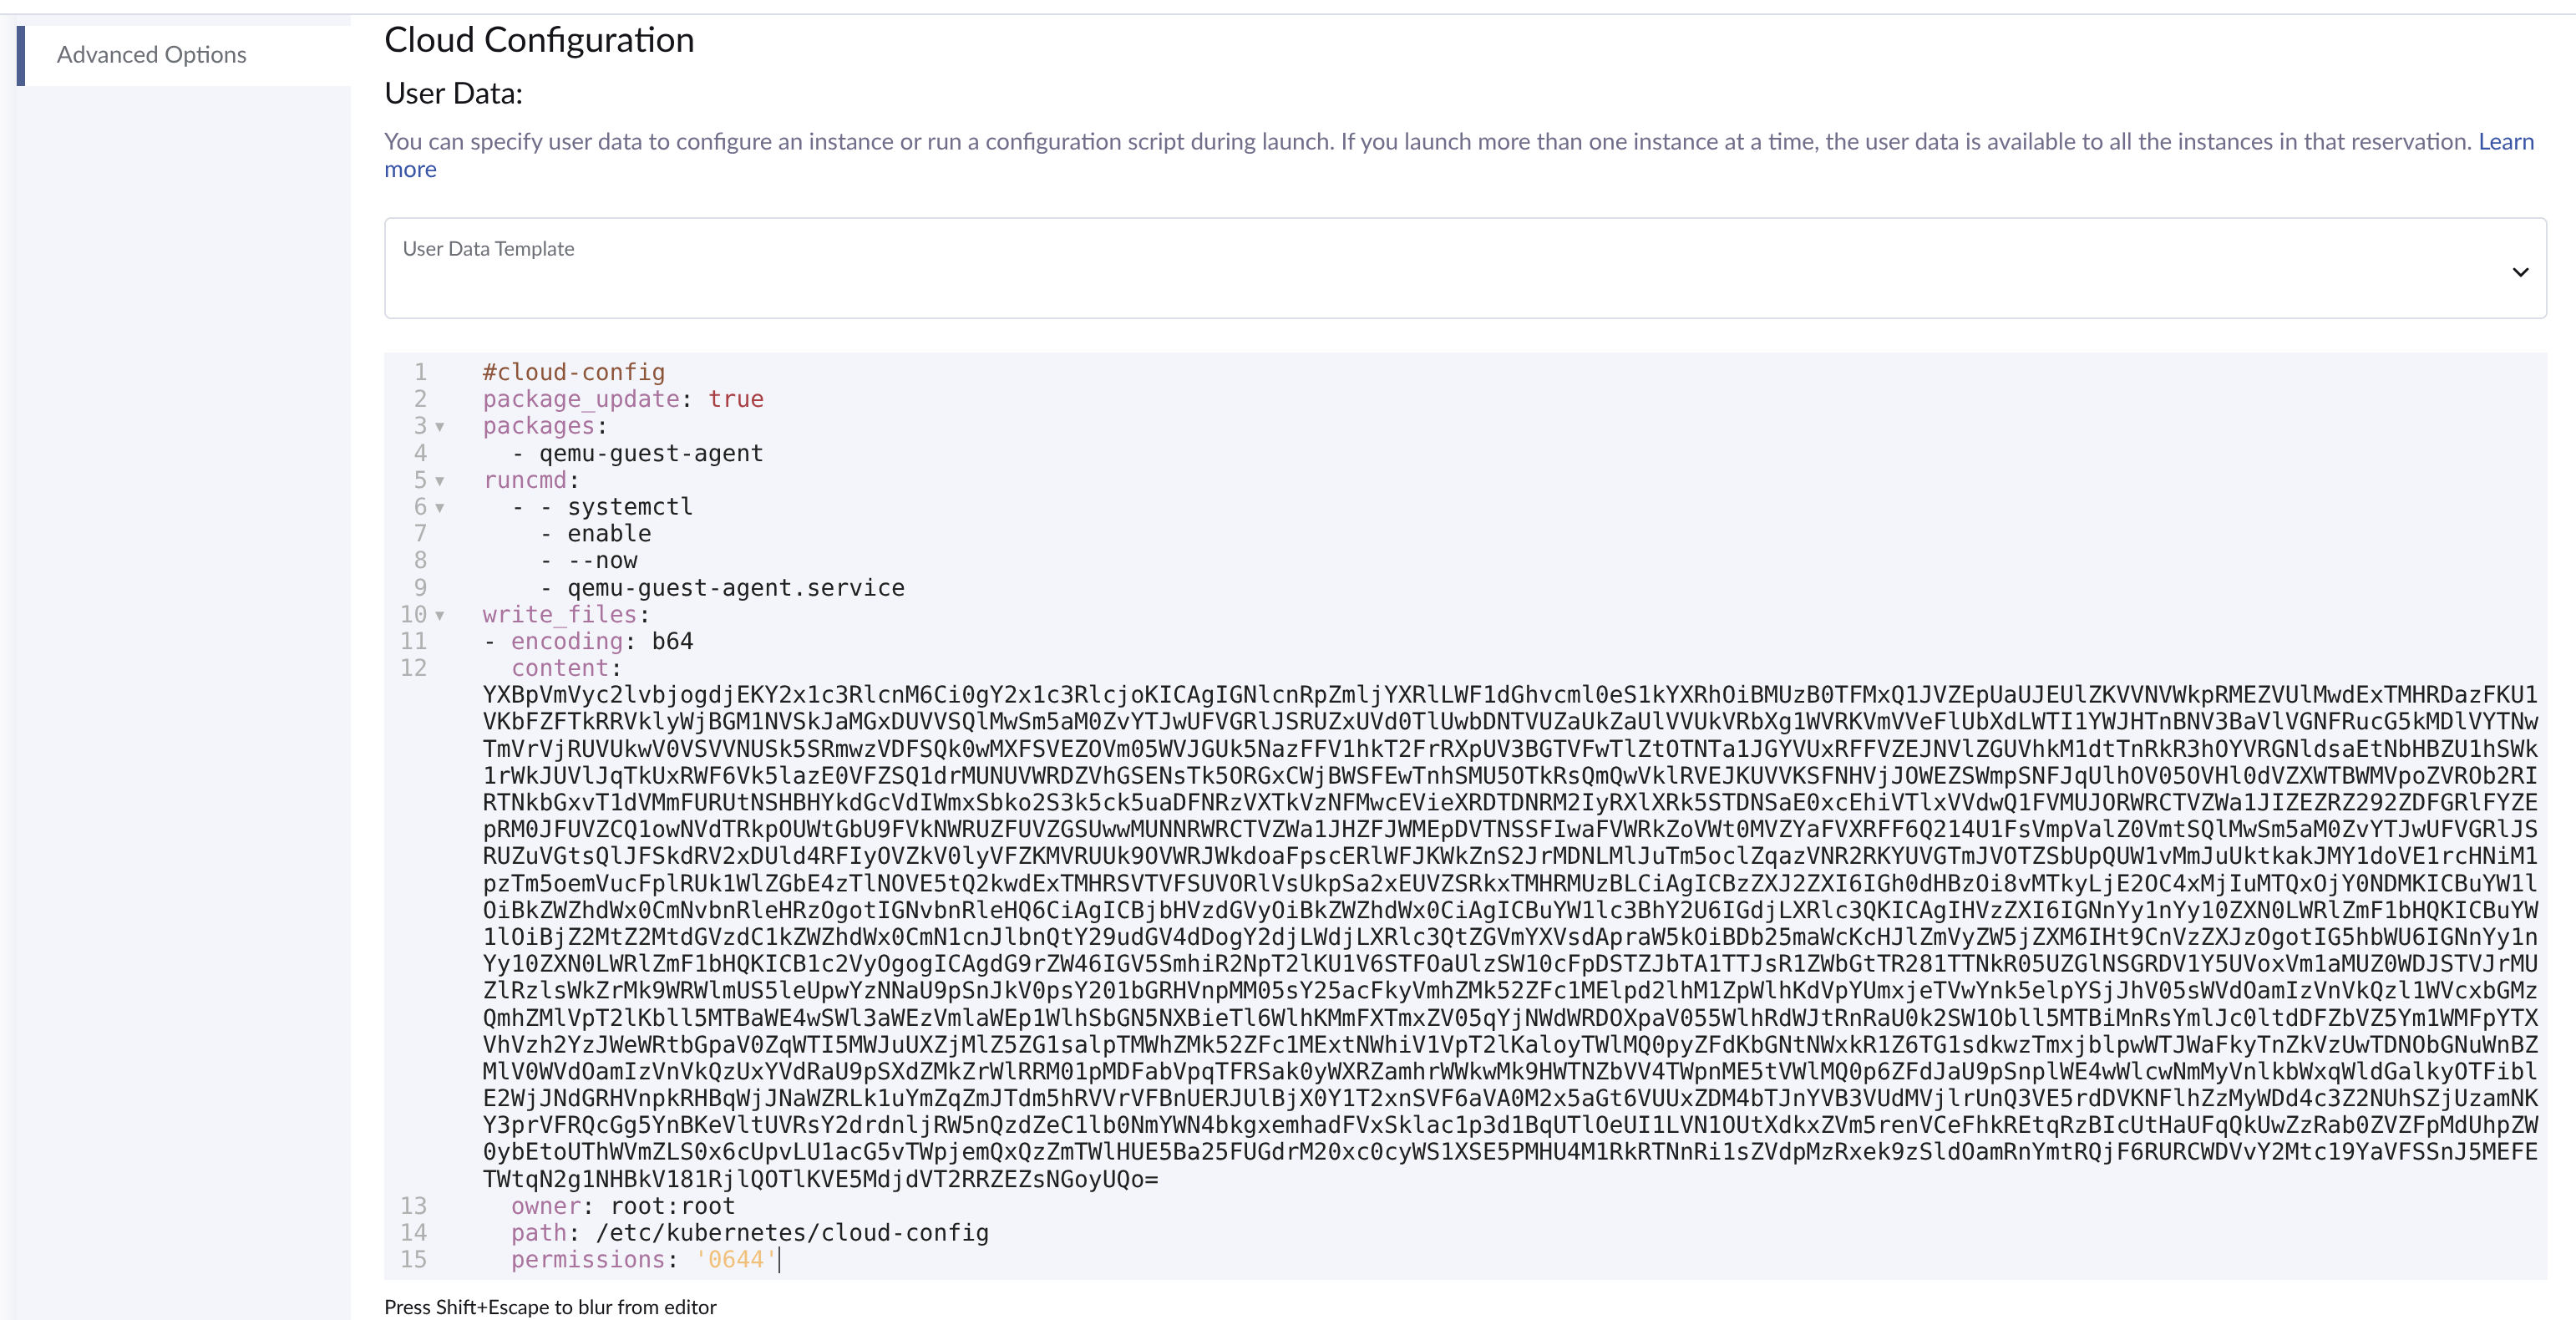
Advanced Options tab: Copy and paste the content of the Cloud Config User Data screen.
noteInstance Labels are critical for Harvester to manage resource allocation and deallocation for guest clusters. If these labels are missing, features like the guest cluster LoadBalancer in
Poolmode may not work, as the Harvester node driver cannot identify the guest cluster. -
-
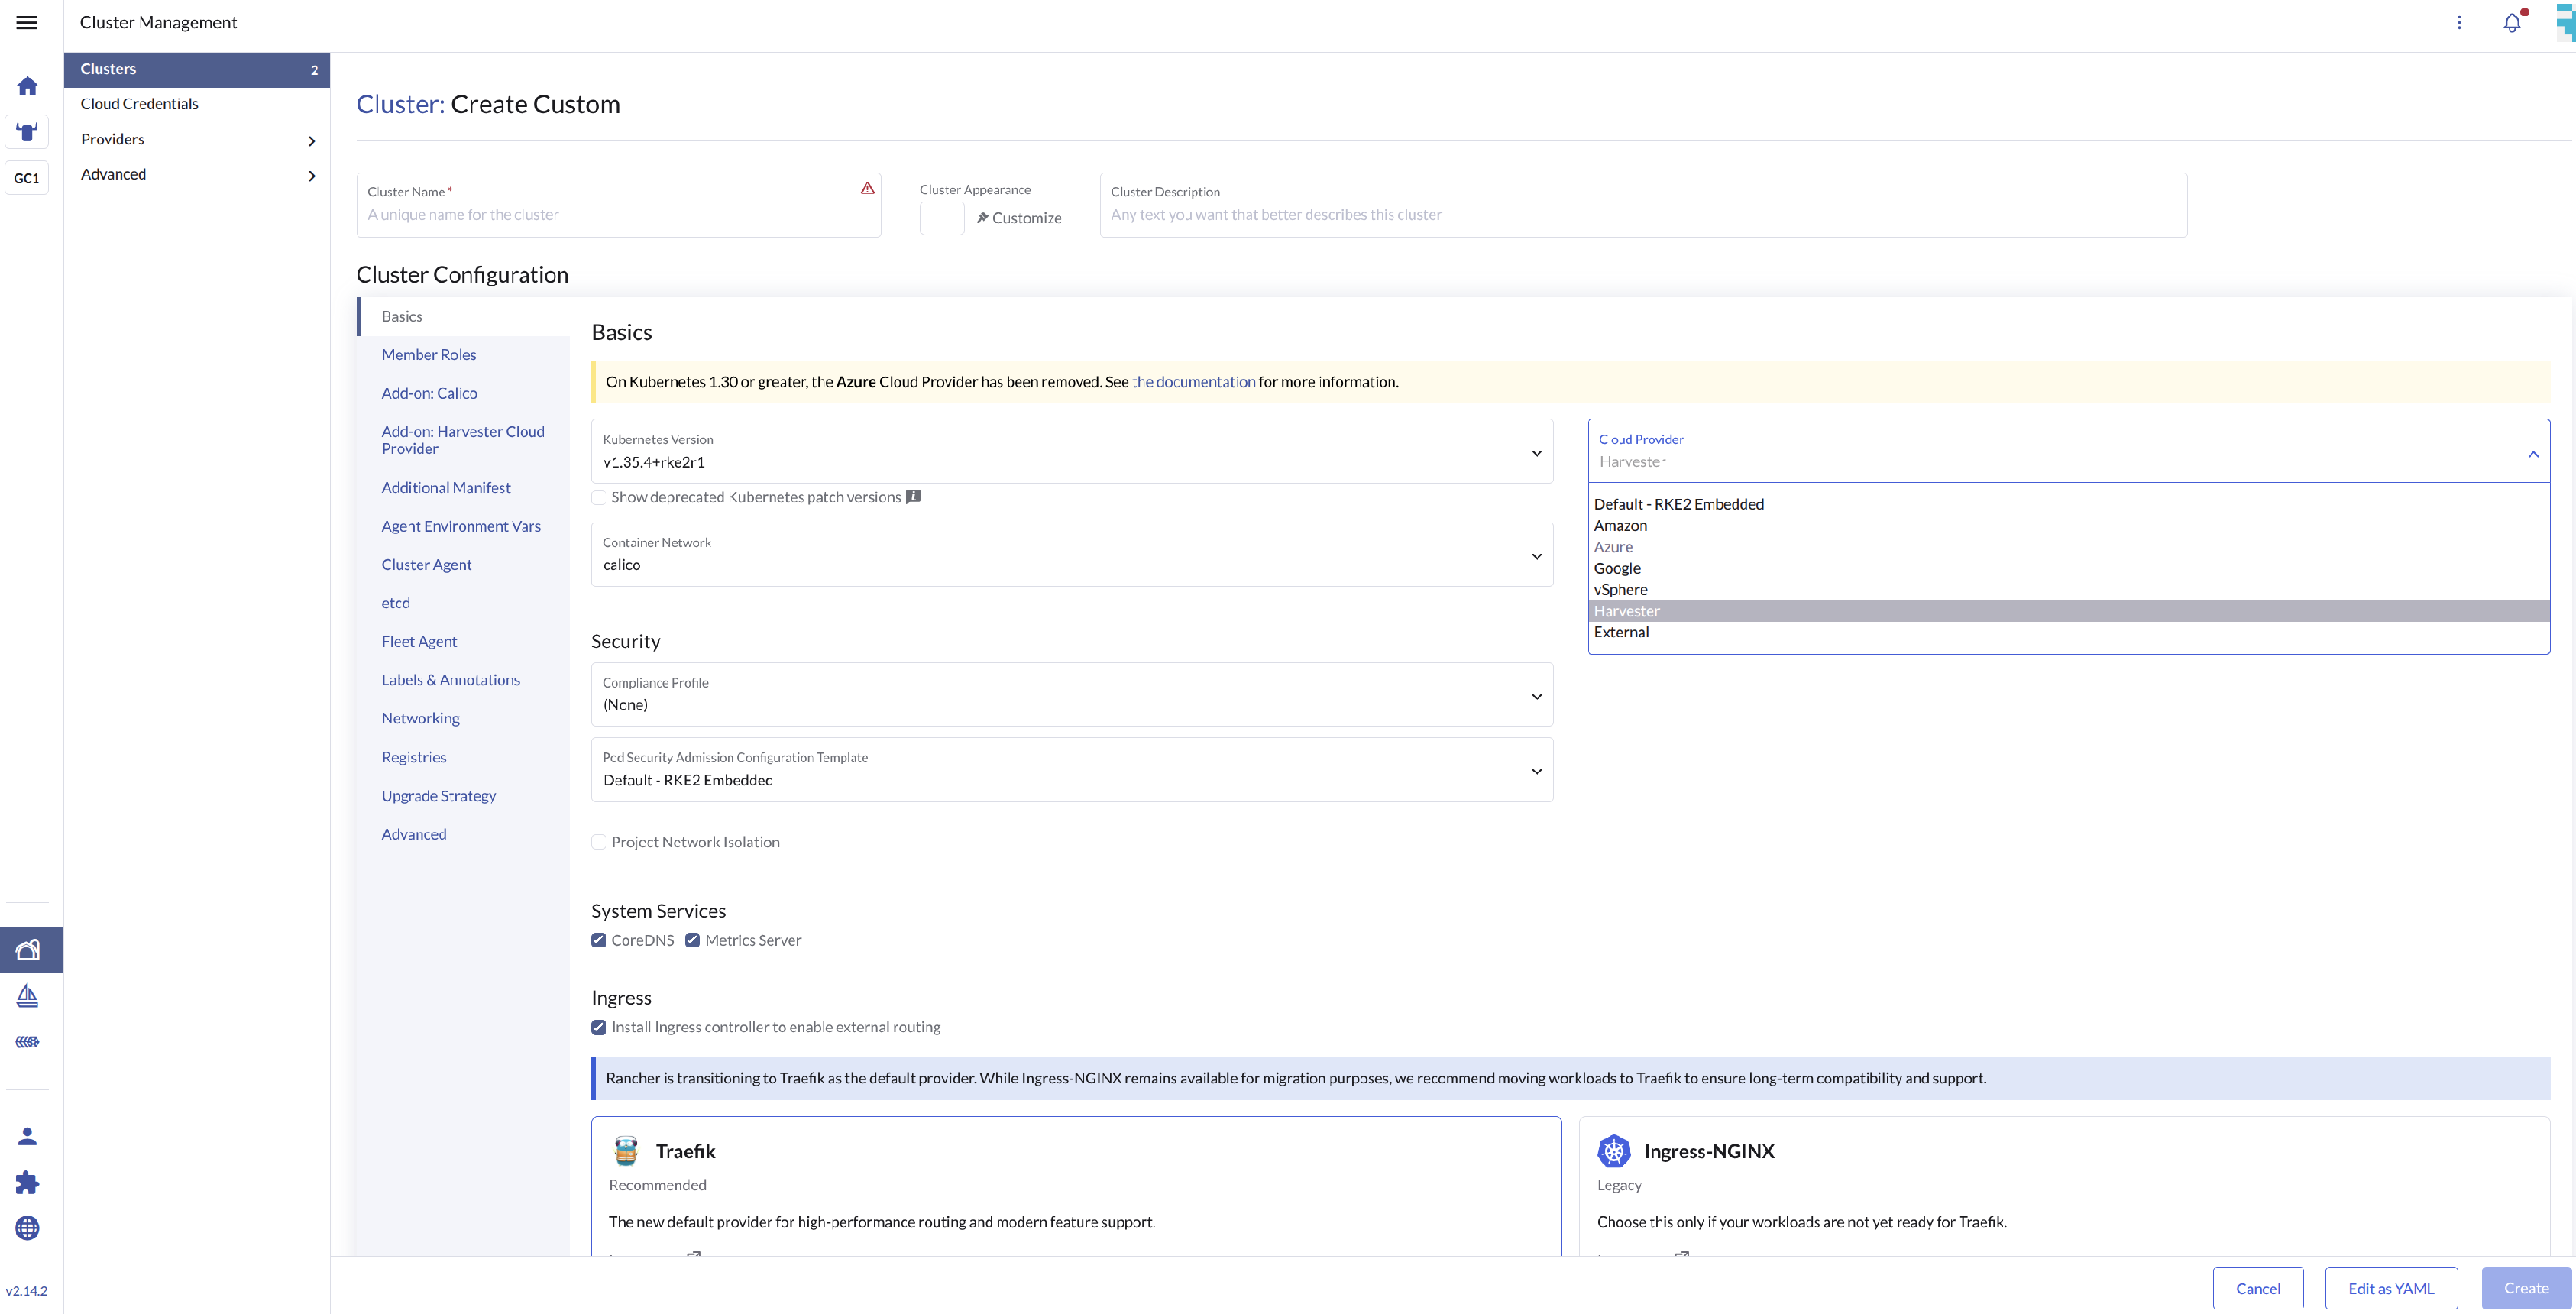
On the Basics tab of the Cluster Configuration screen, select Harvester as the Cloud Provider and then select Create to spin up the cluster.
Click Add-on: Harvester Cloud Provider to verify the
Cloud config file path. On newer versions, this defaults to/var/lib/rancher/rke2/etc/config-files/cloud-provider-config. Ensure this value matches thepathyou set underwrite_files:in the previous step.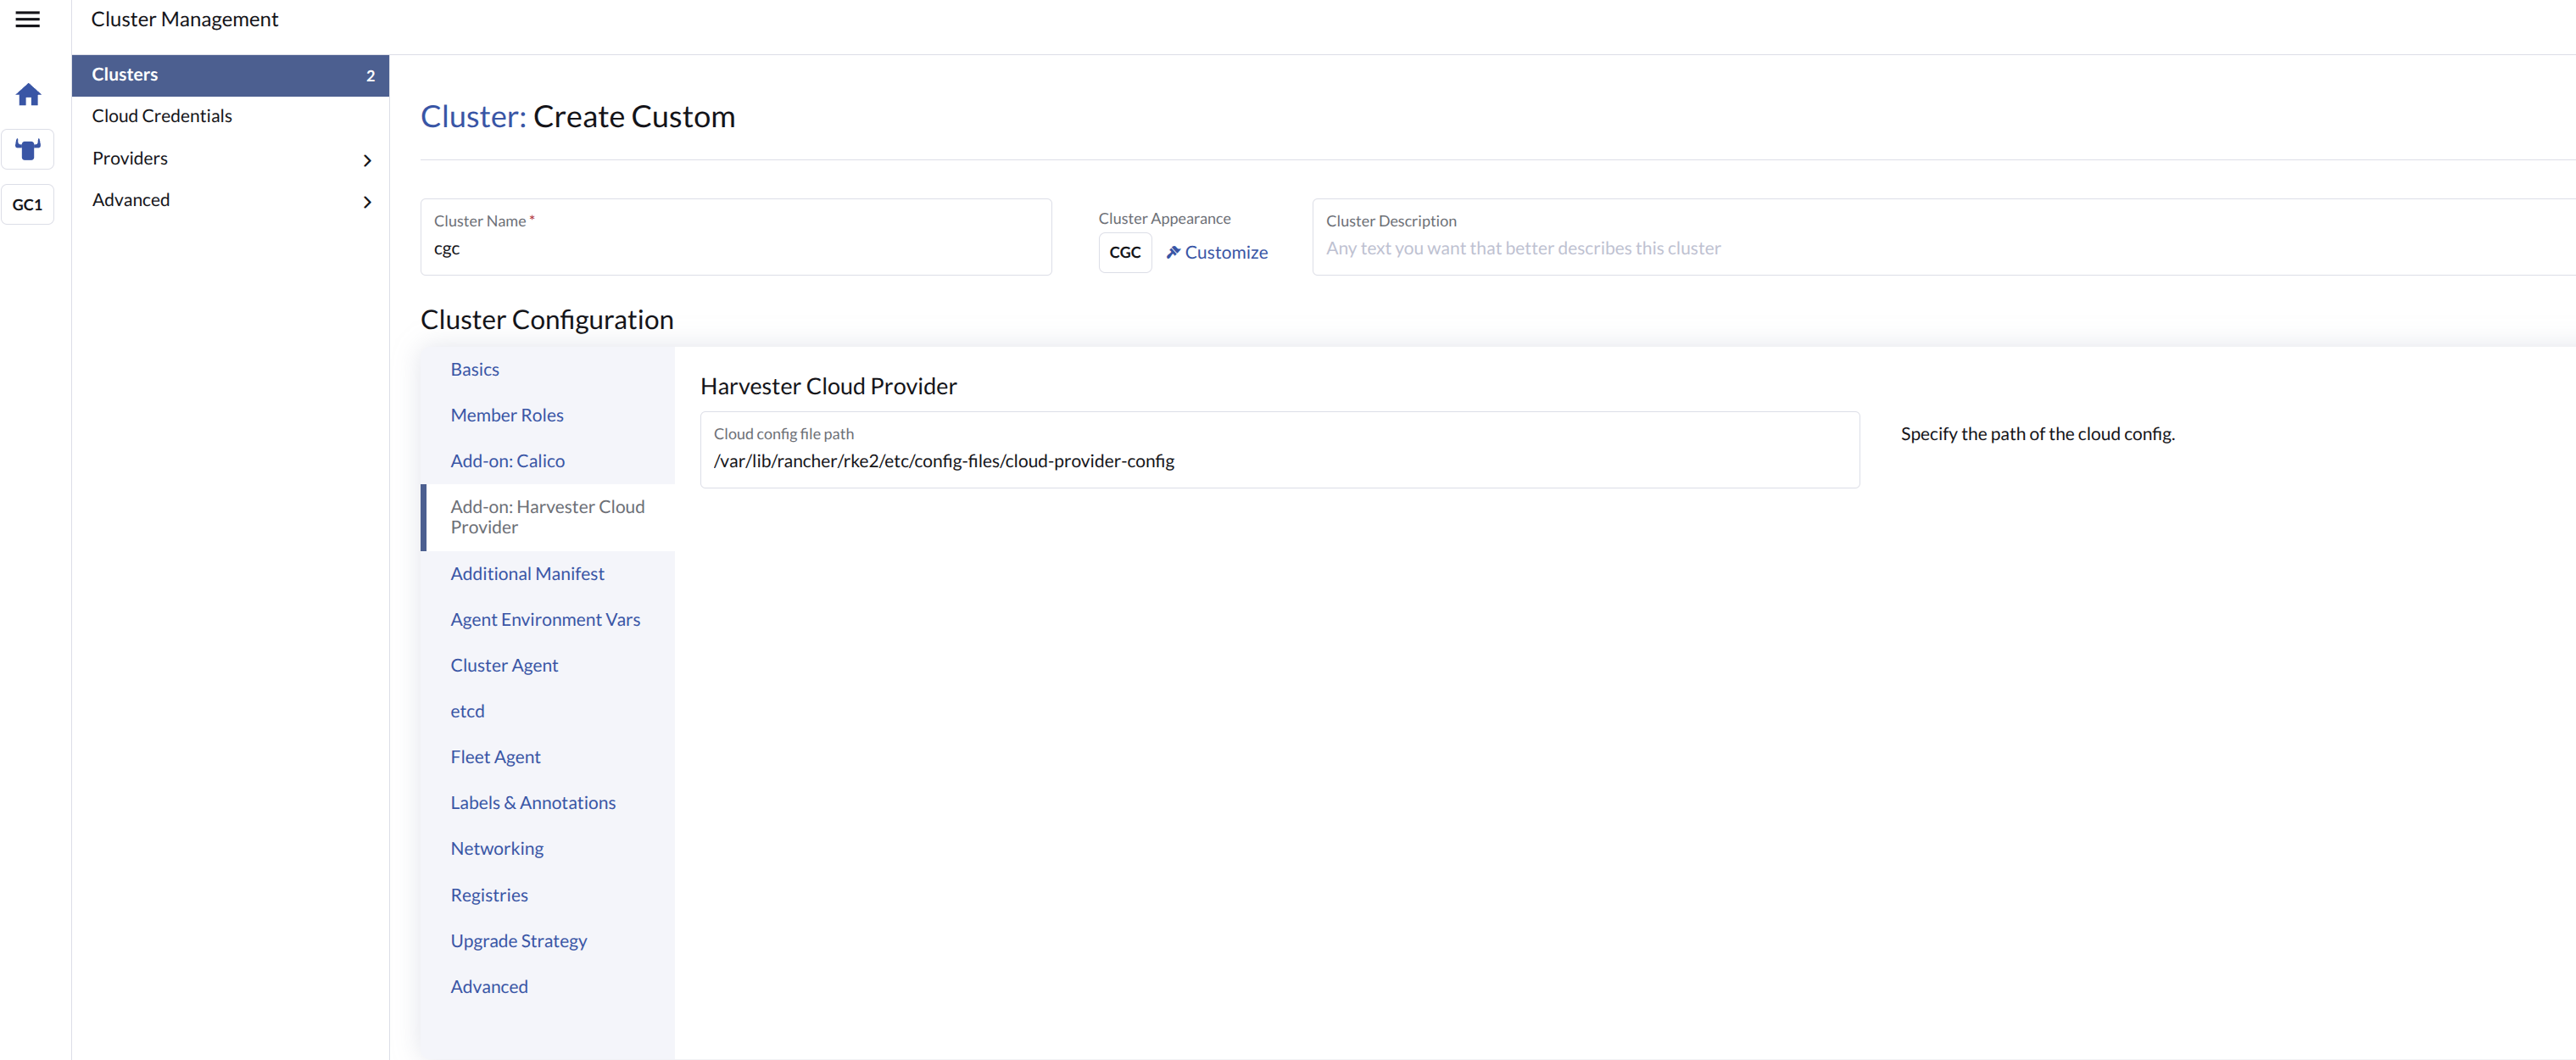
-
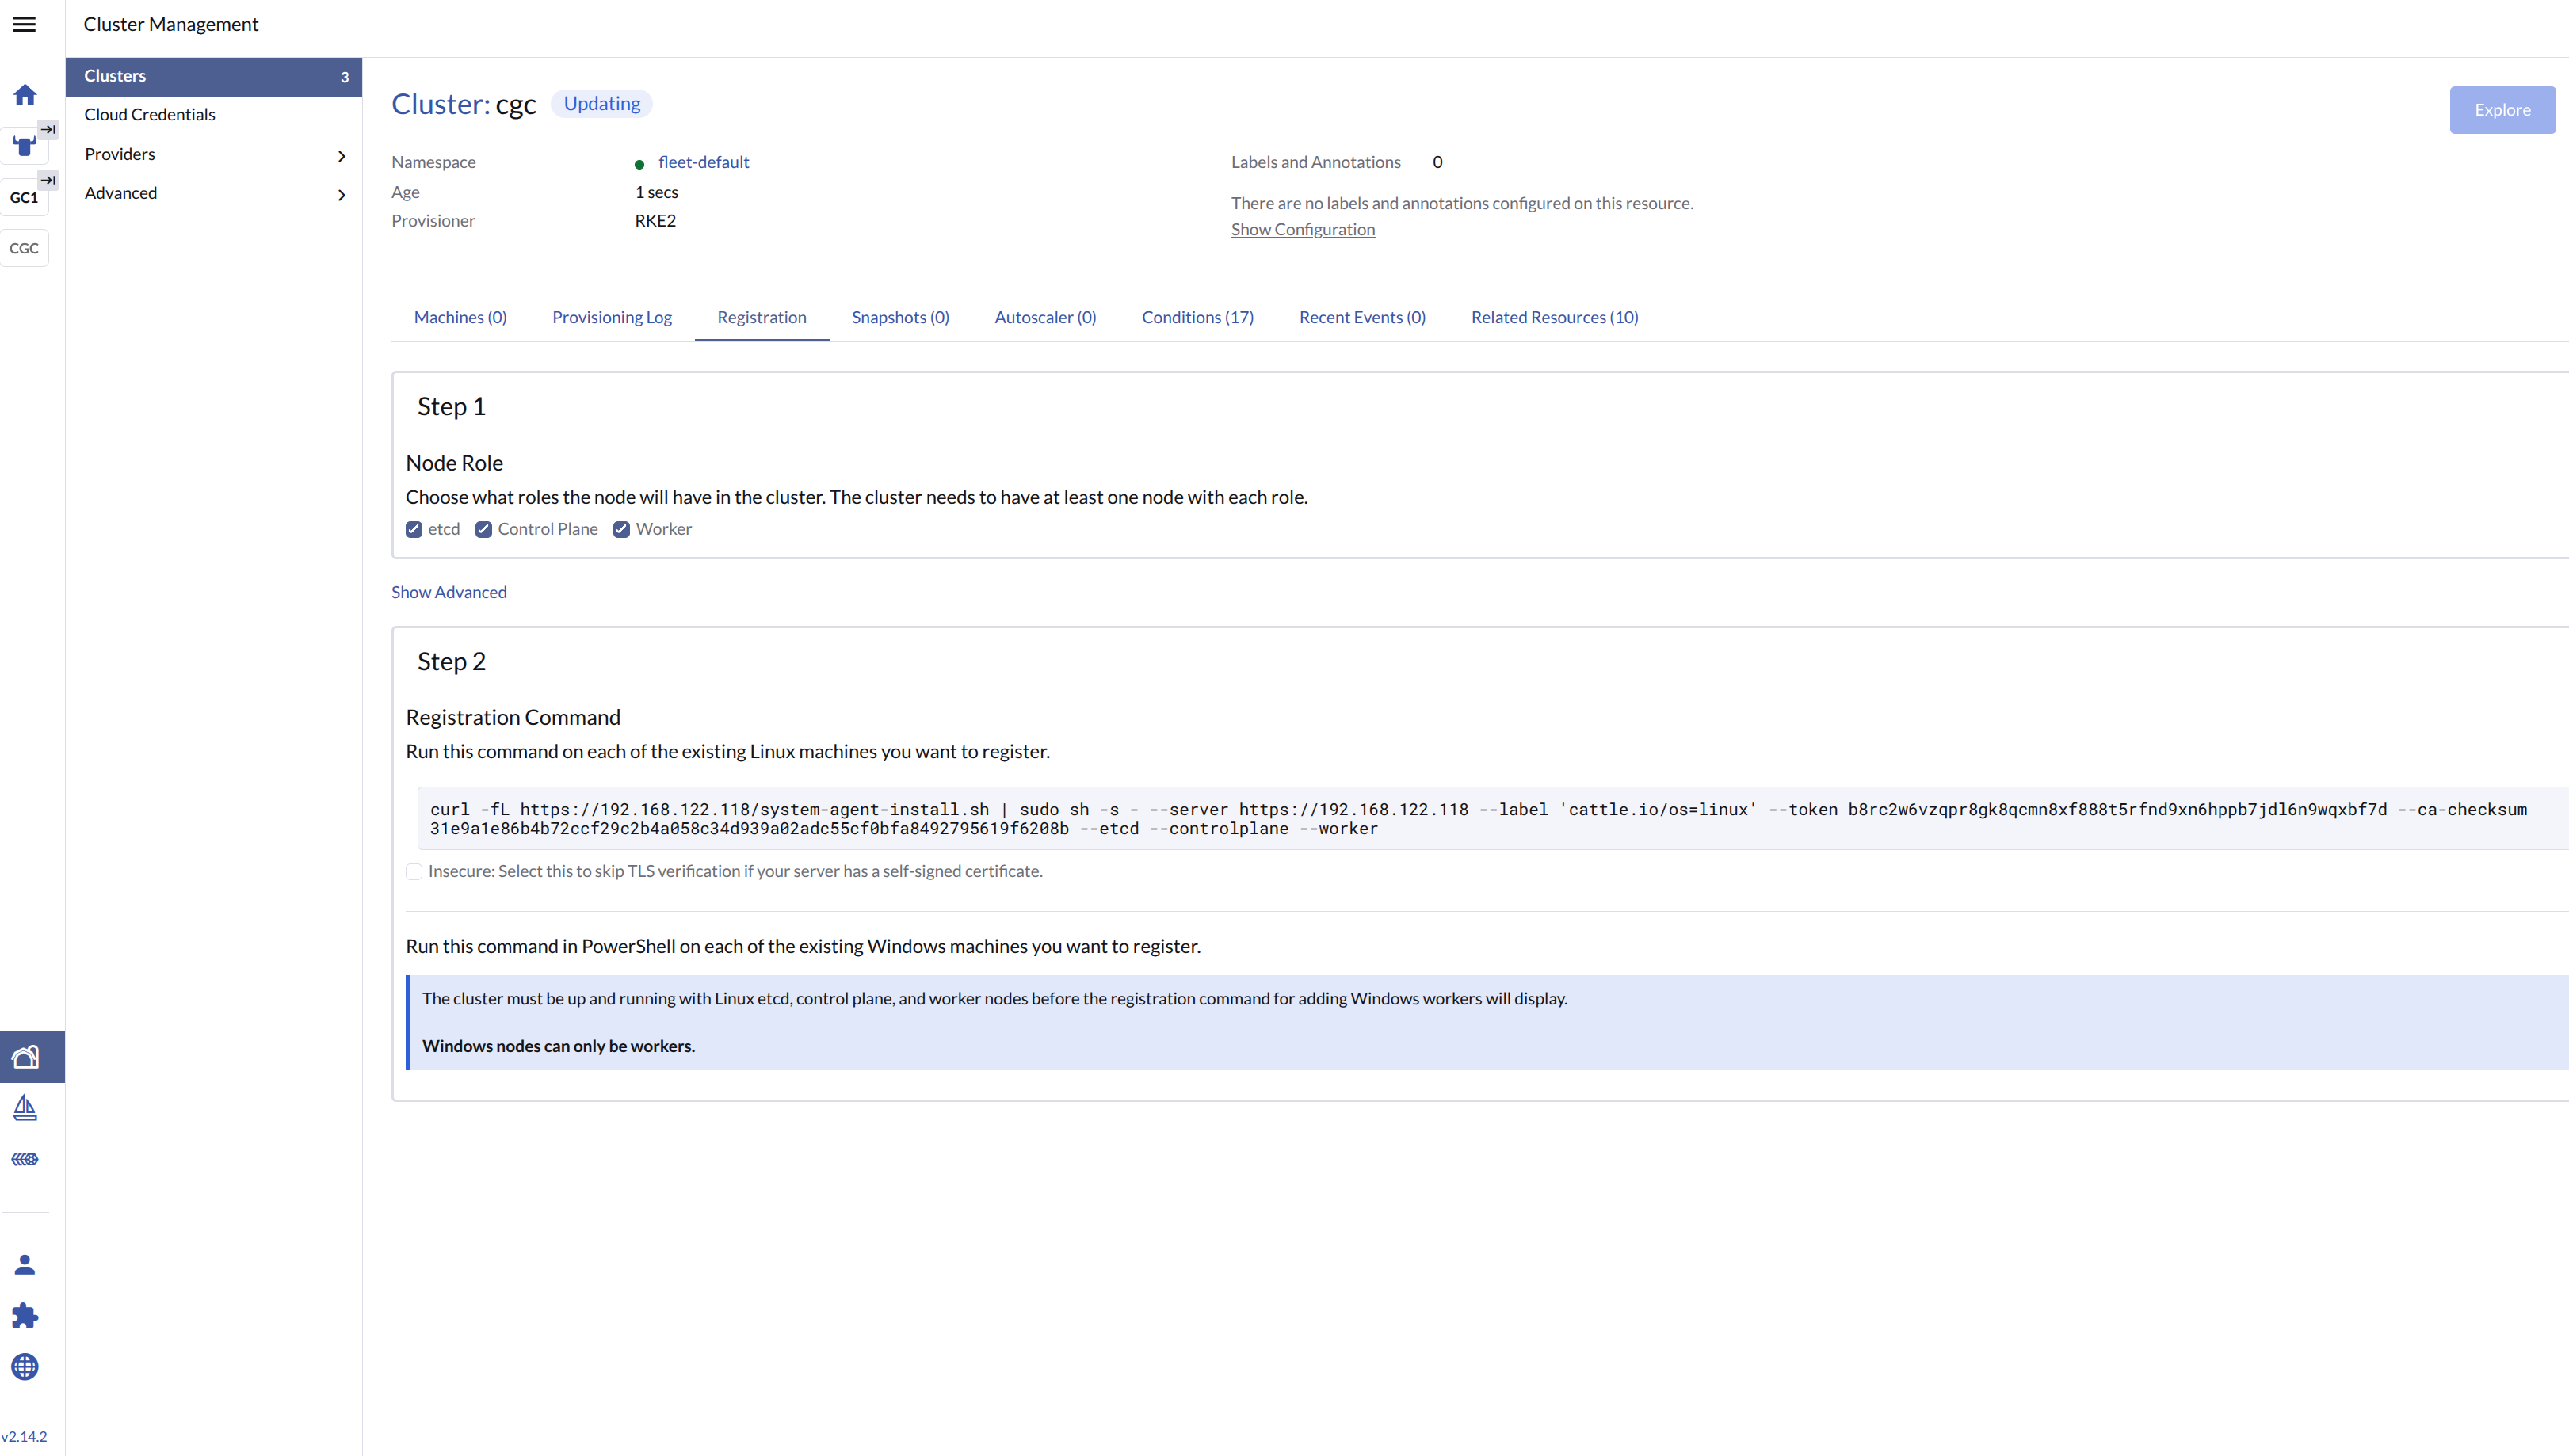
On the Registration tab, perform the steps required to run the RKE2 registration command on the VM.
-
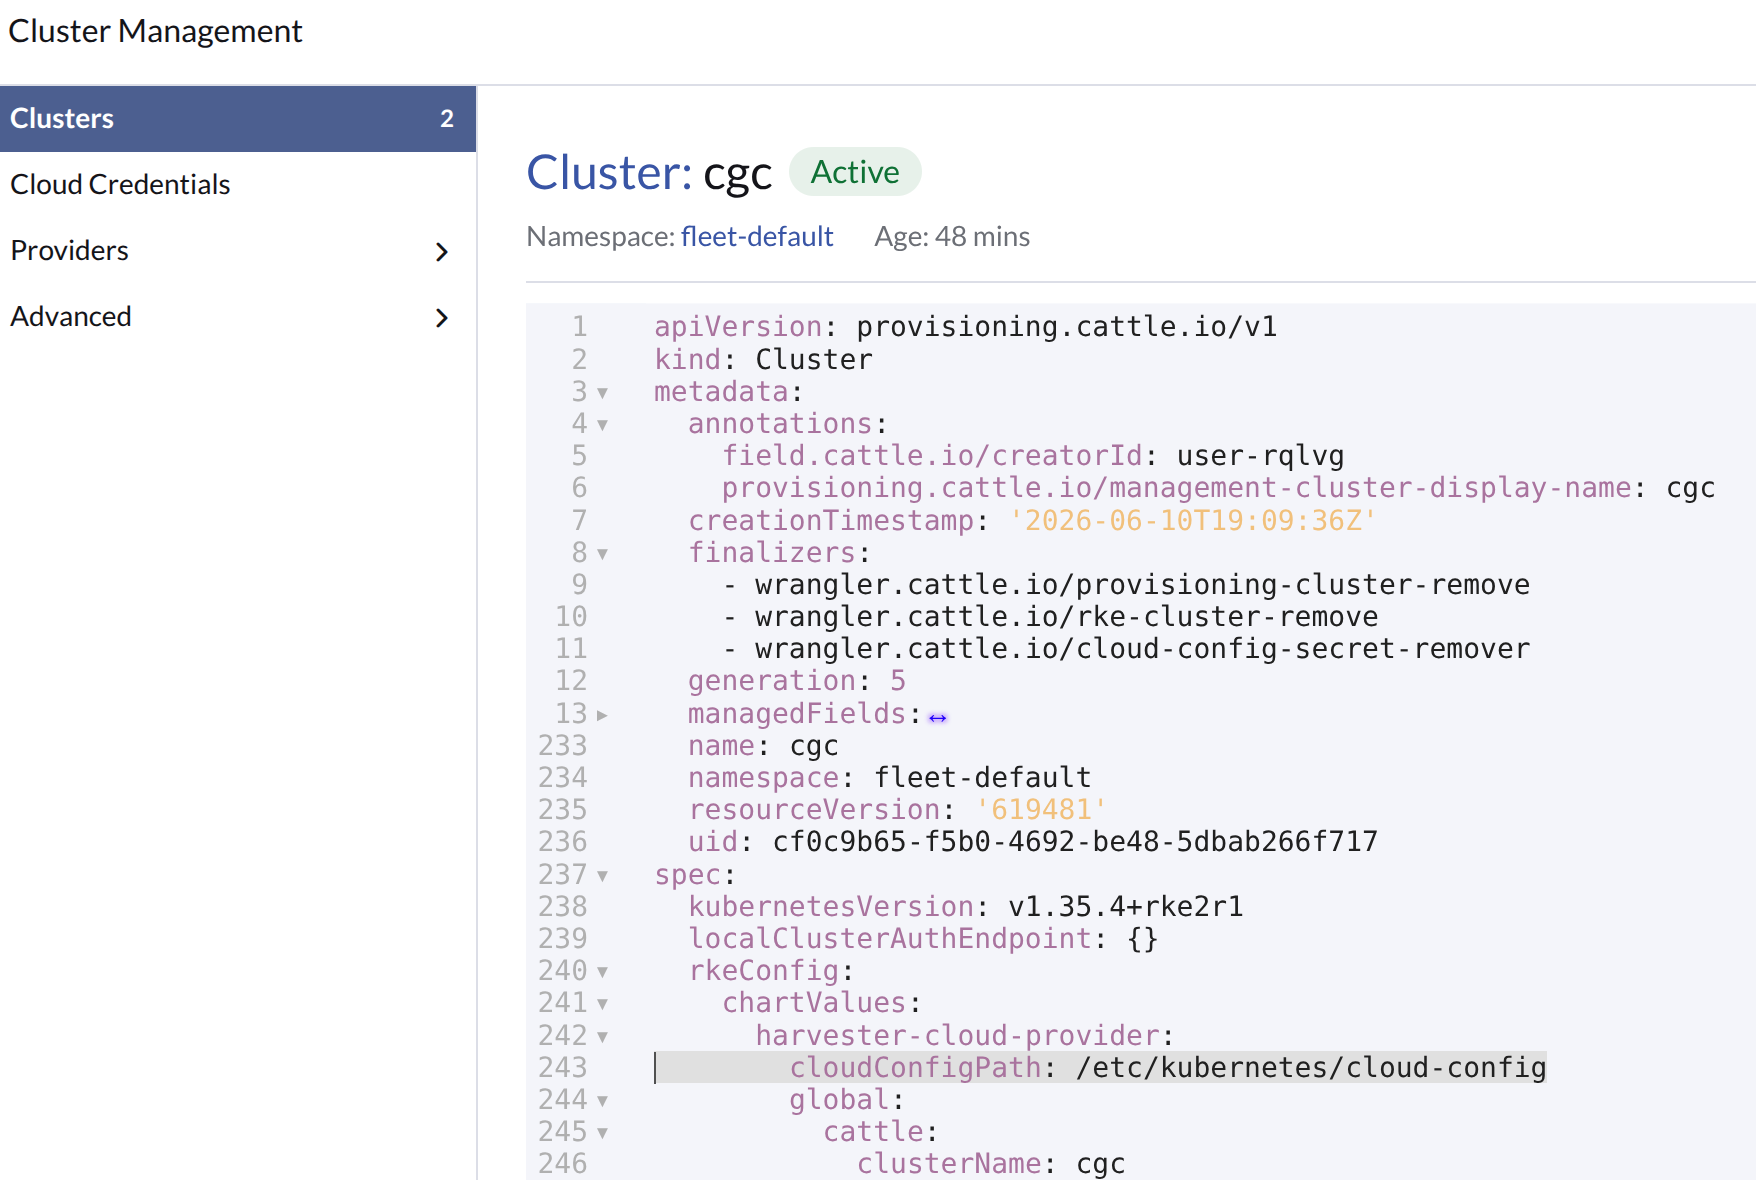
(Optional) Verify the customized cluster YAML to ensure the following fields are correctly set:
.spec.rkeConfig.chartValues.harvester-cloud-provider.global.cattle.clusterName.spec.rkeConfig.chartValues.harvester-cloud-provider.cloudConfigPathIf either field is missing or incorrect, update it in the YAML file.
Deploying to the K3s cluster with Harvester node driver (experimental)
When spinning up a K3s cluster using the Harvester node driver, you can perform the following steps to deploy the harvester cloud provider:
-
Copy and paste the
cloud-init user datacontent to Machine Pools >Show Advanced > User Data. -
Add the following
HelmChartyaml ofharvester-cloud-providerto Cluster Configuration > Add-On Config > Additional Manifest.apiVersion: helm.cattle.io/v1
kind: HelmChart
metadata:
name: harvester-cloud-provider
namespace: kube-system
spec:
targetNamespace: kube-system
bootstrap: true
repo: https://charts.harvesterhci.io/
chart: harvester-cloud-provider
version: 0.2.12
helmVersion: v3 -
Disable the
in-treecloud provider in the following ways:- Click the
Edit as YAMLbutton.
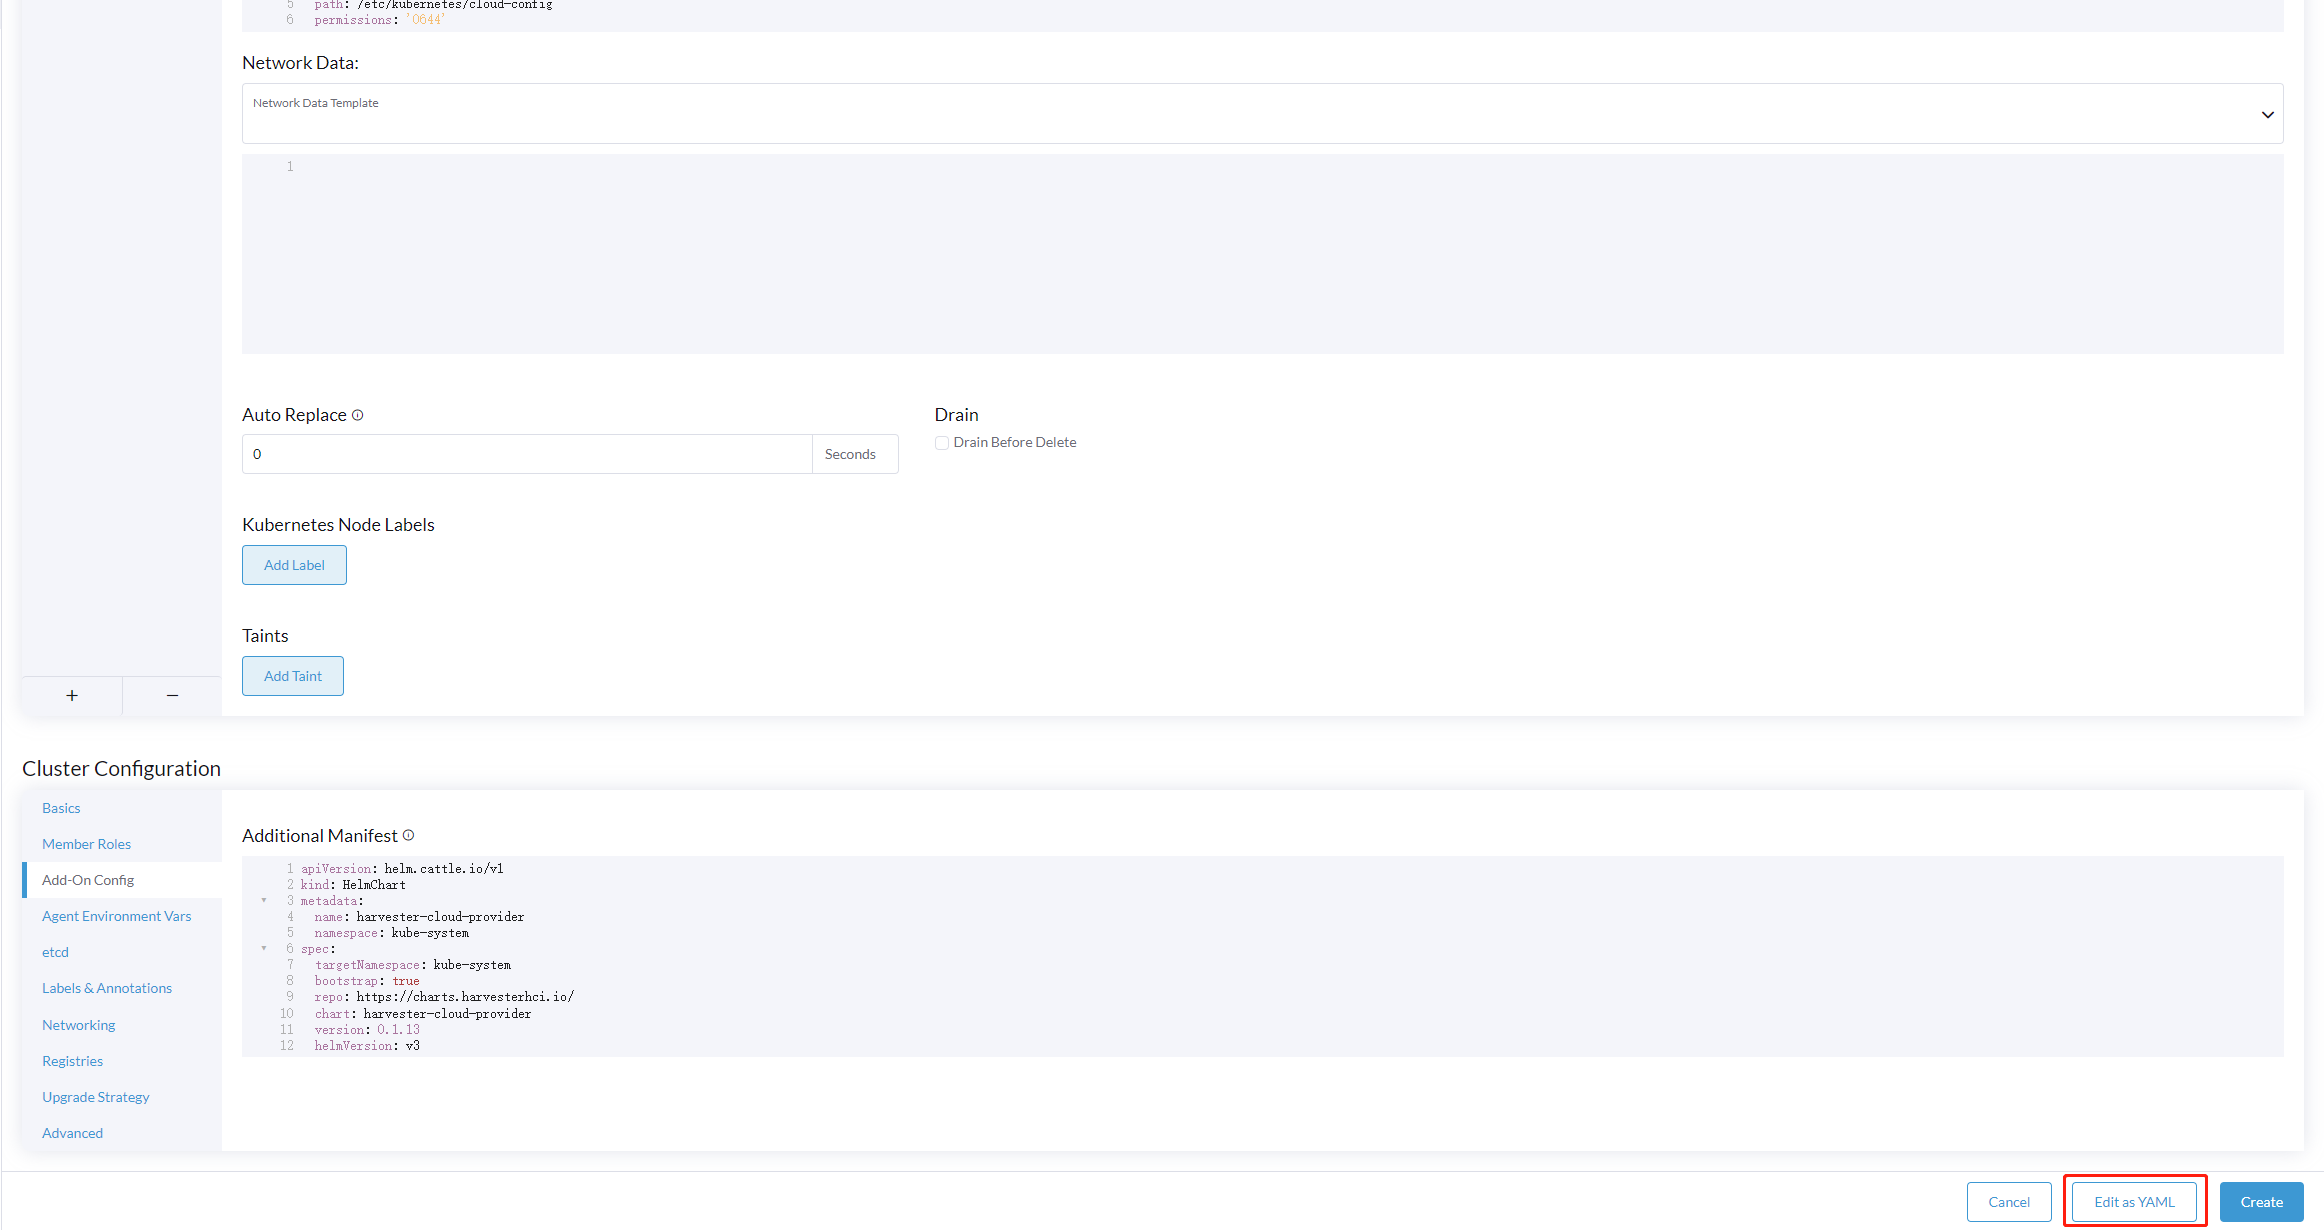
- Disable
servicelband setdisable-cloud-controller: trueto disable the default K3s cloud controller.
    machineGlobalConfig:
      disable:
        - servicelb
disable-cloud-controller: true- Add
cloud-provider=externalto use the Harvester cloud provider.
    machineSelectorConfig:
      - config:
          kubelet-arg:
          - cloud-provider=external
          protect-kernel-defaults: false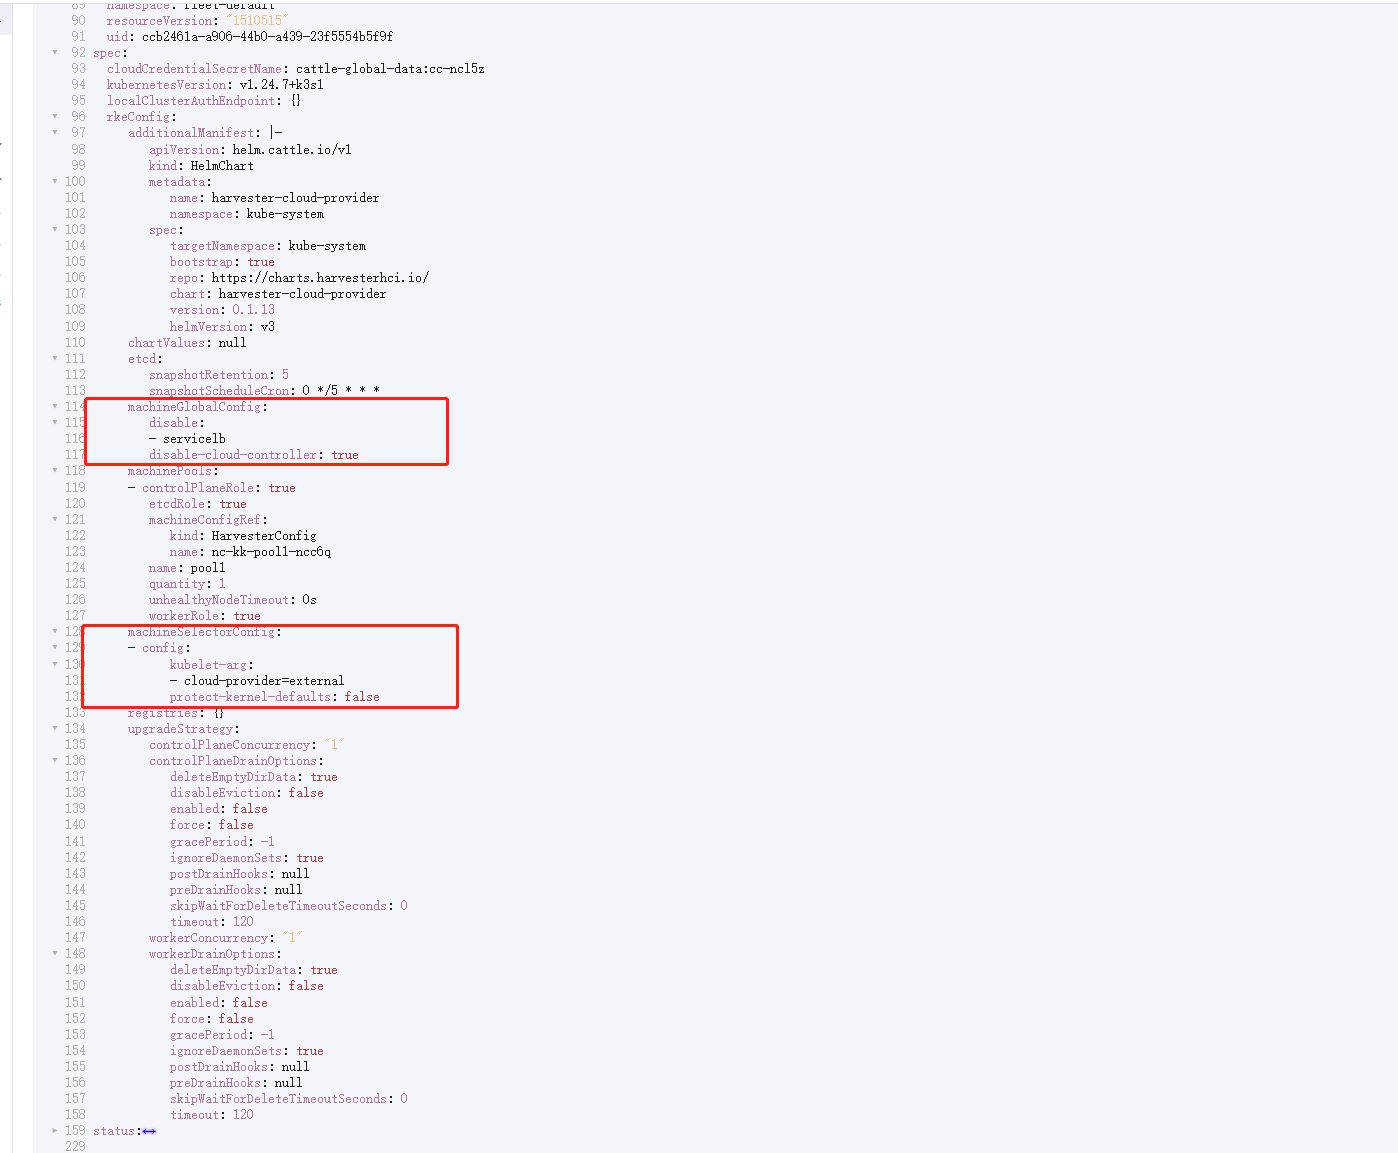
- Click the
With these settings in place a K3s cluster should provision successfully while using the external cloud provider.
Generate the cloud-config for Harvester Cloud Provider
The Harvester Cloud Provider requires a cloud-config file to connect to the remote Harvester cluster (for example, to query virtual machine information or allocate load balancers). You can generate this file using either the API endpoint or a bash script.
Support for the bash script method will be deprecated in a future release. Use the API endpoint to ensure long-term compatibility.
- API
- Bash Script
Available as of v1.9.0
You can send POST and GET requests to the Harvester API endpoint /v1/harvester/kubeconfig using an admin bearer token.
Request Parameters
| Parameter | Type | Description | Example |
|---|---|---|---|
namespace | String | Target namespace in Harvester where the guest cluster is deployed. | gc-test |
serviceAccountName | String | Name of the ServiceAccount created for cloud-config generation. Must strictly match the guest cluster name. | gc4 |
clusterRoleName | String | ClusterRole to bind to the service account (optional) | harvesterhci.io:cloudprovider (only supported value) |
outputFormat | String | Output format | yaml (only supported value) |
clusterRoleName: Harvester usesharvesterhci.io:cloudproviderby default if this field is left empty.outputFormat: Setting this toyamlretrieves the cloud-init user data. Specifying any other value or leaving the field empty returns the raw kubeconfig file.
POST Request
Add -k/--insecure to the curl command only if your Harvester endpoint uses a self-signed certificate.
 curl -X POST \
  -H "Authorization: Bearer token-abcde:..." \
  -H "Content-Type: application/json" \
  -d '{"namespace": "gc-test", "serviceAccountName": "gc4", "outputFormat": "yaml"}' \
  "https://<vip>/v1/harvester/kubeconfig"
POST Response
########## cloud-init user data ############
write_files:
- encoding: b64
  content: <BASE64_CONTENT>
  owner: root:root
  path: /etc/kubernetes/cloud-config
  permissions: '0644'
- encoding: b64
  content: <BASE64_CONTENT>
  owner: root:root
  path: /var/lib/rancher/rke2/etc/config-files/cloud-provider-config
  permissions: '0644'
GET Request
Use a single ampersand (&) to separate query parameters.
curl -X GET \
  -H "Authorization: Bearer token-abcde:..." \
  "https://<vip>/v1/harvester/kubeconfig?namespace=gc-test&serviceAccountName=gc4&outputFormat=yaml"
GET Response
The API response automatically includes cloud-init configurations for both legacy and new paths. Before applying this configuration, remove the block that does not apply to your environment.
########## cloud-init user data ############
write_files:
- encoding: b64
  content: <BASE64_CONTENT>
  owner: root:root
  path: /etc/kubernetes/cloud-config
  permissions: '0644'
- encoding: b64
  content: <BASE64_CONTENT>
  owner: root:root
  path: /var/lib/rancher/rke2/etc/config-files/cloud-provider-config
  permissions: '0644'
-
Generate the cloud-config data using the
generate_addon.shscript.curl -sfL https://raw.githubusercontent.com/harvester/cloud-provider-harvester/master/deploy/generate_addon.sh | bash -s <serviceaccount name> <namespace> -
Copy the generated data to every node.
- Legacy path:
/etc/kubernetes/cloud-config - RKE2 default path (v1.9.0 and later):
/var/lib/rancher/rke2/etc/config-files/cloud-provider-config
- Legacy path:
The script requires kubectl and jq to interact with the Harvester cluster, and functions only when given access to the Harvester cluster's kubeconfig file.
You can find the kubeconfig file on any Harvester management node at the following path: /etc/rancher/rke2/rke2.yaml. Before using the kubeconfig file, you must replace the IP address in the server: field with your cluster's VIP address.
Example of content:
apiVersion: v1
clusters:
- cluster:
    certificate-authority-data: <redacted>
    server: https://127.0.0.1:6443
  name: default
# ...
You must specify the namespace in which the guest cluster will be created.
Example of output:
########## cloud config ############
apiVersion: v1
clusters:
- cluster:
    certificate-authority-data: <CACERT>
    server: https://HARVESTER-ENDPOINT/k8s/clusters/local
  name: local
contexts:
- context:
    cluster: local
    namespace: default
    user: harvester-cloud-provider-default-local
  name: harvester-cloud-provider-default-local
current-context: harvester-cloud-provider-default-local
kind: Config
preferences: {}
users:
- name: harvester-cloud-provider-default-local
  user:
    token: <TOKEN>

########## cloud-init user data ############
write_files:
- encoding: b64
  content: <CONTENT>
  owner: root:root
  path: /etc/kubernetes/cloud-config
  permissions: '0644'
In newer RKE2 versions (such as v1.33.11), the default cloud-config path is /var/lib/rancher/rke2/etc/config-files/cloud-provider-config. You must ensure that the cloudConfigPath value matches the exact file location you write to.
Depending on your setup, choose one of the following approaches:
-
Use the RKE2 default path: In the
write_filesentry in your cloud-init configuration, change the value ofpathto/var/lib/rancher/rke2/etc/config-files/cloud-provider-config. -
Keep the legacy path: In the Rancher UI, set
.spec.rkeConfig.chartValues.harvester-cloud-provider.cloudConfigPathto/etc/kubernetes/cloud-config.
Upgrade Cloud Provider
Upgrade RKE2
The cloud provider can be upgraded by upgrading the RKE2 version. You can upgrade the RKE2 cluster via the Rancher UI as follows:
- Click ☰ > Cluster Management.
- Find the guest cluster that you want to upgrade and select ⋮ > Edit Config.
- Select Kubernetes Version.
- Click Save.
Upgrade K3s
K3s upgrade cloud provider via the Rancher UI, as follows:
- Click ☰ > K3s Cluster > Apps > Installed Apps.
- Find the cloud provider chart and select ⋮ > Edit/Upgrade.
- Select Version.
- Click Next > Update.
The upgrade process for a single-node guest cluster may stall when the new harvester-cloud-provider pod is stuck in the Pending state. This issue is caused by a section in the harvester-cloud-provider deployment that describes the rolling update strategy. Specifically, the default value conflicts with the podAntiAffinity configuration in single-node clusters.
For more information, see this GitHub issue comment. To address the issue, manually delete the old harvester-cloud-provider pod. You might need to do this multiple times until the new pod can be successfully scheduled.
Node Instance Metadata Support
When registering and updating guest nodes, harvester-cloud-provider queries the Harvester API server to inspect the underlying VirtualMachine (VM) and VirtualMachineInstance (VMI) objects. It constructs the standard cloudprovider.InstanceMetadata struct by targeting three key metadata elements from the VMI:
1. Provider Identifier (ProviderID)
Sets a globally unique identifier for the guest node based on the underlying Harvester VM's UID:
- Format:
harvester://<vm.UID> - Purpose: Allows Kubernetes to deterministically map the guest
Nodeobject back to its physical Harvester VM resource.
2. Topology Metadata (Region & Zone)
Reads topology annotations set on the VMI object to establish placement context for Kubernetes scheduling:
- Region: Extracted from the
topology.kubernetes.io/regionannotation. - Zone: Extracted from the
topology.kubernetes.io/zoneannotation. - Fallback: If the VMI lacks topology annotations,
ProviderIDis still reported while region/zone fields remain unset.
3. Node Addresses (NodeAddresses)
Constructs the complete address list ([]v1.NodeAddress) for the guest node by combining hostname mapping with VMI status discovery:
-
Host Name (
NodeHostName): Setsv1.NodeHostNamedirectly using the targetnode.Name. -
IP Discovery (
InternalIP&ExternalIP): Evaluates active network interface IPs reported directly in the VMI status alongside provider configuration—eliminating the need for host-level probes or hardcoded NIC assumptions. -
Deterministic Mapping: Assigns detected IPs to
InternalIPandExternalIPtypes, providing a consistent source of truth for downstream intra-cluster networking and load balancer traffic routing.
To customize or filter which VM network interfaces and IP ranges are used when reporting node addresses, see Extra Arguments.
Load Balancer Support
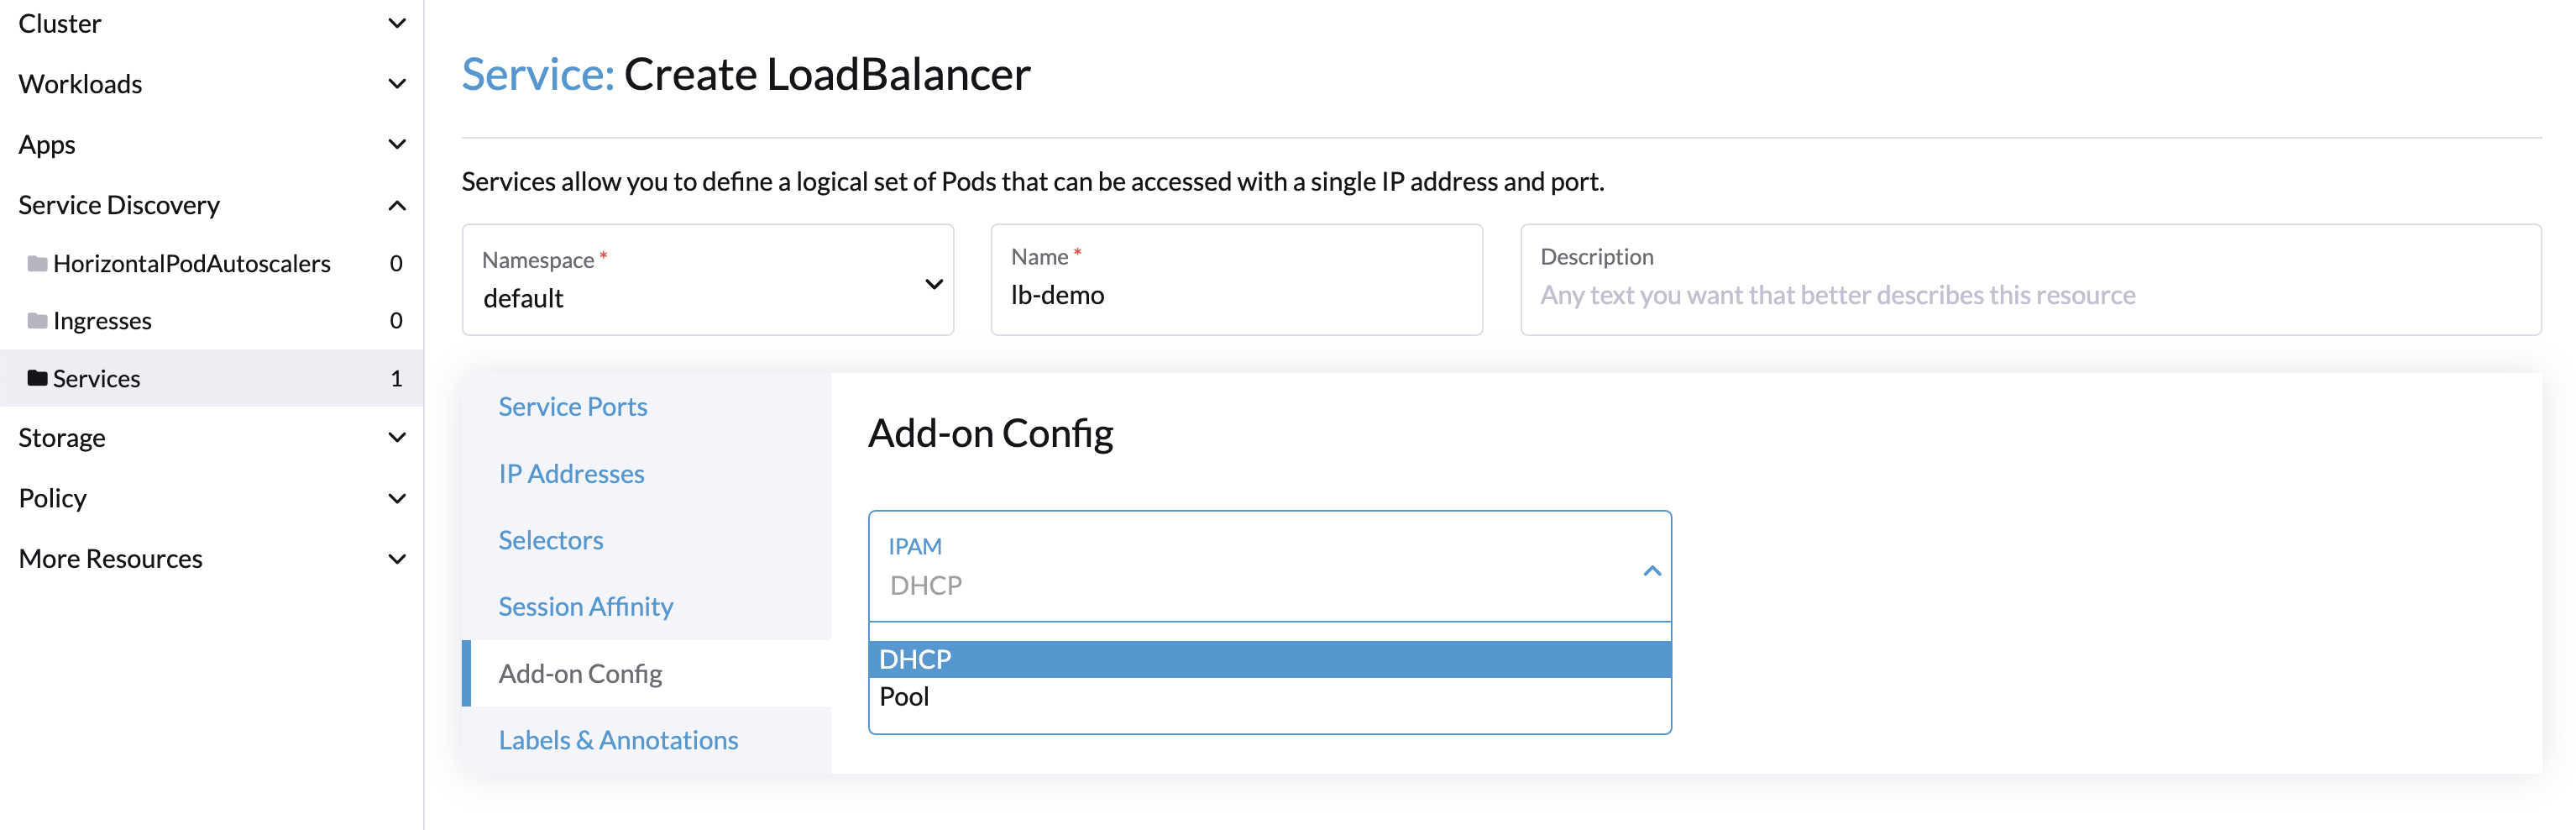
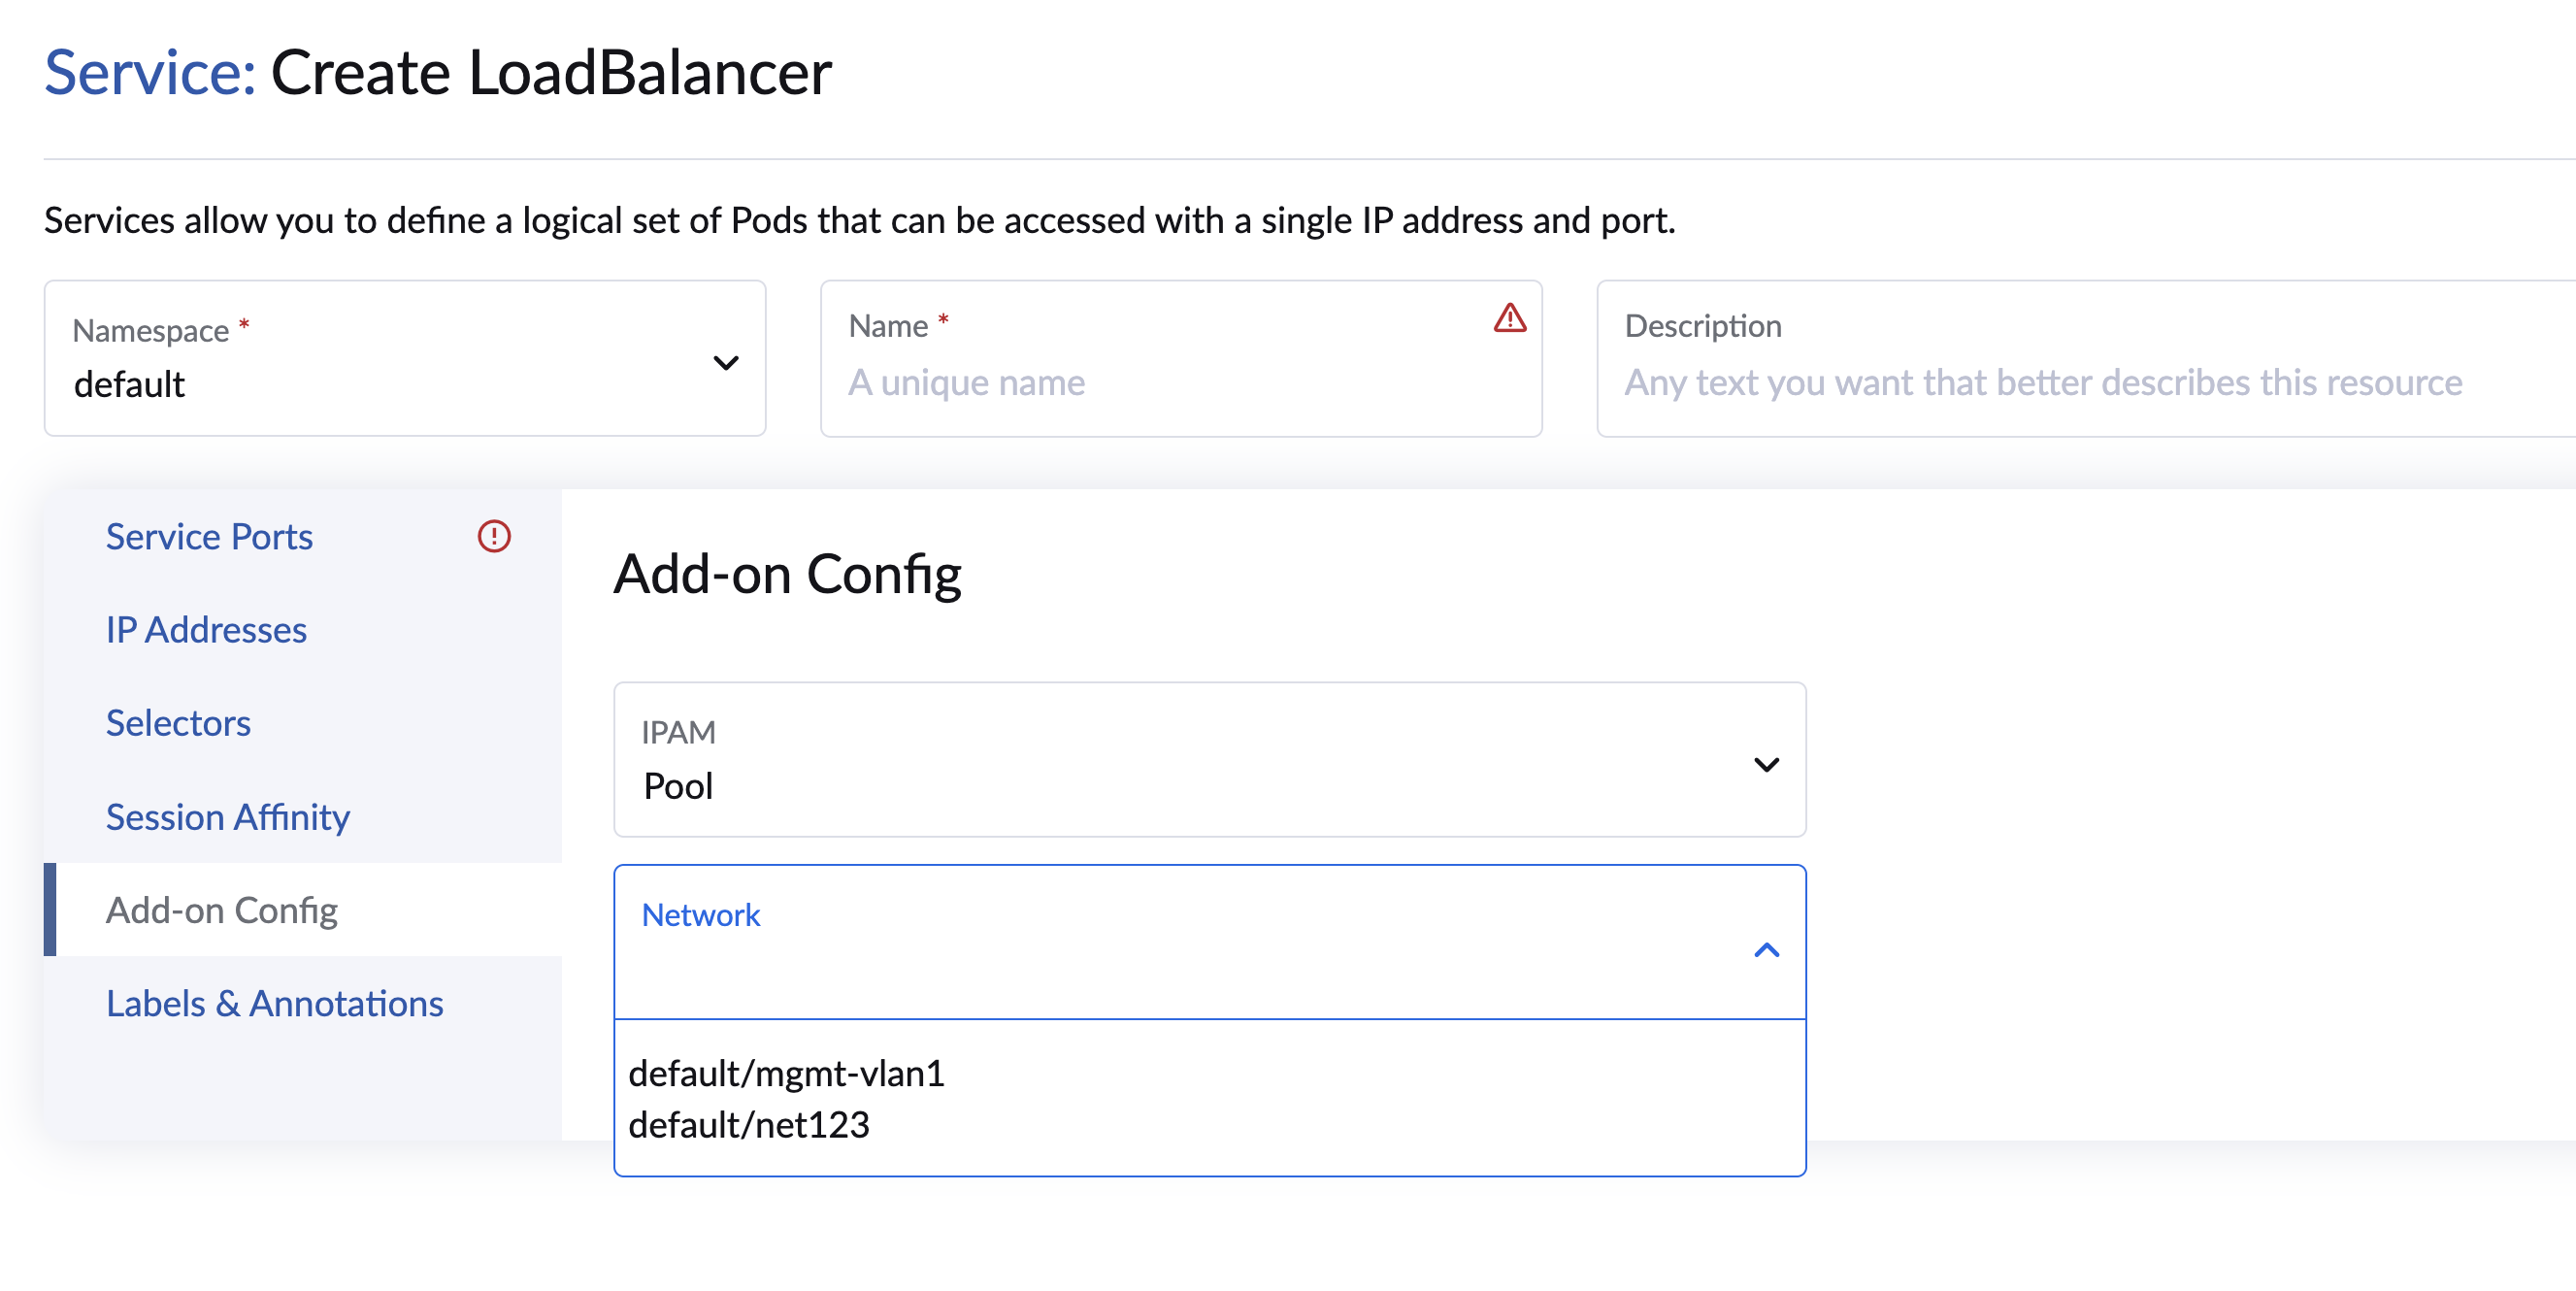
Once you've deployed the Harvester cloud provider, you can leverage the Kubernetes LoadBalancer service to expose a microservice within the guest cluster to the external world. Creating a Kubernetes LoadBalancer service assigns a dedicated Harvester load balancer to the service, and you can make adjustments through the Add-on Config within the Rancher UI.
IPAM
Harvester's built-in load balancer offers both DHCP and Pool modes, and you can configure it by adding the annotation cloudprovider.harvesterhci.io/ipam: $mode to its corresponding service. Starting from Harvester cloud provider >= v0.2.0, it also introduces a unique Share IP mode. A service shares its load balancer IP with other services in this mode.
-
DHCP: A DHCP server is required. The Harvester load balancer will request an IP address from the DHCP server. For pre-allocating static addresses using MAC-to-IP bindings, see Static IP for Guest Cluster LoadBalancer Service (DHCP Mode).
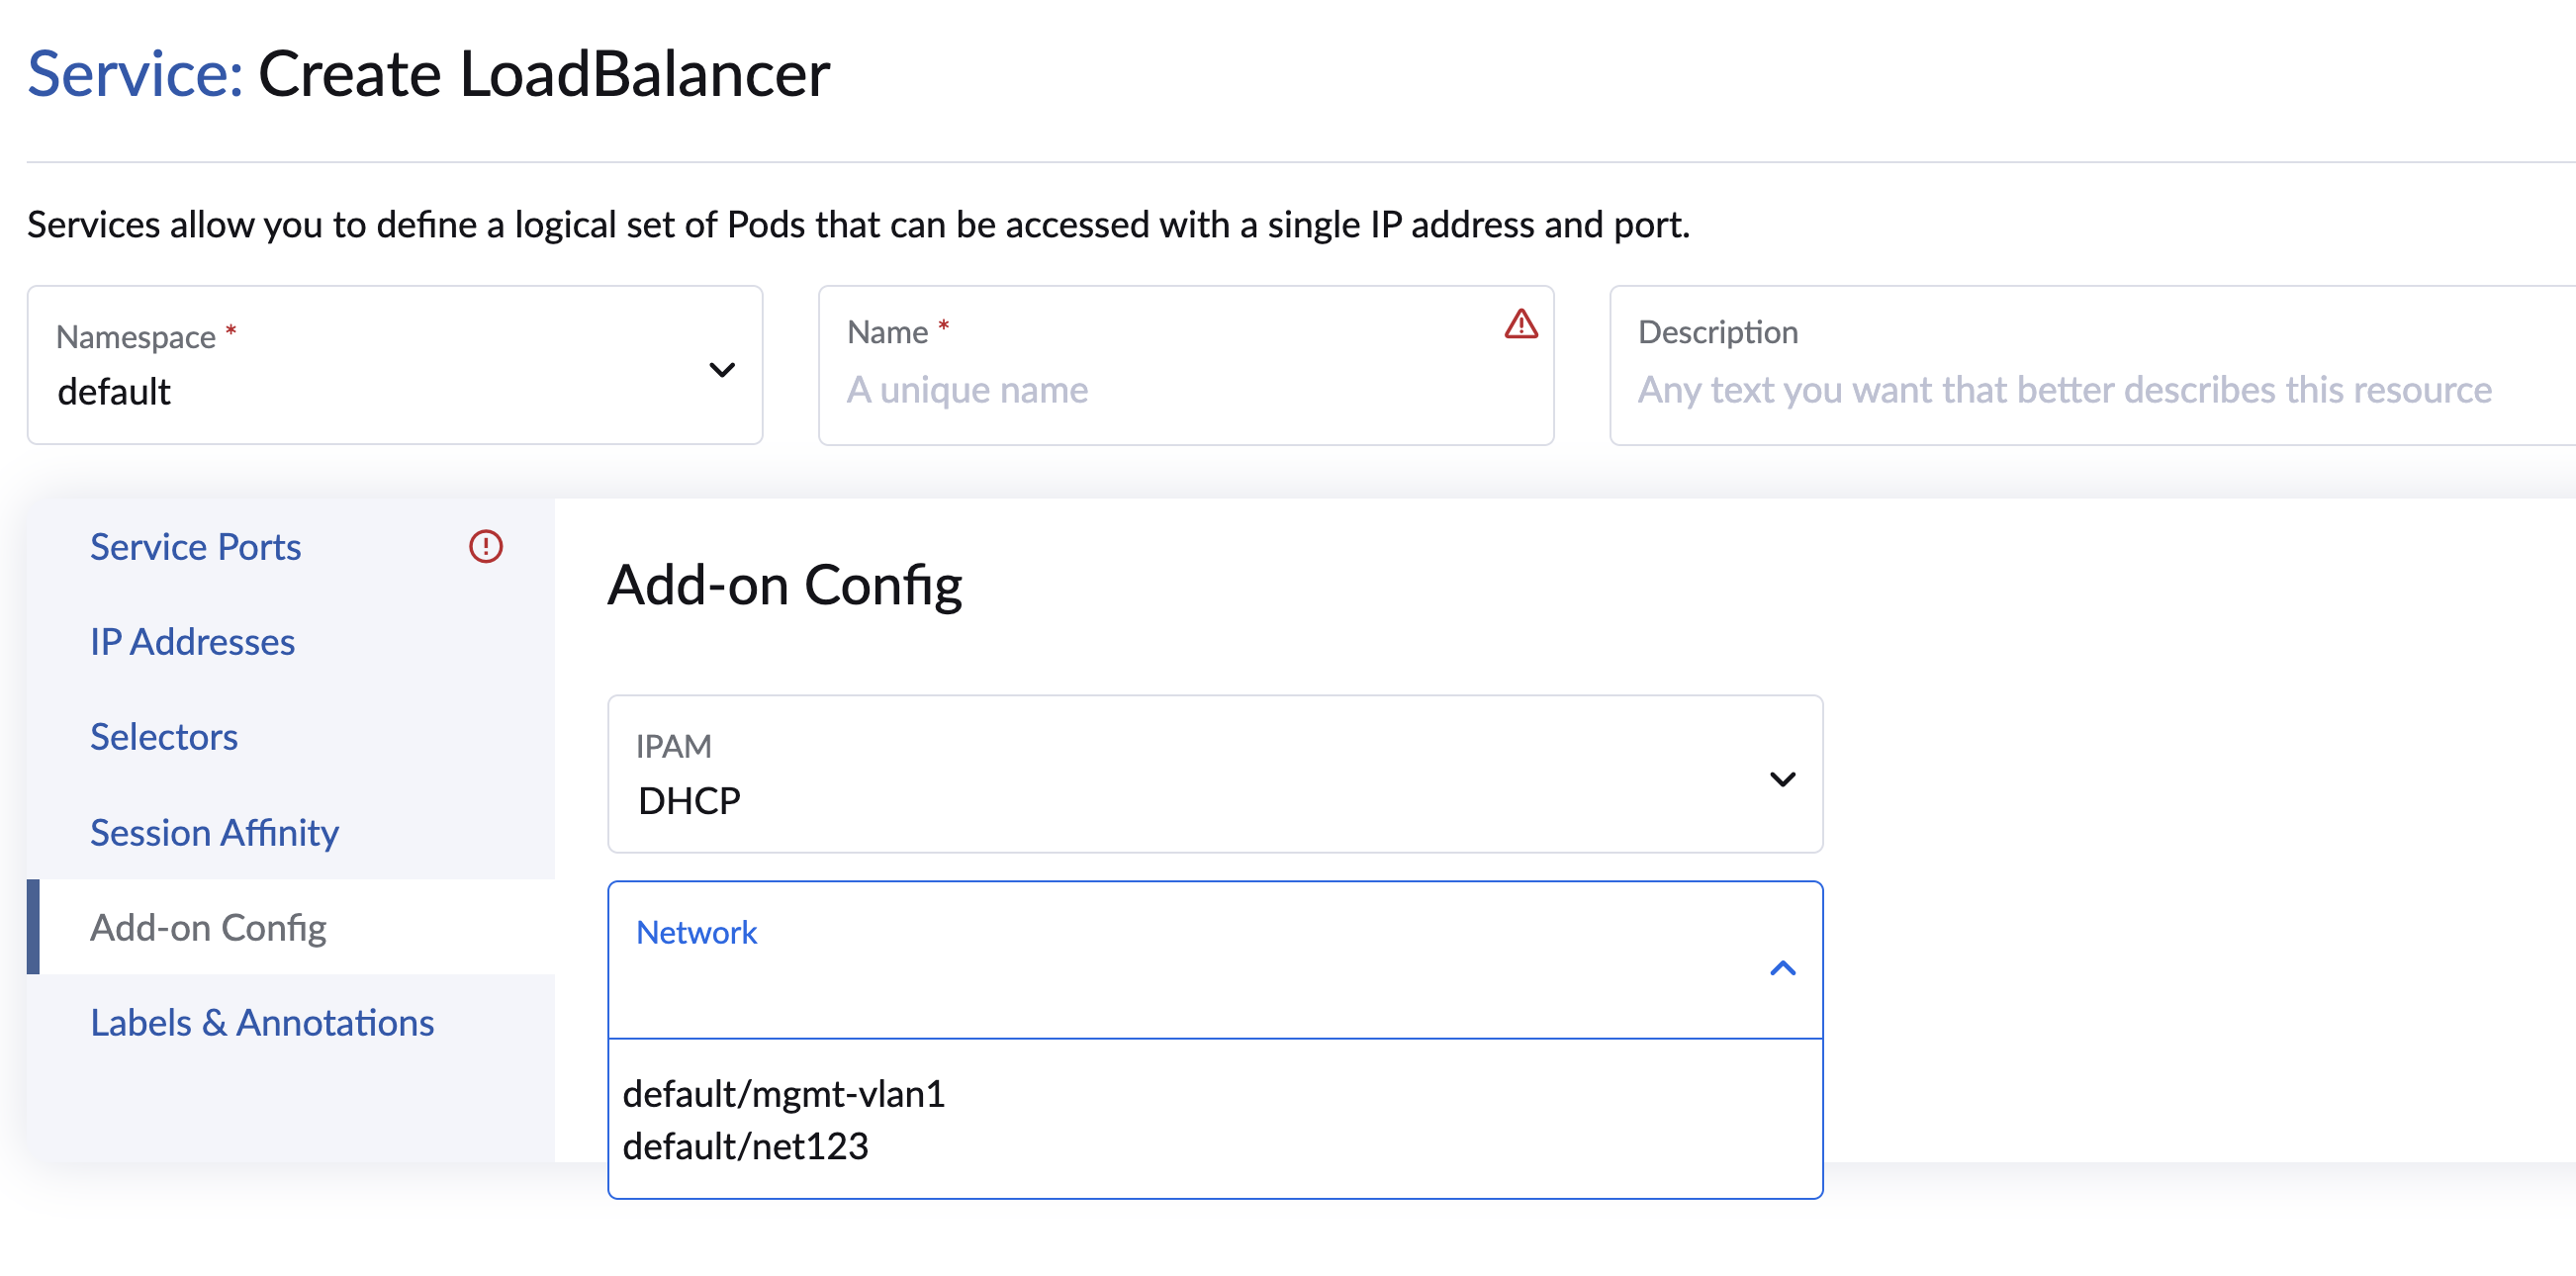
Starting with Rancher v2.15.1, you can select a VM network when creating a
LoadBalancerservice using the UI. This enables explicit binding of the virtual IP to the correct network interface. If you do not select a VM network, the load balancer uses the default interface.On earlier Rancher versions (v2.12.x, v2.13.x, and v2.14.x), you can achieve the same result by adding the following annotations to the
Servicemanifest:cloudprovider.harvesterhci.io/ipam: "dhcp"cloudprovider.harvesterhci.io/network: "default/mgmt-vlan1"
-
Pool: A pre-configured IP pool is required. The Harvester load balancer controller allocates an IP for the load balancer service according to the IP pool selection policy. You can create IP pools using either the Harvester UI or the Rancher UI. For more information, see Best Practices.
Starting with Rancher v2.15.1, you can select a VM network when creating a
LoadBalancerservice using the UI. This enables explicit binding of the load balancer to the correct network interface. If you do not select a VM network(specifically, thecloudprovider.harvesterhci.io/networkis empty), the load balancer controller automatically determines the network to be used.On earlier Rancher versions (v2.12.x, v2.13.x, and v2.14.x), you can achieve the same result by adding the following annotations to the
Servicemanifest:cloudprovider.harvesterhci.io/ipam: "ippool"cloudprovider.harvesterhci.io/network: "default/mgmt-vlan1"
noteThe remote Harvester version needs to be v1.9.0 or higher to support the customized
cloudprovider.harvesterhci.io/networkusage on Harvester-cloud-provider.When a guest cluster uses multiple networks, or when multiple guest clusters with distinct networks share a single namespace, configuring the correct network parameters is critical. For details on how the system automatically determines the network, refer to Guest Cluster Load Balancer Network Resolution.
-
Share IP: When creating a new load balancer service, you can re-utilize an existing load balancer service IP. The new service is referred to as a secondary service, while the currently chosen service is the primary one. To specify the primary service in the secondary service, you can add the annotation
cloudprovider.harvesterhci.io/primary-service: $primary-service-name. However, there are two known limitations:- Services that share the same IP address can't use the same port.
- Secondary services cannot share their IP with additional services.
-
Modifying the
IPAMmode isn't allowed. You must create a new service if you intend to change theIPAMmode. -
Refer to Guest Cluster LoadBalancer IP Leaks with Multiple Cloud Providers if you encounter leftover
LoadBalancerobjects when deleting services in environments with multiple cloud providers.
Asymmetric Network Topology
The network dropdown list on the UI displays only networks assigned to the exact same interface position across all cluster nodes.
Example:
| Network-Interface Mapping | UI Behavior | Node A | Node B | Displayed Networks |
|---|---|---|---|---|
| Identical mapping across all nodes | All networks are displayed | enp1s0 → mgmtenp2s0 → net-101 | enp1s0 → mgmtenp2s0 → net-101 | mgmt and net-101 |
| Network in different interface positions across nodes | Network is hidden | enp1s0 → mgmtenp2s0 → net-101 | enp1s0 → mgmtenp2s0 → net-102enp3s0 → net-101 | mgmt |
| Network absent on some nodes | Network is hidden | enp1s0 → mgmt | enp1s0 → mgmtenp2s0 → net-101 | mgmt |
| Swapped interface mapping order | Only matching networks are displayed | enp1s0 → mgmtenp2s0 → net-101enp3s0 → net-102 | enp1s0 → mgmtenp2s0 → net-102enp3s0 → net-101 | mgmt |
If VM network interfaces are attached in different orders across nodes, reconfigure the network interface order in the machine pool settings to allow Rancher and RKE2 to reprovision the guest cluster virtual machines.
Limitations
-
Default load balancer provider:
kube-vipis selected by default on the UI. If you disablekube-vipand use an alternative provider, refer to that provider's documentation for configuration instructions. -
Pre-condition for secondary network load balancing: The secondary network interface of each guest cluster node must have a valid IP address and route. Otherwise, the load balancer cannot route traffic. Verifying this interface configuration should be the first step when troubleshooting issues related to secondary network load balancers.
-
Load balancer network changes: Delete and recreate the load balancer service if you require changes to the load balancer network. Modifying the network annotation on an existing service may cause unexpected behavior and is not supported.
-
Incorrect network annotation: The load balancer may fail to obtain an IP address or become unreachable if you directly configure the
cloudprovider.harvesterhci.io/networkannotation and specify a network that is either invalid or exhibits an asymmetric topology. Because webhook validation is not performed on this annotation, select the target network on the UI instead.
Secondary network load balancer traffic isolation: Incoming traffic arrives on the secondary network interface and undergoes NAT to the pod network. Consequently, only workloads listening on the pod network can receive load balancer traffic. Workloads configured to listen exclusively on the secondary network interface cannot. Full traffic isolation is currently unsupported.
Health checks
Beginning with Harvester cloud provider v0.2.0, additional health checks of the LoadBalancer service within the guest Kubernetes cluster are no longer necessary. Instead, you can configure liveness and readiness probes for your workloads. Consequently, any unavailable pods will be automatically removed from the load balancer endpoints to achieve the same desired outcome.
Automatic Cleanup
Available as of Harvester v1.8.0
When a guest cluster with the harvester-cloud-provider enabled is deleted, Harvester automatically performs a cleanup of all associated LoadBalancer resources on the host cluster.
Key benefits:
-
Resource Management: Prevents "orphaned" LoadBalancers from consuming IP addresses after a guest cluster is gone.
-
Zero Manual Intervention: The lifecycle of the LoadBalancer is tied directly to the lifecycle of the guest Kubernetes cluster.
Known Issue: Stale Harvester CloudCredentials after re-registering cluster
If a Harvester cluster is removed from Rancher and later re-registered, Rancher may retain stale Harvester CloudCredentials that reference the previous management cluster ID.
This can cause downstream cluster provisioning (for example, RKE2 or K3s clusters) to fail with errors such as:
clusters.management.cattle.io "<old-cluster-id>" not found
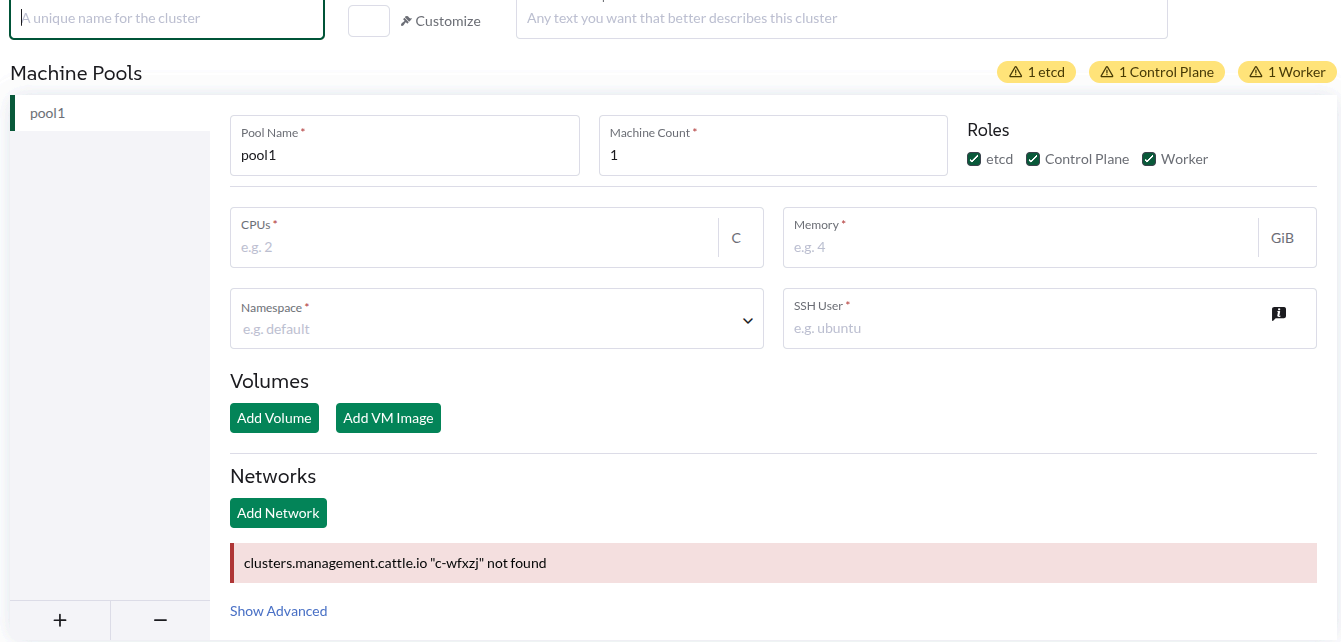
The existing CloudCredential still references the old Harvester cluster ID, which no longer exists after re-registration.
Workaround
- Go to Rancher > Cluster Management > Cloud Credentials.
- Delete the old Harvester CloudCredential associated with the removed cluster.
- Create a new Harvester CloudCredential.
- Retry provisioning the downstream cluster.
Related issue: #53642