VM Network
Harvester provides three types of networks for virtual machines (VMs), including:
- Management Network
- VLAN Network
- Untagged Network
The management network is usually used for VMs whose traffic only flows inside the cluster. If your VMs need to connect to the external network, use the VLAN network or untagged network.
Available as of v1.0.1
Harvester also introduced storage networking to separate the storage traffic from other cluster-wide workloads. Please refer to the storage network document for more details.
Management Network
Harvester uses Canal as its default management network. It is a built-in network that can be used directly from the cluster.
By default, the management network IP of a VM can only be accessed within the cluster nodes, and the management network IP will change after the VM reboot. This is non-typical behaviour that needs to be taken note of since VM IPs are expected to remain unchanged after a reboot.
However, you can leverage the Kubernetes service object to create a stable IP for your VMs with the management network.
How to use management network
Since the management network is built-in and doesn't require extra operations, you can add it directly when configuring the VM network.
mgmt uses the default MTU value 1500 if you do not specify a value other than 0 or 1500 in the install.management_interface setting during installation. However, the network interfaces of virtual machines connected to mgmt have an MTU value of 1450. This is because Harvester uses the Calico and Flannel CNI, which has an overhead of 50 bytes per packet, to carry the in-cluster overlay network.

If any of your workloads involve transmission of network traffic, you must specify the appropriate MTU value for the affected VM network interfaces and bridges.
VLAN Network
The Harvester network-controller leverages the multus and bridge CNI plugins to implement its customized L2 bridge VLAN network. It helps to connect your VMs to the host network interface and can be accessed from internal and external networks using the physical switch.
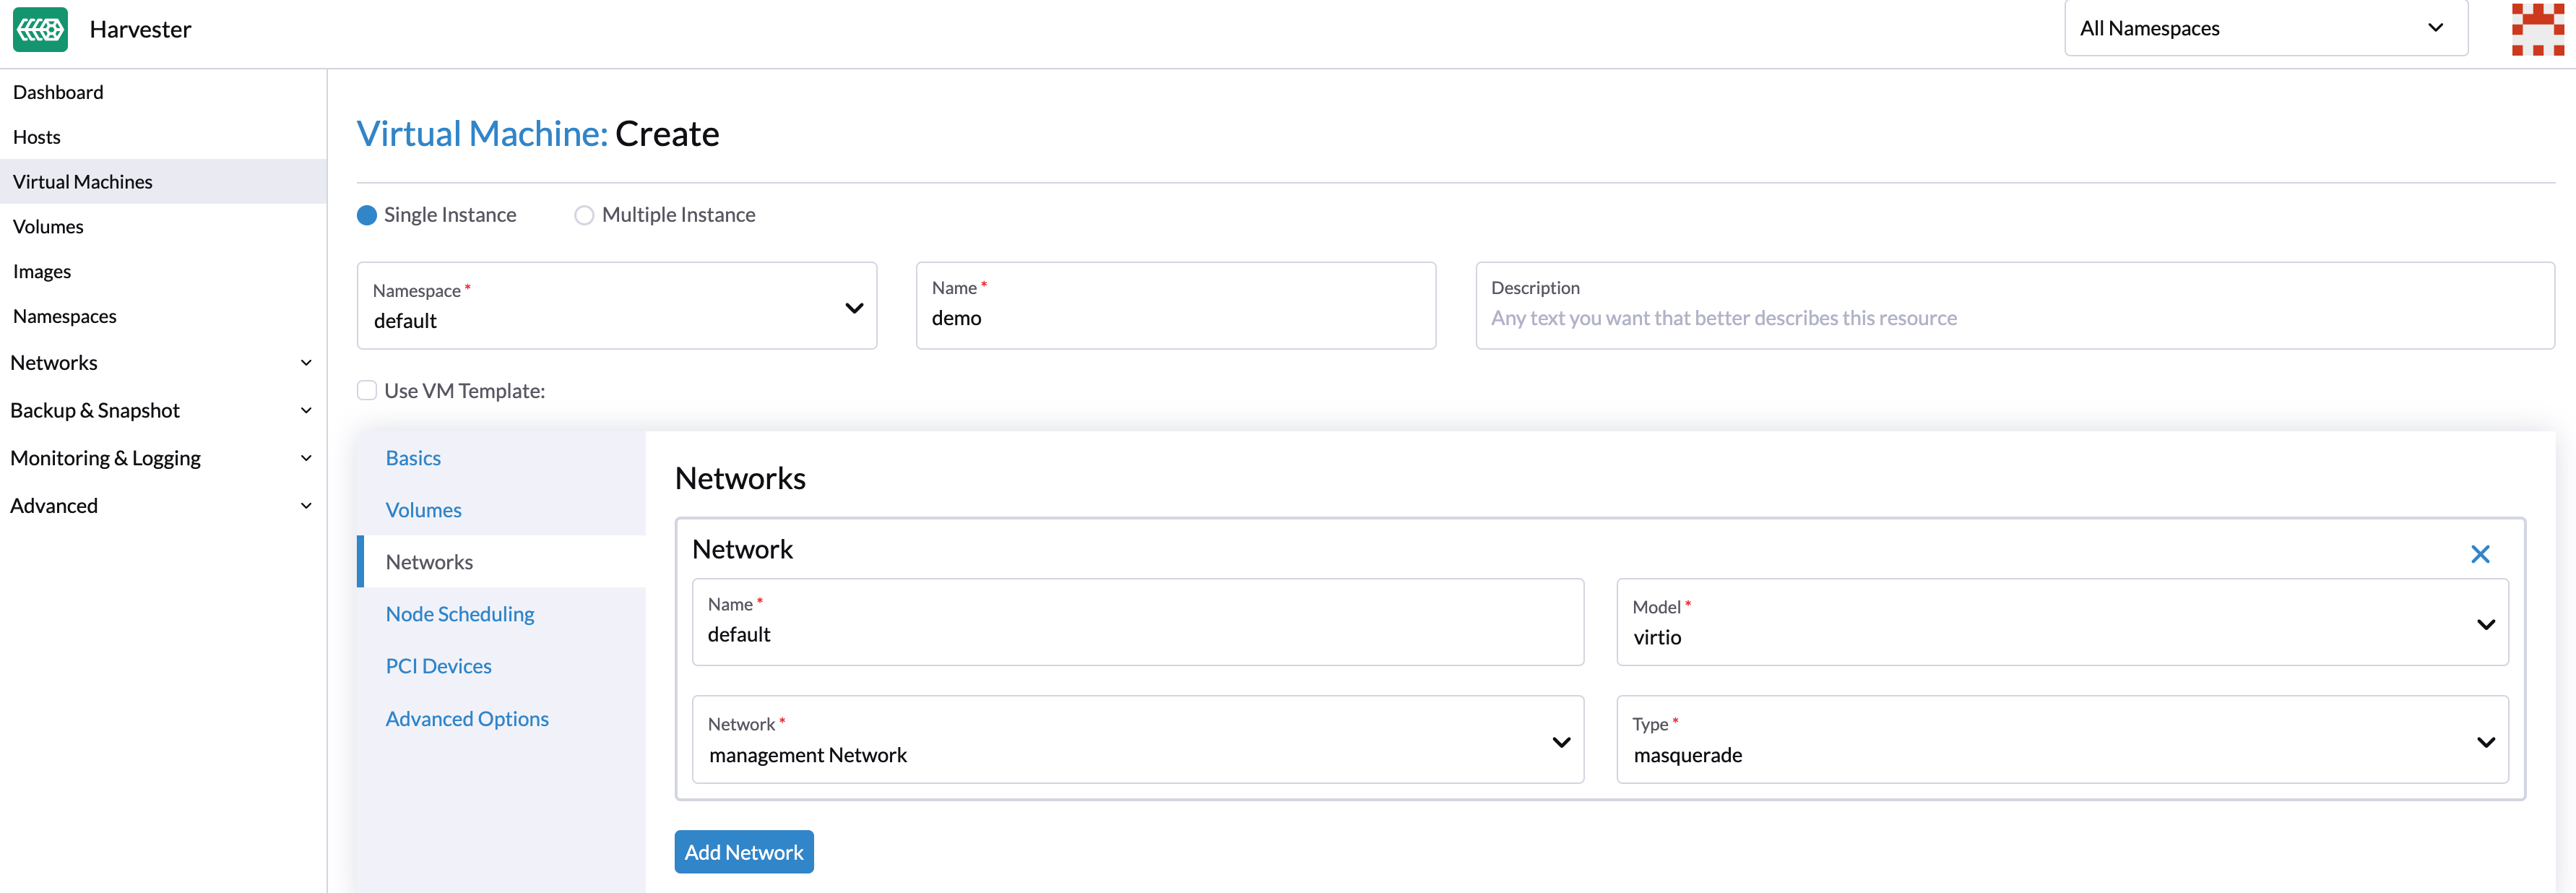
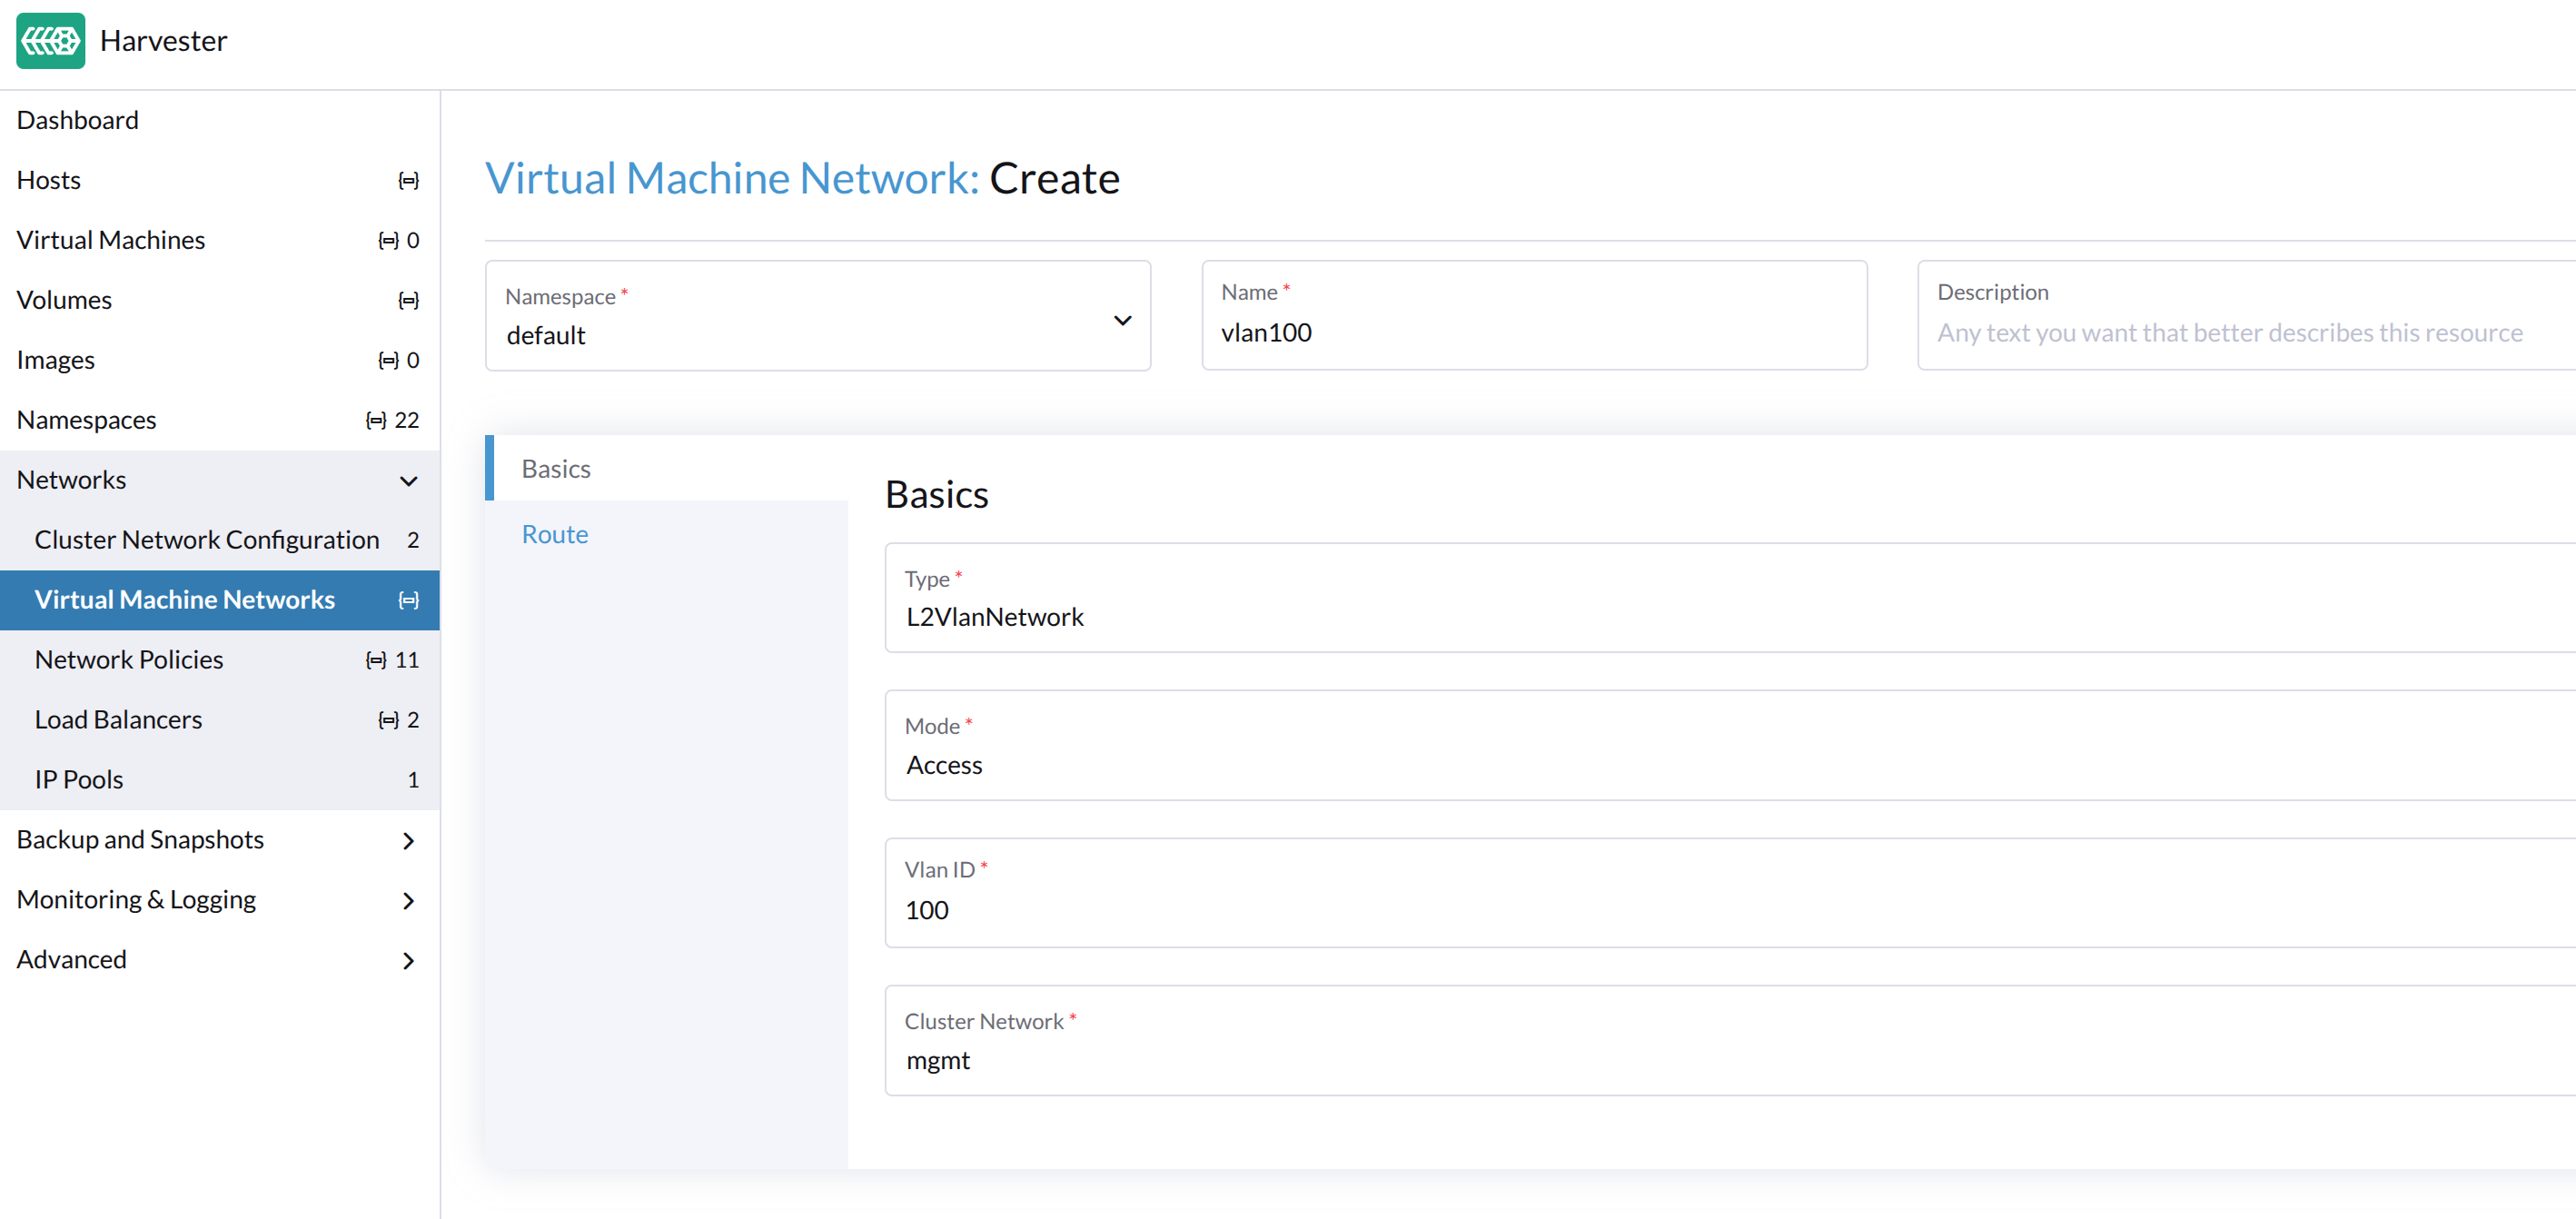
Create a VM Network
-
Go to Networks > VM Networks.
-
Select Create.
-
Configure the following settings:
- Namespace
- Name
- Description (optional)
-
On the Basics tab, configure the following settings:
- Type: Select L2VlanNetwork.
- Mode: Select Access.
- Vlan ID
- Cluster Network
Virtual machine networks inherit the MTU from the network configuration of the associated cluster network. This ensures that virtual machines benefit from the best possible hardware performance. You cannot set a different MTU for virtual machine networks.
When you change the MTU on the physical NICs of cluster network uplink, the newly created virtual machine networks automatically inherit the new MTU. The existing virtual machine networks are also updated automatically. For more information, see Change the MTU of a Network Configuration with an Attached Storage Network and Change the MTU of a Network Configuration with No Attached Storage Network.
The Harvester webhook does not allow you to directly change the MTU on VM networks.
-
On the Route tab, select an option and then specify the related IPv4 addresses.
- Auto(DHCP): The Harvester network controller retrieves the CIDR and gateway addresses from the DHCP server. You can specify the DHCP server address.
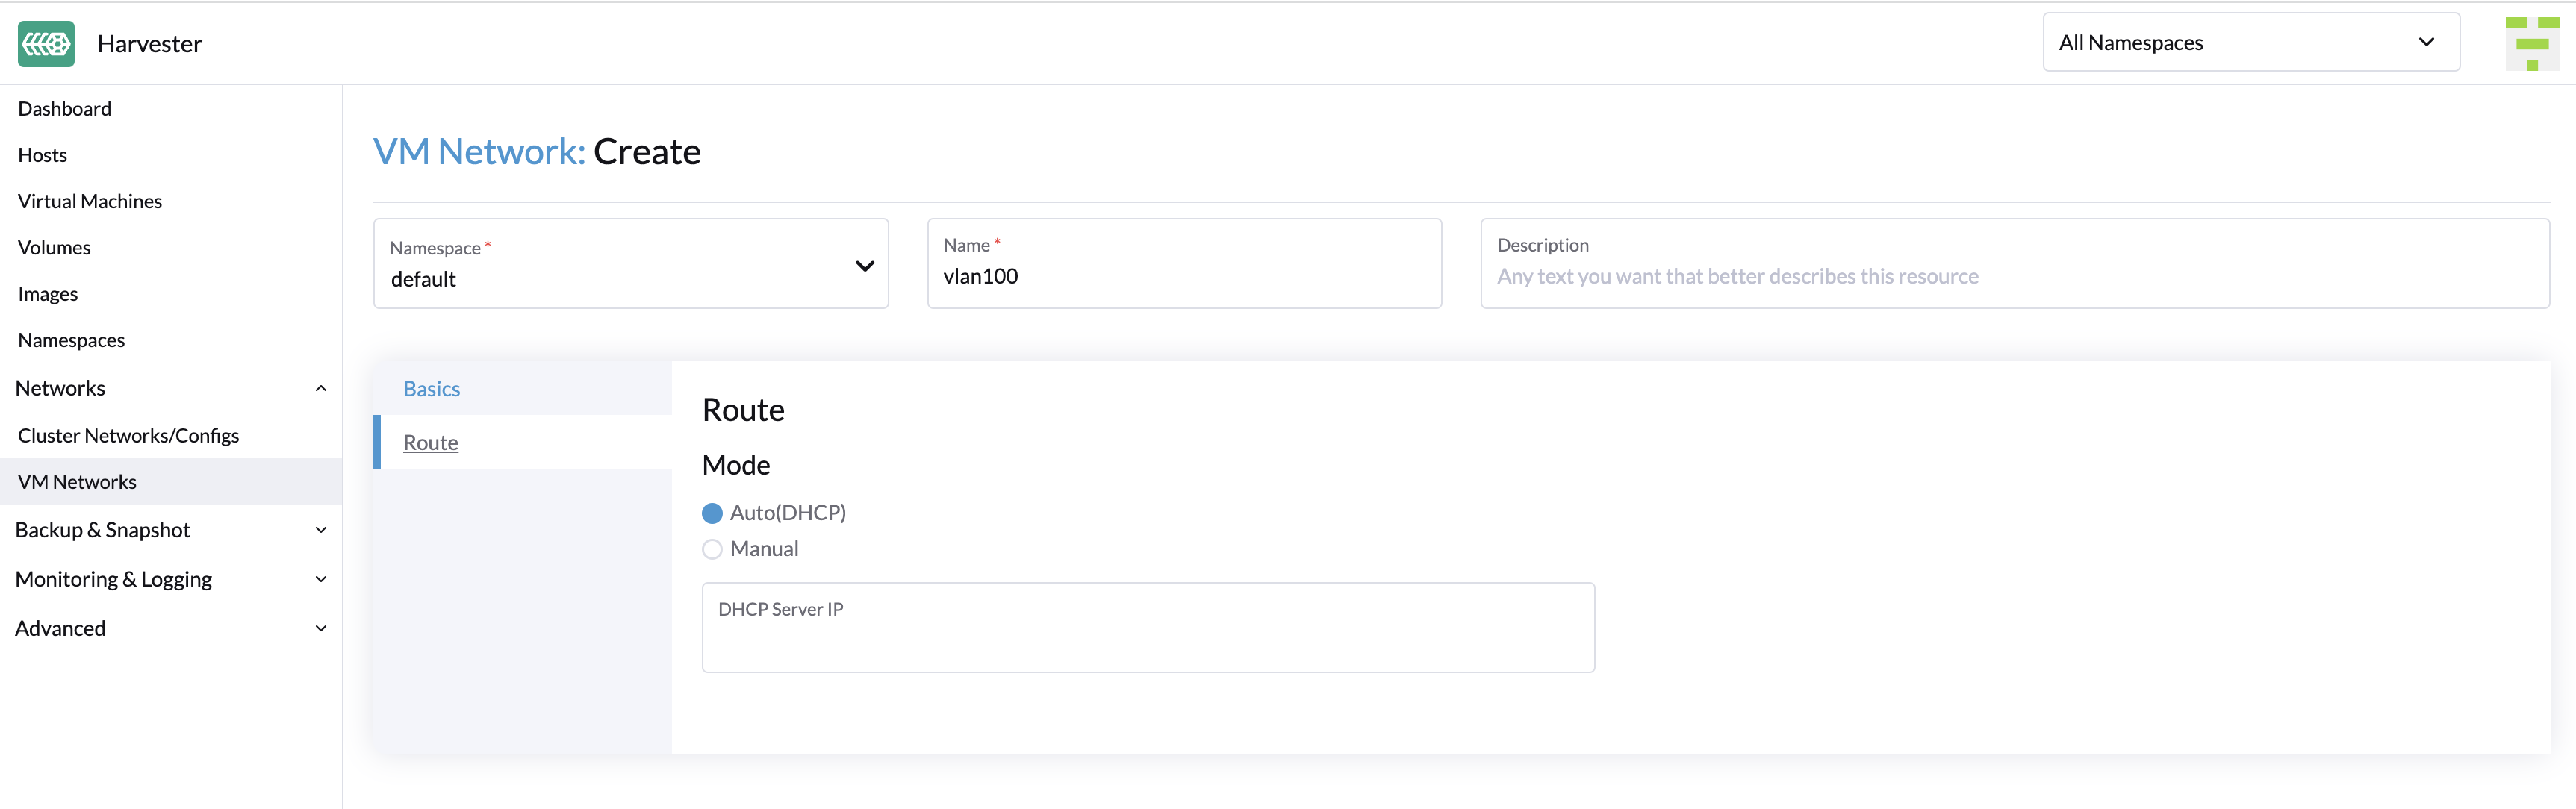
- Manual: Specify the CIDR and gateway addresses.
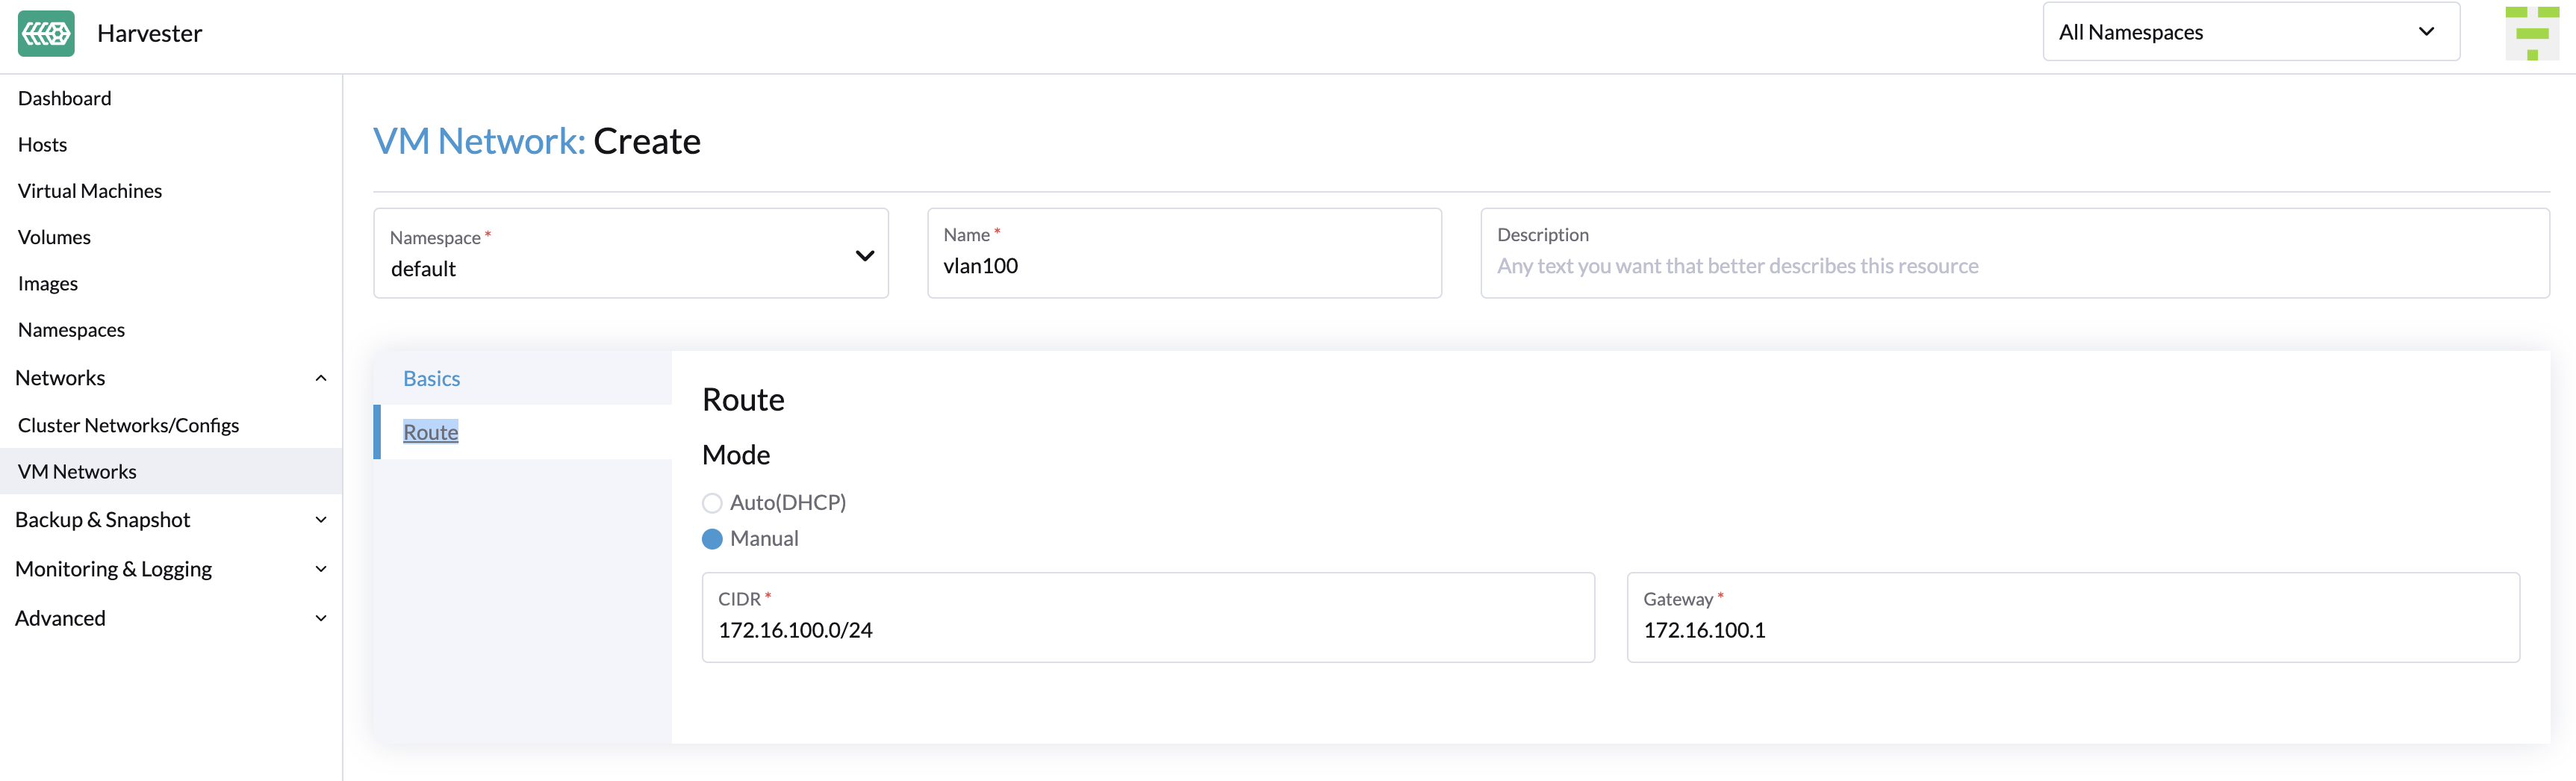 important
Harvester uses the information to verify that all nodes can access the VM network you are creating. If that is the case, the Network connectivity column on the VM Networks screen indicates that the network is active. Otherwise, the screen indicates that an error has occurred.
Create a VM with VLAN Network
You can now create a new VM using the VLAN network configured above:
- Click the Create button on the Virtual Machines page.
- Specify the required parameters and click the Networks tab.
- Either configure the default network to be a VLAN network or select an additional network to add.
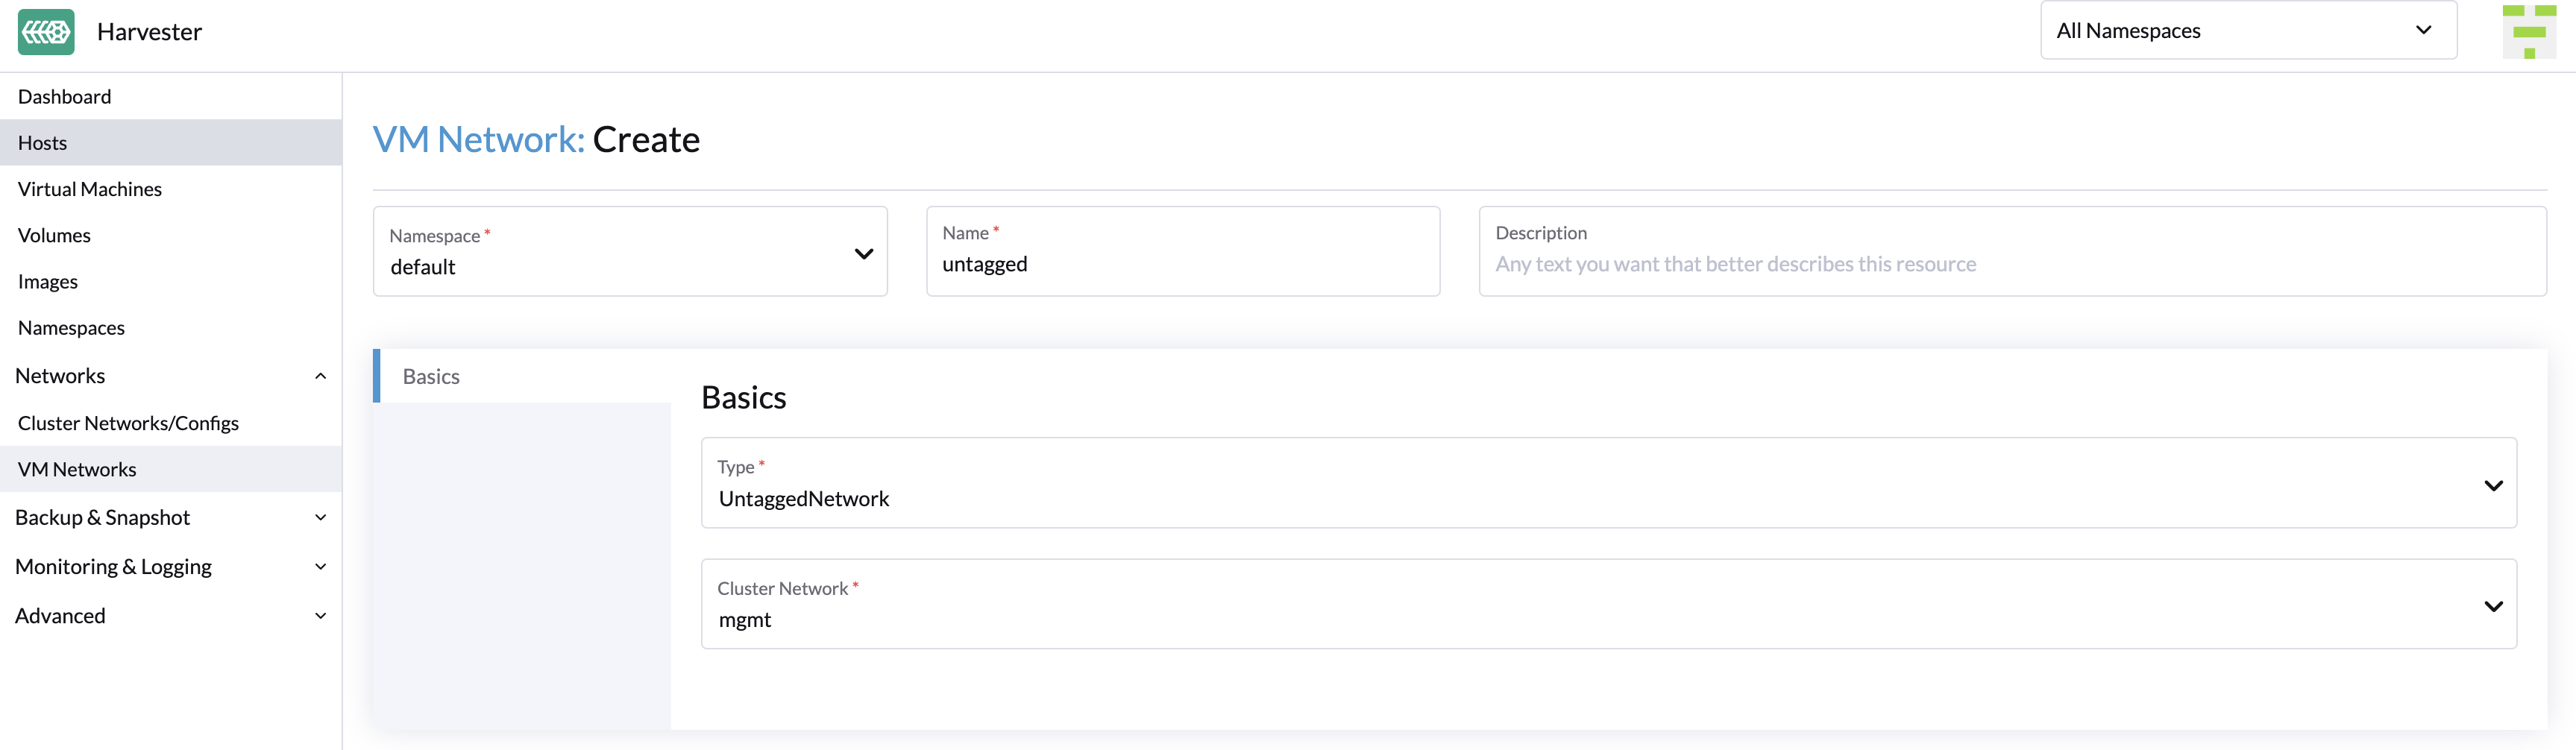
Untagged Network
As is known, the traffic under a VLAN network has a VLAN ID tag and we can use the VLAN network with PVID (default 1) to communicate with any normal untagged traffic. However, some network devices may not expect to receive an explicitly tagged VLAN ID that matches the native VLAN on the switch the uplink belongs to. That's the reason why we provide the untagged network.
How to use untagged network
The usage of untagged network is similar to the VLAN network.
To create a new untagged network, go to the Networks > VM Networks page and click the Create button. You have to specify the name, select the type Untagged Network and choose the cluster network.
Starting from Harvester v1.1.2, Harvester supports updating and deleting VM networks. Make sure to stop all affected VMs before updating or deleting VM networks.
VLAN Trunk Network
Available as of v1.7.0
-
Go to Networks > VM Networks.
-
Select Create.
-
Configure the following settings:
- Namespace
- Name
- Description (optional)
-
On the Basics tab, configure the following settings:
- Type: Select L2VlanNetwork.
- Mode: Select Trunk.
- Minimum VLAN ID: Specify the starting VLAN ID of a range.
- Maximum VLAN ID: Specify the ending VLAN ID of a range.
- Cluster Network: Select the associated cluster network.
noteYou can specify multiple, overlapping VLAN ID ranges.
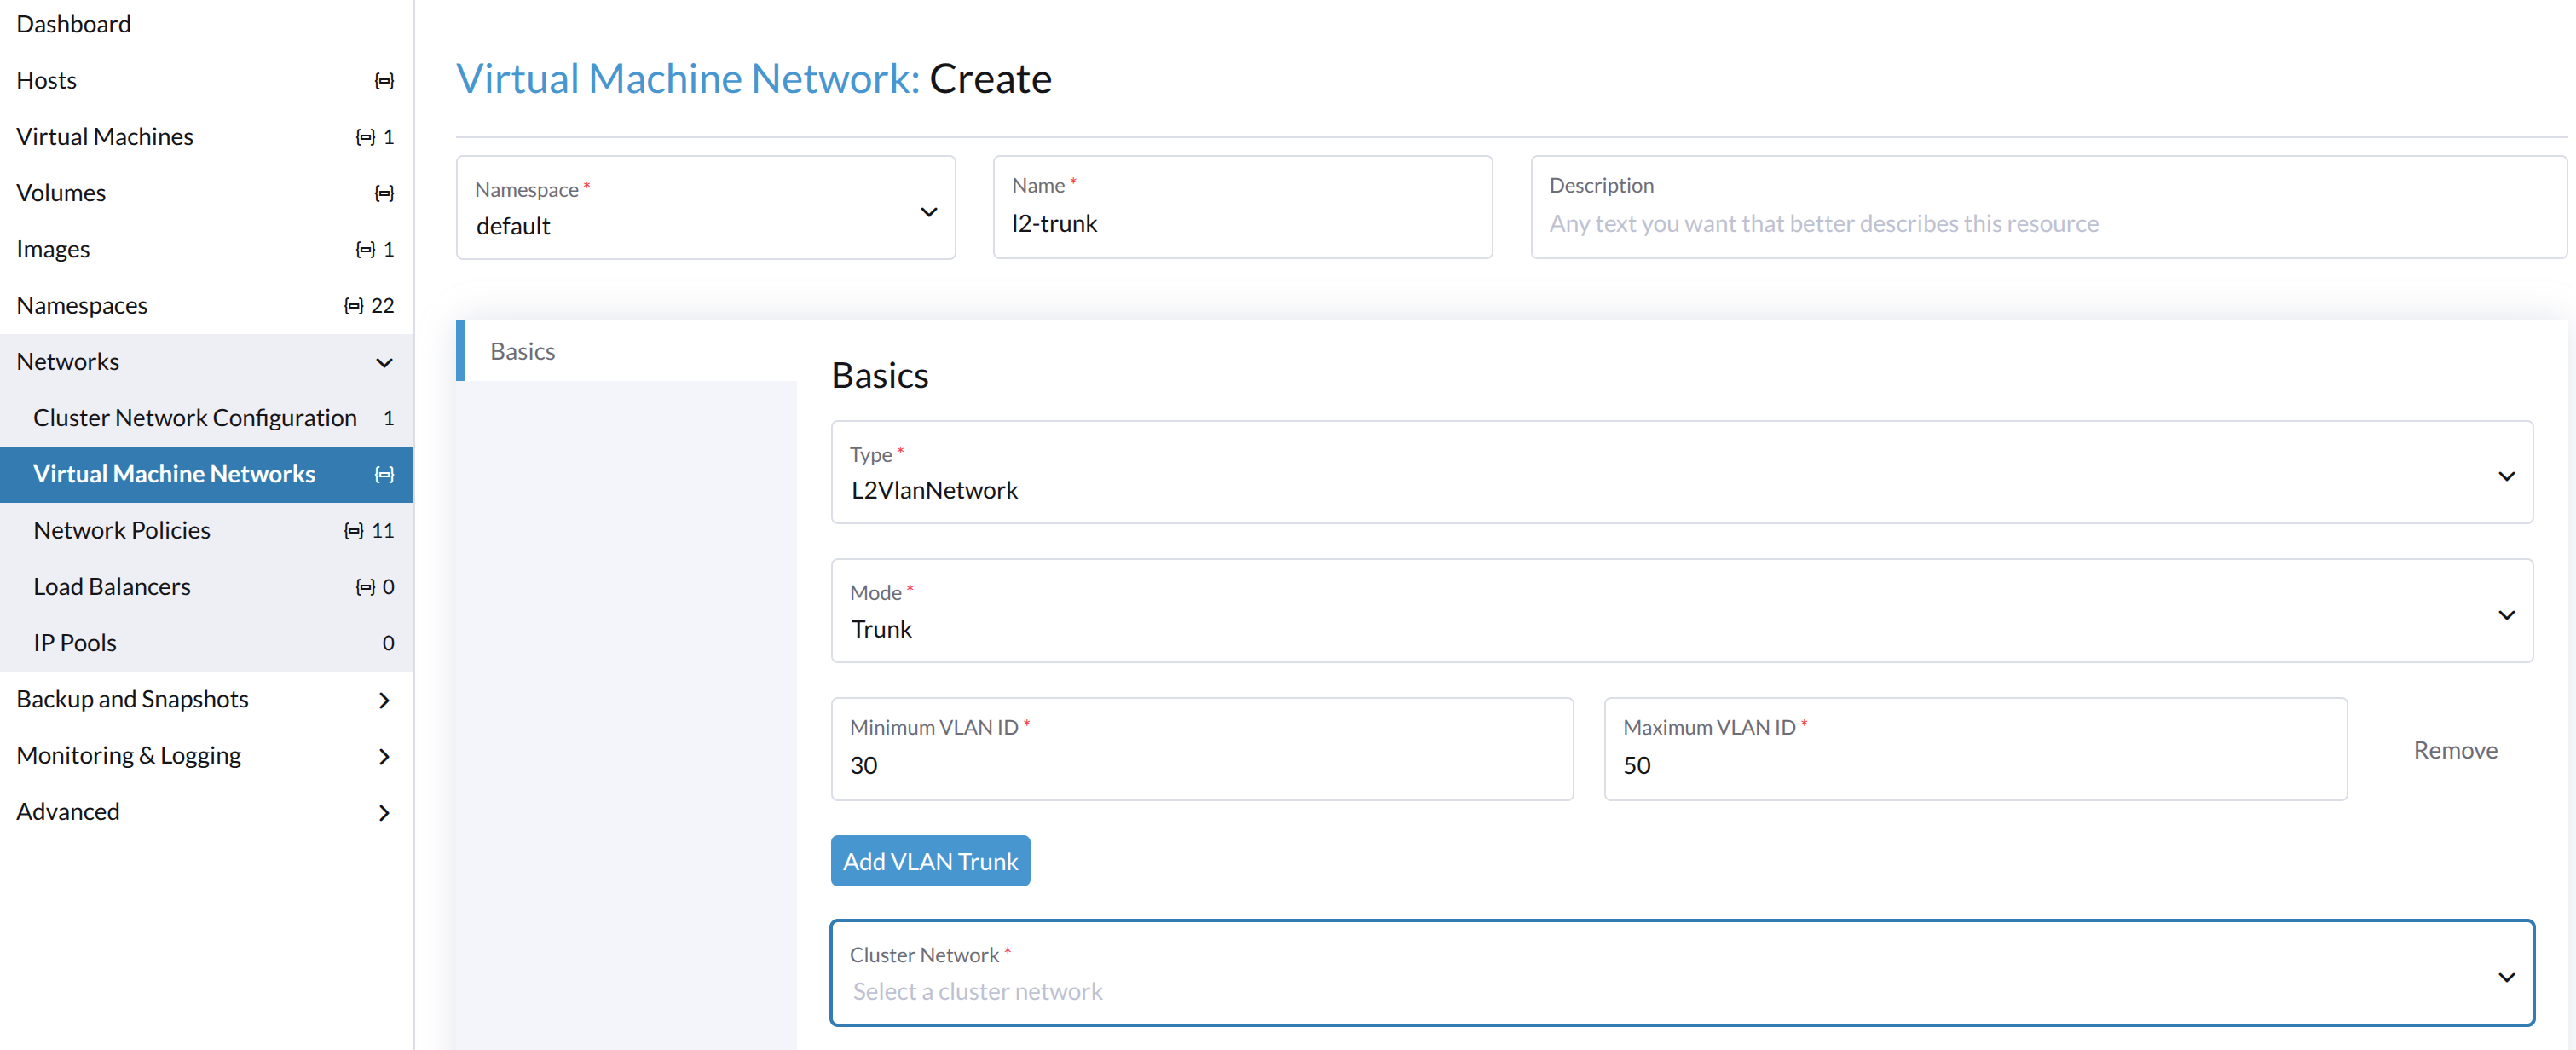
When a virtual machine is attached to a VLAN trunk network, the guest operating system and applications are allowed to send and receive packets tagged with any of the VLAN IDs within the specified range.
You can change the network type only when all attached virtual machines are stopped.
When you change the network type from VLAN to VLAN Trunk or Untagged, the settings you configured on the Route tab are removed. You must reconfigure these settings if you decide to change the network type back to VLAN.
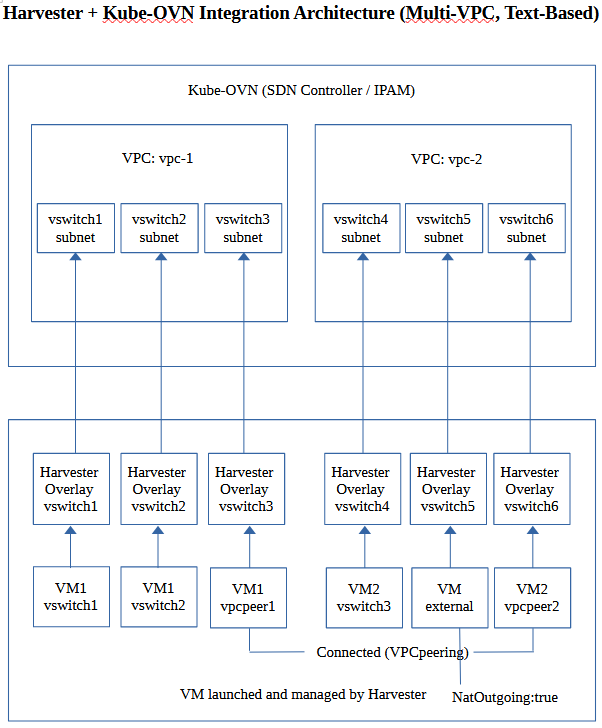
Overlay Network (Experimental)
Available as of v1.6.0
The Harvester network-controller leverages Kube-OVN to create an OVN-based virtualized network that supports advanced SDN capabilities such as virtual private clouds (VPCs) and subnets for virtual machine workloads.
An overlay network represents a virtual layer 2 switch that encapsulates and forwards traffic between virtual machines. This network can be linked to the subnet created in the VPC so that virtual machines can access the internal virtualized network and also reach the external network. However, the same virtual machines cannot be accessed by external networks such as VLANs and untagged networks because of current VPC limitations.
Create an Overlay Network
-
Go to Networks > Virtual Machine Networks, and then click Create.
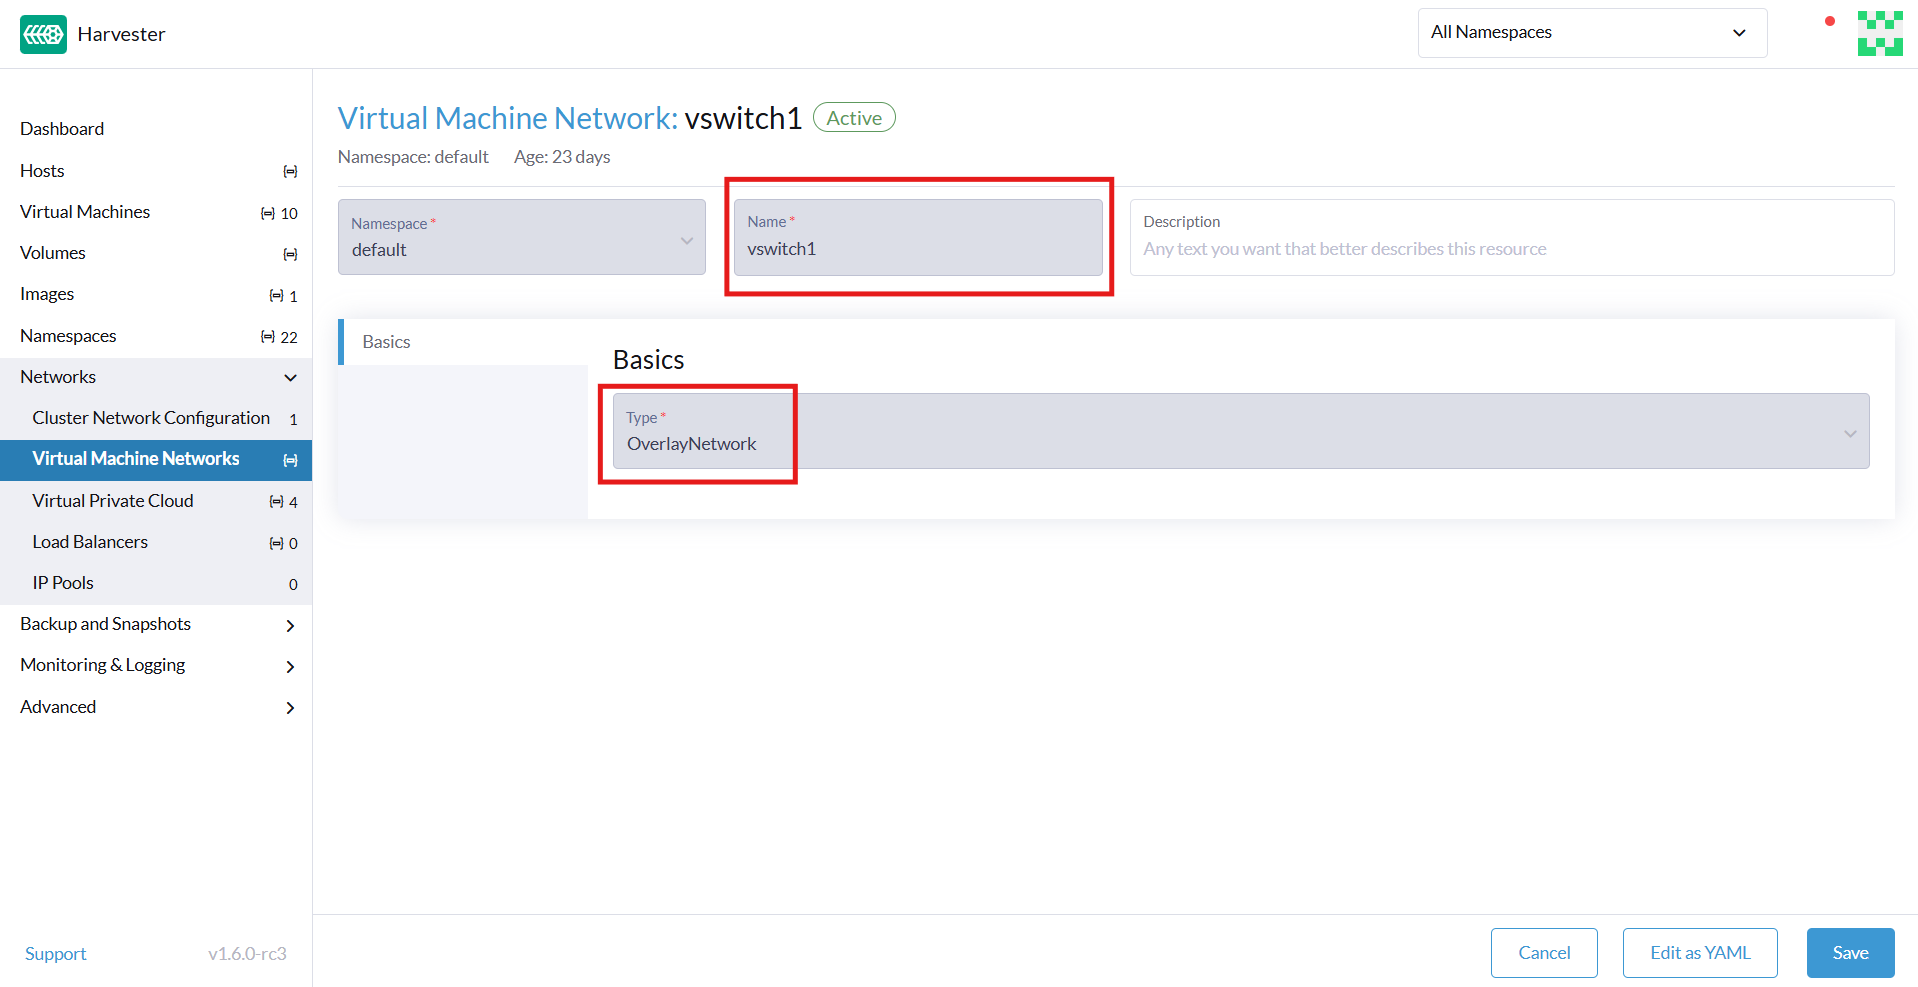
-
On the Virtual Machine Network:Create screen, specify a name for the network.
-
On the Basics tab, select
OverlayNetworkas the network type. -
Click Create.
Limitations
The overlay network implementation in Harvester v1.6 has the following limitations:
-
Overlay networks that are backed by Kube-OVN can only be created on
mgmt(the built-in management network). -
By default, the
enableDHCPanddhcpV4Optionssettings are not configured, so no default route exists on virtual machines that are attached to a Kube-OVN overlay subnet. Attempts to access external destinations fail until the default route is correctly configured on the guest operating system. You can perform either of the following workarounds:-
Manually add the subnet’s gateway IP as the virtual machine's default route.
-
Use the
managedTapbinding: Edit the YAML configuration of the attached subnet, and verify that the field.spec.enableDHCPis set totrue. Next, edit the YAML configuration of the virtual machine, and modify the interface definition to use binding.interfaces:
- binding:
name: managedtap
model: virtio
name: default
-
-
Kube-OVN "native" load balancers (LBs) are not integrated yet because this requires fundamental changes to the upstream codebase. Kube-OVN currently functions as the primary CNI plug-in for each cluster.
-
Underlay networking is still unavailable. Consequently, you cannot directly map a subnet to a physical network, and external hosts cannot reach virtual machines that live on an overlay subnet.
-
The
natOutgoingfield is set tofalseby default in all subnets (in both default and custom VPCs). Only subnets that belong to the default VPC can reach the internet after you change the value totrueand configure the default route. Subnets created in custom VPCs are unable to access the internet withoutVpcNatGatewaysupport. -
The static IP in cloud-init appears to be ignored for overlay NICs. In practice, the static IP works only if it matches the exact address Kube-OVN has reserved for the virtual machine. Any other value breaks connectivity.
-
When multiple NICs are attached and the overlay NIC is not the primary interface, you must manually initialize the overlay NIC within the guest operating system (IP link setup) and run the DHCP client (dhclient) command to obtain the NIC's IP address.
-
Peering only works between custom VPCs. Attempts to establish a peering connection between the default VPC and a custom VPC will fail.
-
Virtual machine load balancers, which are provided by the Harvester Load Balancer, are not compatible with Kube-OVN overlay networks. You can only use these load balancers with VLAN networks.
-
Cluster load balancers, which are provided by the Harvester Cloud Provider and the Harvester Load Balancer, do not function properly with guest clusters on Kube-OVN overlay networks. The compatibility issues are caused by the following:
-
PoolIPAM: Kube-OVN is unaware that the load balancer's front-end IP addresses are allocated from pools managed by the Harvester Load Balancer. This can lead to IP address conflicts. -
DHCPIPAM: Dynamic IP address allocation does not work even when the DHCP service is enabled for the Kube-OVN subnet. The lease record is managed on the control plane by Kube-OVN. Integration enhancements are required to allow the affected components to function properly together.
-
-
Rancher integration (specifically, downstream cluster creation using the Harvester Node Driver) only works on Kube-OVN overlay networks within the default VPC. To ensure successful cluster creation, you must perform the following actions:
-
Enable the DHCP service for the overlay network. You must set a valid default gateway.
-
Manually update the underlying virtual machine spec to adapt the
managedTapbinding interface for the downstream cluster during the cluster provision period.
-