Upgrade from v1.4.0 to v1.4.1
General Information
An Upgrade button appears on the Dashboard screen whenever a new Harvester version that you can upgrade to becomes available. For more information, see Start an upgrade.
For air-gapped environments, see Prepare an air-gapped upgrade.
Check the disk usage of the operating system images on each node before starting the upgrade. To do this, access the node via SSH and run the command du -sh /run/initramfs/cos-state/cOS/*.
Example:
# du -sh /run/initramfs/cos-state/cOS/*
1.7G    /run/initramfs/cos-state/cOS/active.img
3.1G    /run/initramfs/cos-state/cOS/passive.img
If passive.img (which represents the previously installed Harvester v1.4.0 image) consumes 3.1G of disk space, run the following commands using the root account:
# mount -o remount,rw /run/initramfs/cos-state
# fallocate --dig-holes /run/initramfs/cos-state/cOS/passive.img
# mount -o remount,ro /run/initramfs/cos-state
passive.img is converted to a sparse file, which should only consume 1.7G of disk space (the same as active.img). This ensures that each node has enough free space, preventing the upgrade process from becoming stuck in the "Waiting Reboot" state.
Update Harvester UI Extension on Rancher v2.10.1
To import Harvester v1.4.1 clusters on Rancher v2.10.1, you must use v1.0.3 of the Rancher UI extension for Harvester.
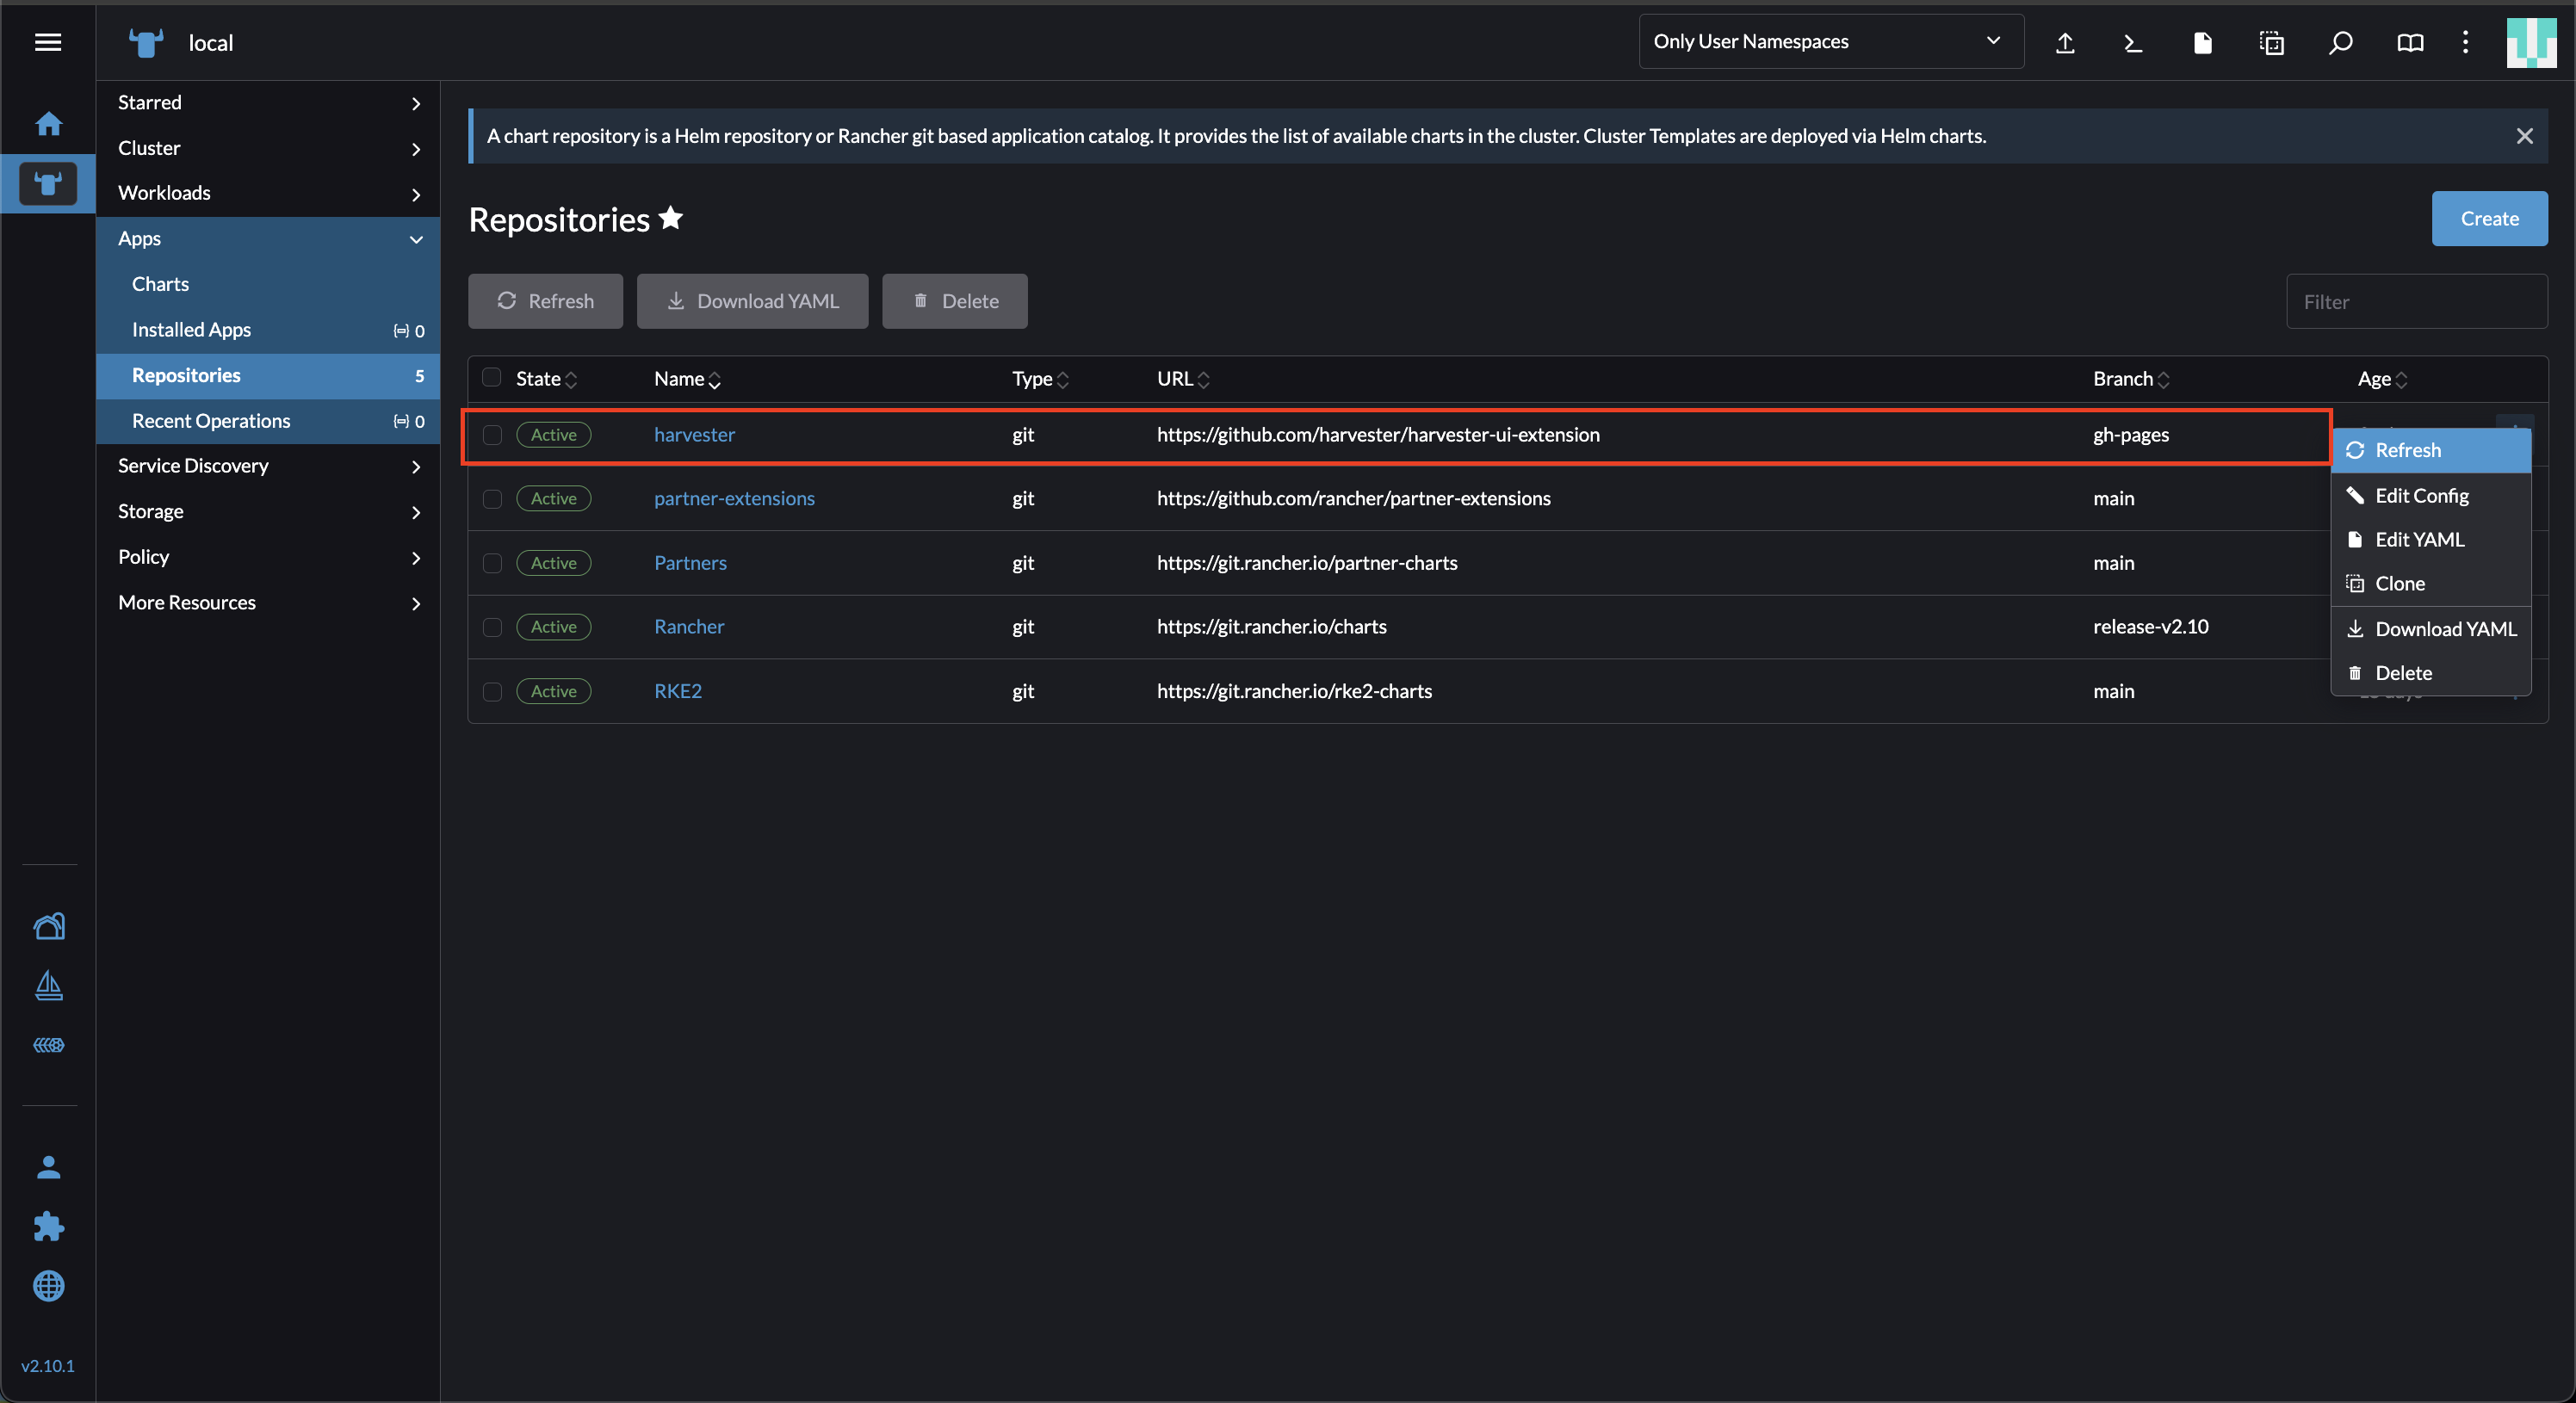
On the Rancher UI, go to local > Apps > Repositories.
Locate the repository named harvester, and then select ⋮ > Refresh. This repository has the following properties:
- URL: https://github.com/harvester/harvester-ui-extension
- Branch: gh-pages
Go to the Extensions screen.
Locate the extension named Harvester, and then click Update.
Select version 1.0.3, and then click Update.
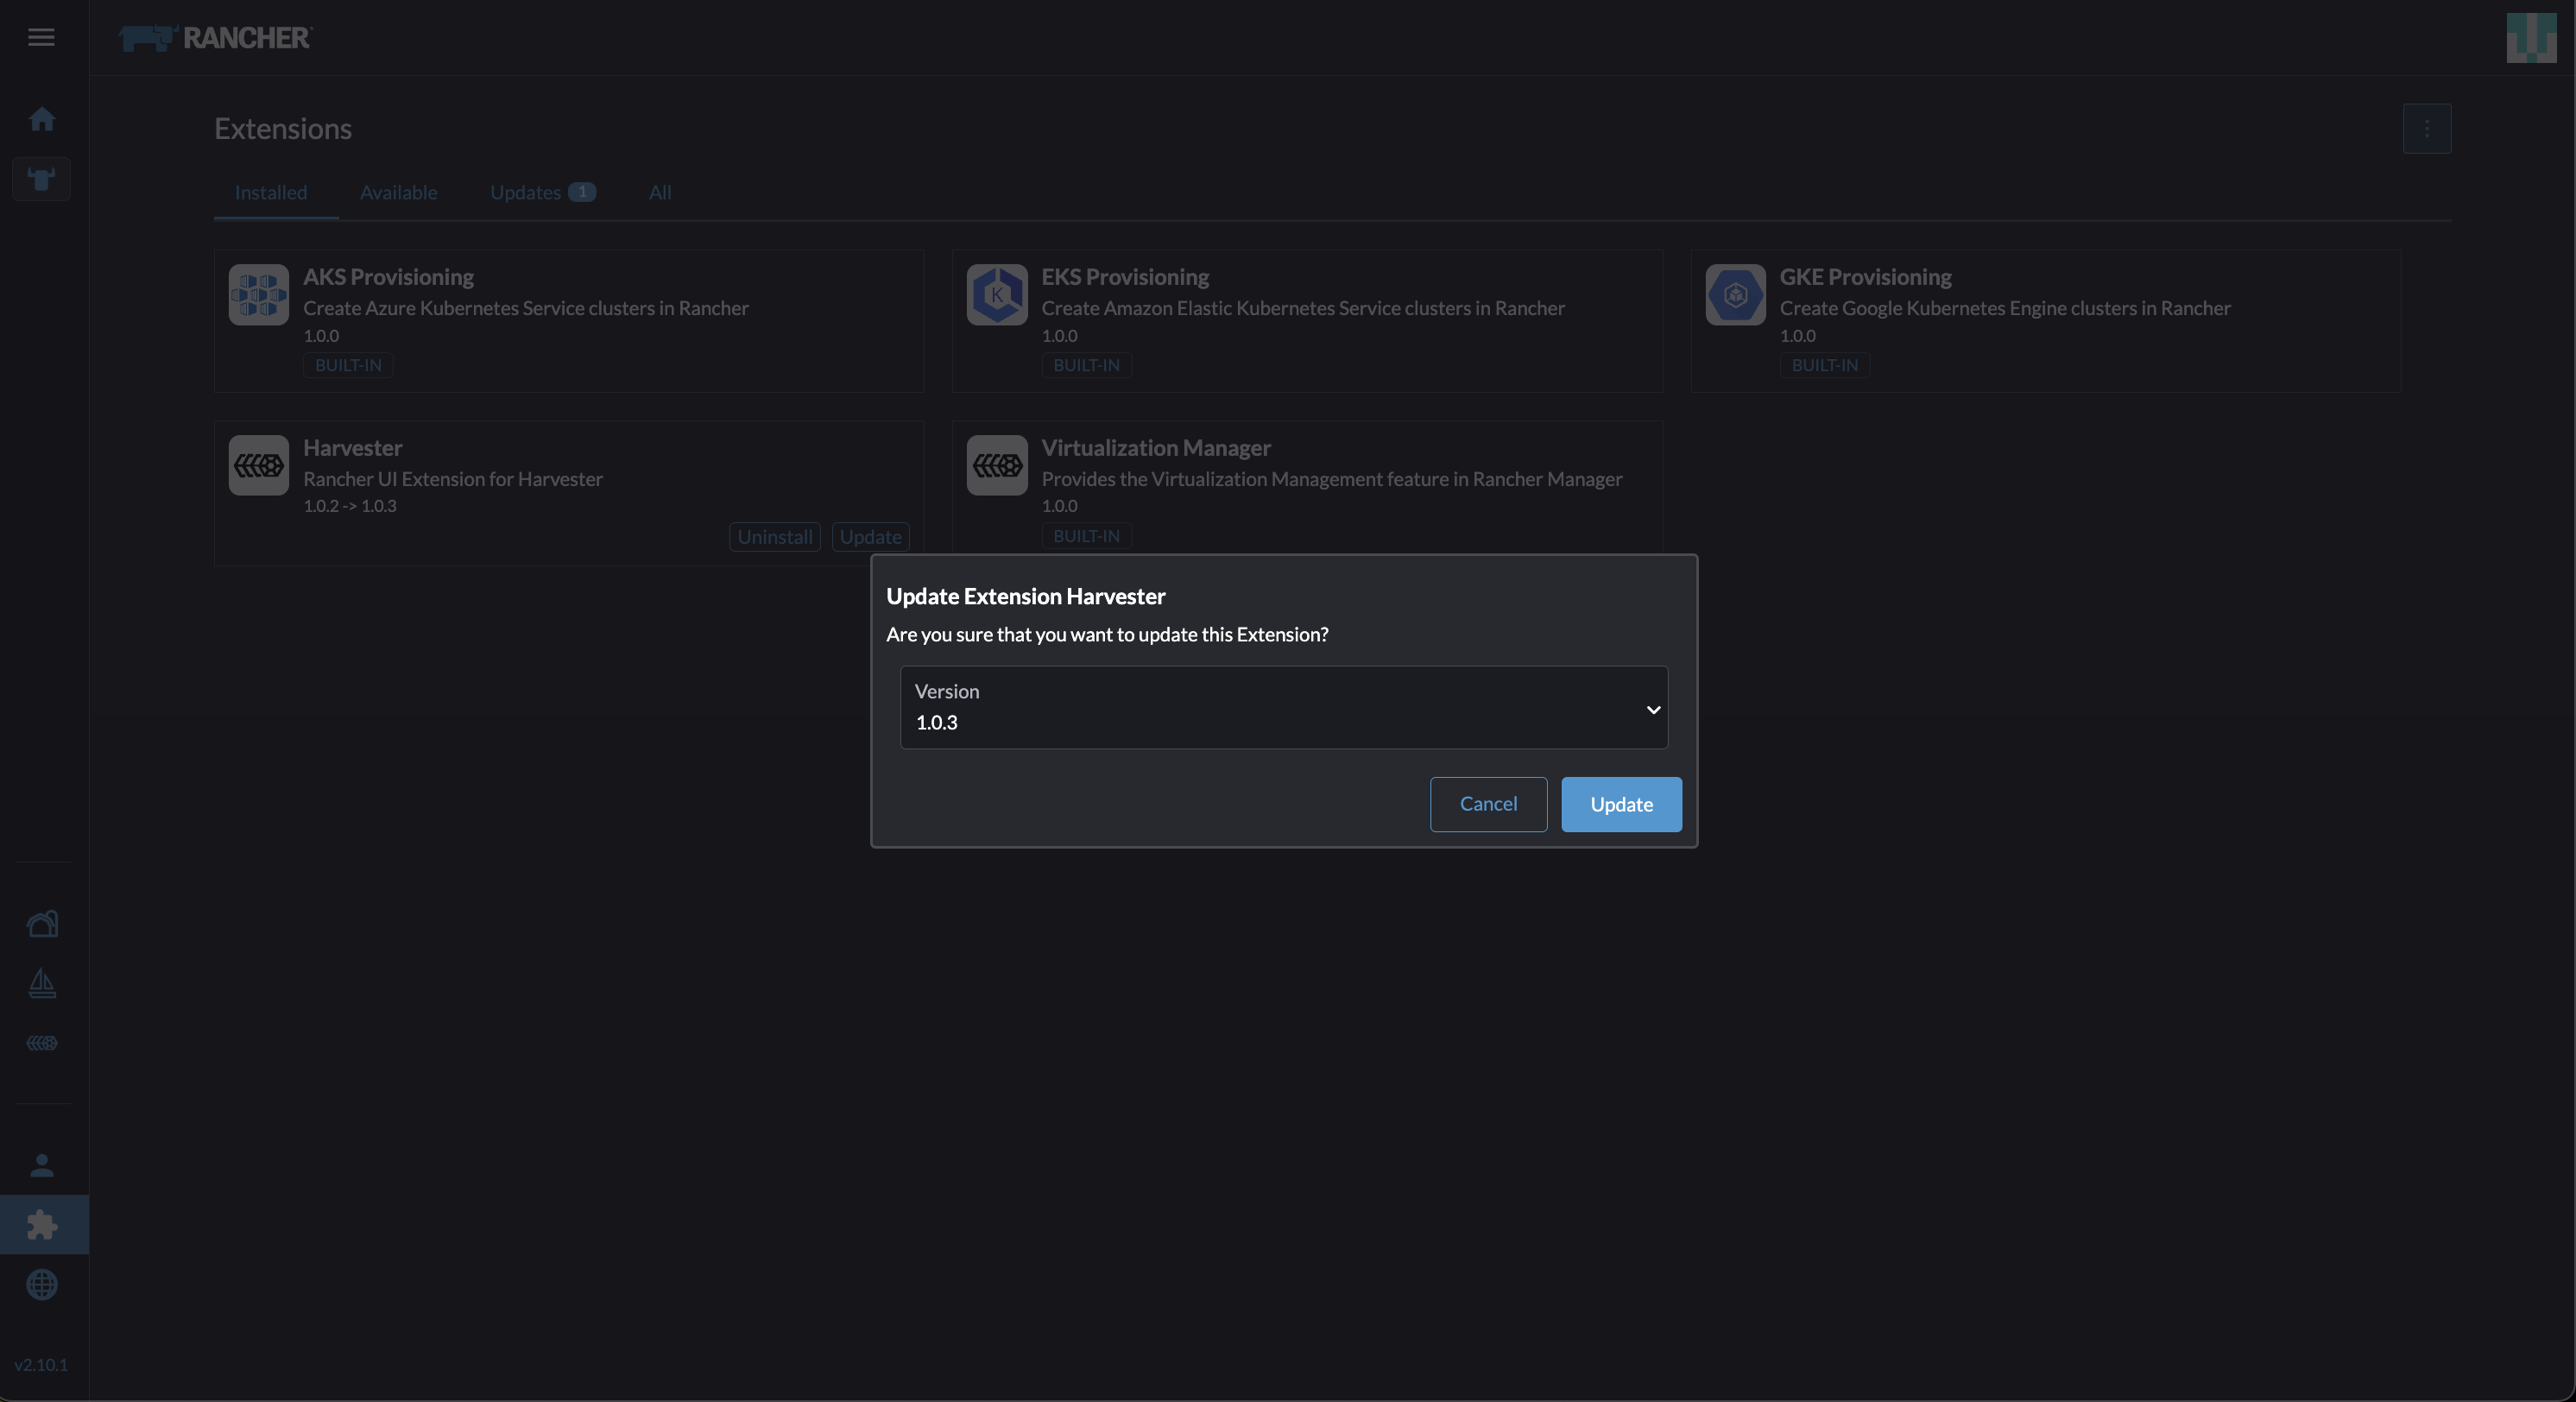
Allow some time for the extension to be updated, and then refresh the screen.
The Rancher UI displays an error message after the extension is updated. The error message disappears when you refresh the screen.
This issue, which exists in Rancher v2.10.0 and v2.10.1, will be fixed in v2.10.2.
Related issues: #7234 and #107
Known Issues
1. Upgrade is Stuck in the "Pre-drained" State
The upgrade process may become stuck in the "Pre-drained" state. Kubernetes is supposed to drain the workload on the node, but some factors may cause the process to stall.

A possible cause is processes related to orphan engines of the Longhorn Instance Manager. To determine if this applies to your situation, perform the following steps:
Check the name of the
instance-managerpod on the stuck node.Example:
The stuck node is
harvester-node-1, and the name of the Instance Manager pod isinstance-manager-d80e13f520e7b952f4b7593fc1883e2a.$ kubectl get pods -n longhorn-system --field-selector spec.nodeName=harvester-node-1 | grep instance-manager
instance-manager-d80e13f520e7b952f4b7593fc1883e2a 1/1 Running 0 3d8hCheck the Longhorn Manager logs for informational messages.
Example:
$ kubectl -n longhorn-system logs daemonsets/longhorn-manager
...
time="2025-01-14T00:00:01Z" level=info msg="Node instance-manager-d80e13f520e7b952f4b7593fc1883e2a is marked unschedulable but removing harvester-node-1 PDB is blocked: some volumes are still attached InstanceEngines count 1 pvc-9ae0e9a5-a630-4f0c-98cc-b14893c74f9e-e-0" func="controller.(*InstanceManagerController).syncInstanceManagerPDB" file="instance_manager_controller.go:823" controller=longhorn-instance-manager node=harvester-node-1
The
instance-managerpod cannot be drained because of the enginepvc-9ae0e9a5-a630-4f0c-98cc-b14893c74f9e-e-0.Check if the engine is still running on the stuck node.
Example:
$ kubectl -n longhorn-system get engines.longhorn.io pvc-9ae0e9a5-a630-4f0c-98cc-b14893c74f9e-e-0 -o jsonpath='{"Current state: "}{.status.currentState}{"\nNode ID: "}{.spec.nodeID}{"\n"}'
Current state: stopped
Node ID:
The issue likely exists if the output shows that the engine is not running or even the engine is not found.
Check if all volumes are healthy.
kubectl get volumes -n longhorn-system -o yaml | yq '.items[] | select(.status.state == "attached")| .status.robustness'All volumes must be marked
healthy. If this is not the case, please help to report the issue.Remove the
instance-managerpod's PodDisruptionBudget (PDB) .Example:
kubectl delete pdb instance-manager-d80e13f520e7b952f4b7593fc1883e2a -n longhorn-system
Related issues: #7366 and #6764
2. Upgrade with Default StorageClass That Is Not harvester-longhorn
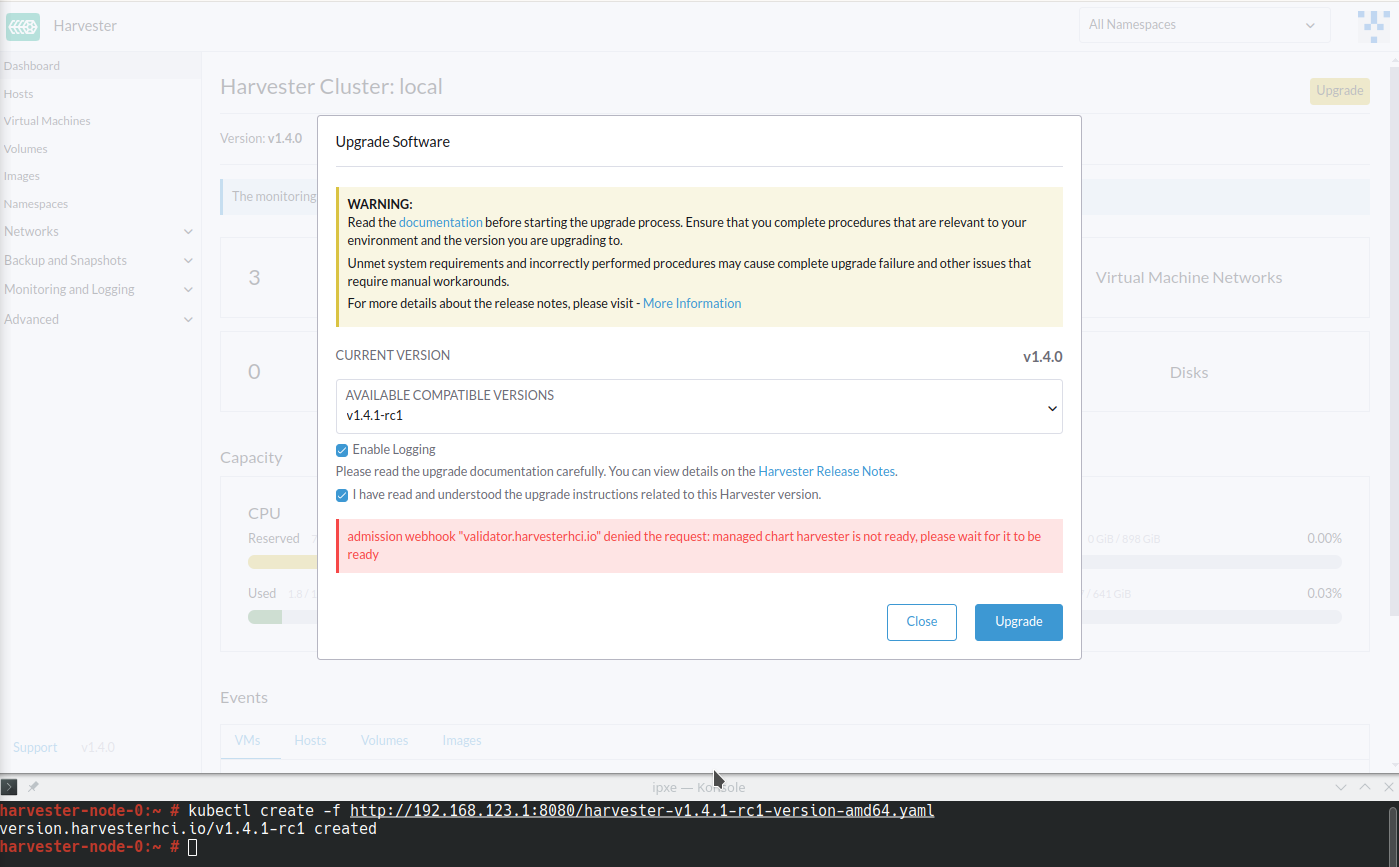
Harvester adds the annotation storageclass.kubernetes.io/is-default-class: "true" to harvester-longhorn, which is the original default StorageClass. When you replace harvester-longhorn with another StorageClass, the following occur:
The Harvester ManagedChart shows the error message
cannot patch "harvester-longhorn" with kind StorageClass: admission webhook "validator.harvesterhci.io" denied the request: default storage class %!s(MISSING) already exists, please reset it first.The webhook denies the upgrade request.
You can perform any of the following workarounds:
Set
harvester-longhornas the default StorageClass.Add
spec.values.storageClass.defaultStorageClass: falseto theharvesterManagedChart.kubectl edit managedchart harvester -n fleet-localAdd
timeoutSeconds: 600to the Harvester ManagedChart spec.kubectl edit managedchart harvester -n fleet-local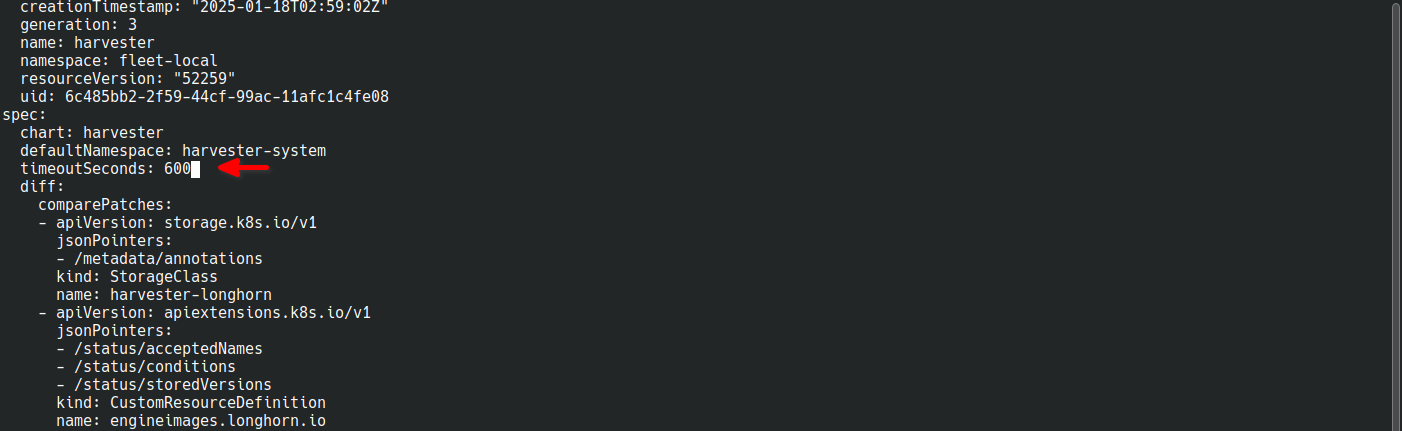
Related issue: #7375
3. Upgrade is Stuck in the "Waiting Reboot" State
The upgrade process may become stuck in the "Waiting Reboot" state after the Harvester v1.4.1 image is installed on a node and a reboot is initiated. At this point, the upgrade controller observes if the Harvester v1.4.1 operating system is running.
If the Harvester v1.4.1 image (hereafter referred to as active.img) fails to boot for any reason, the node automatically restarts in fallback mode and boots the previously installed Harvester v1.4.0 image (hereafter referred to as passive.img). The upgrade controller is unable to detect the expected operating system, so the upgrade remains stuck until an administrator fixes the problem with active.img.
active.img can become corrupted and unbootable because of insufficient disk space in the COS_STATE partition during the upgrade. This occurs if Harvester v1.4.0 was originally installed on the node and the system was configured to use a separate data disk. The issue does not occur in the following situations:
- The system has a single disk that is shared by the operating system and data.
- An earlier Harvester version was originally installed and then later upgraded to v1.4.0.
To check if the issue exists in your environment, perform the following steps:
Access the node via SSH and log in using the root account.
Run the commands
cat /proc/cmdlineandhead -n1 /etc/harvester-release.yaml.Example:
# cat /proc/cmdline
BOOT_IMAGE=(loop0)/boot/vmlinuz console=tty1 root=LABEL=COS_STATE cos-img/filename=/cOS/passive.img panic=0 net.ifnames=1 rd.cos.oemlabel=COS_OEM rd.cos.mount=LABEL=COS_OEM:/oem rd.cos.mount=LABEL=COS_PERSISTENT:/usr/local rd.cos.oemtimeout=120 audit=1 audit_backlog_limit=8192 intel_iommu=on amd_iommu=on iommu=pt multipath=off upgrade_failure

# head -n1 /etc/harvester-release.yaml
harvester: v1.4.0
The presence of
cos-img/filename=/cOS/passive.imgandupgrade_failurein the output indicates that the system booted into fallback mode. The Harvester version in/etc/harvester-release.yamlconfirms that the system is currently using the v1.4.0 image.Check if
active.imgis corrupted by running the commandfsck.ext2 -nf /run/initramfs/cos-state/cOS/active.img.Example:
# fsck.ext2 -nf /run/initramfs/cos-state/cOS/active.img
e2fsck 1.46.4 (18-Aug-2021)
Pass 1: Checking inodes, blocks, and sizes
Pass 2: Checking directory structure

  [...a list of various different errors may appear here...]

e2fsck: aborted

COS_ACTIVE: ********** WARNING: Filesystem still has errors **********
Check the partition sizes by running the command
lsblk -o NAME,LABEL,SIZE.Example:
# lsblk -o NAME,LABEL,SIZE
NAME   LABEL             SIZE
loop0  COS_ACTIVE          3G
sr0                     1024M
vda                      250G
├─vda1 COS_GRUB           64M
├─vda2 COS_OEM            64M
├─vda3 COS_RECOVERY        4G
├─vda4 COS_STATE           8G
└─vda5 COS_PERSISTENT  237.9G
vdb    HARV_LH_DEFAULT   128G
The output in the example shows a COS_STATE partition that is 8G in size. In this specific case, which involves an unsuccessful upgrade attempt and a corrupted
active.img, the partition likely did not have enough free space for the upgrade to succeed.
To fix the issue, perform the following steps:
If your cluster has two or more nodes, access the remaining nodes via SSH and check the disk usage of
active.imgandpassive.img.# du -sh /run/initramfs/cos-state/cOS/*
1.7G /run/initramfs/cos-state/cOS/active.img
3.1G /run/initramfs/cos-state/cOS/passive.imgIf
passive.imgconsumes 3.1G of disk space, run the following commands using the root account:# mount -o remount,rw /run/initramfs/cos-state
# fallocate --dig-holes /run/initramfs/cos-state/cOS/passive.img
# mount -o remount,ro /run/initramfs/cos-statepassive.imgis converted to a sparse file, which should only consume 1.7G of disk space (the same asactive.img). This ensures that the other nodes have enough free space, preventing the upgrade process from becoming stuck again.Access the stuck node via SSH, and then run the following commands using the root account:
# mount -o remount,rw /run/initramfs/cos-state
# cp /run/initramfs/cos-state/cOS/passive.img \
     /run/initramfs/cos-state/cOS/active.img
# tune2fs -L COS_ACTIVE /run/initramfs/cos-state/cOS/active.img
# mount -o remount,ro /run/initramfs/cos-state
The existing (clean)
passive.imgis copied over the corruptedactive.imgand the label is set correctly.Reboot the stuck node, and then select the first entry ("Harvester v1.4.1") on the GRUB boot screen.
The GRUB boot screen initially displays "Harvester v1.4.1 (fallback)" by default. Despite the displayed version, the system boots into Harvester v1.4.0.
Copy
rootfs.squashfsfrom the Harvester v1.4.1 ISO to a convenient location on the stuck node.The ISO can be mounted either on the stuck node or on another system. You can copy the file using the
scpcommand.Access the stuck node via SSH, and then run the following commands using the root account:
# mkdir /tmp/manual-os-upgrade
# mkdir /tmp/manual-os-upgrade/config
# mkdir /tmp/manual-os-upgrade/rootfs
# mount -o loop rootfs.squashfs /tmp/manual-os-upgrade/rootfs
# cat > /tmp/manual-os-upgrade/config/config.yaml <<EOF
upgrade:
  system:
    size: 3072
EOF
# elemental upgrade \
    --logfile /tmp/manual-os-upgrade/upgrade.log \
    --directory /tmp/manual-os-upgrade/rootfs \
    --config-dir /tmp/manual-os-upgrade/config \
--debugnoteYou must replace the sample path in the fourth line with the actual path of the copied
rootfs.squashfs.A new (clean)
active.imgis generated based on the root image from the Harvester v1.4.1 ISO.If any errors occur, save a copy of
/tmp/manual-os-upgrade/upgrade.log.Run the following commands:
# umount /tmp/manual-os-upgrade/rootfs
# reboot
The node should boot successfully into Harvester v1.4.1, and the upgrade should proceed as expected.
Related issues: #7457, #7493, and #7518
4. Upgrade Restarts Unexpectedly After the "Dismiss it" Button is Clicked
When you use Rancher to upgrade Harvester, the Rancher UI displays a dialog with a button labeled "Dismiss it". Clicking this button may result in the following issues:
- The
statussection of theharvesterhci.io/v1beta1/upgradeCR is cleared, causing the loss of all important information about the upgrade. - The upgrade process starts over again unexpectedly.
This issue affects Rancher v2.10.x, which uses v1.0.2, v1.0.3, and v1.0.4 of the Harvester UI Extension. All Harvester UI versions are not affected. The issue will be fixed in Harvester UI Extension v1.0.5 and v1.5.0.
To avoid this issue, perform either of the following actions:
- Use the Harvester UI to upgrade Harvester. Clicking the "Dismiss it" button on the Harvester UI does not result in unexpected behavior.
- Instead of clicking the button on the Rancher UI, run the following command against the cluster:
kubectl -n harvester-system label upgrades -l harvesterhci.io/latestUpgrade=true harvesterhci.io/read-message=true
Related issue: #7791
5. Virtual Machines That Use Migratable RWX Volumes Restart Unexpectedly
A Longhorn issue causes virtual machines that use migratable RWX volumes to restart unexpectedly when the CSI plugin pods are restarted. This issue affects Harvester v1.4.x, v1.5.0, and v1.5.1.
The workaround is to disable the setting Automatically Delete Workload Pod When The Volume Is Detached Unexpectedly on the Longhorn UI before starting the upgrade. You must enable the setting again once the upgrade is completed.
The issue will be fixed in Longhorn v1.8.3, v1.9.1, and later versions. Harvester v1.6.0 will include Longhorn v1.9.1.