ISO Installation
Harvester ships as a bootable appliance image, you can install it directly on a bare metal server with the ISO image. To get the ISO image, download 💿 harvester-v1.x.x-amd64.iso from the Harvester releases page.
During the installation, you can either choose to create a new Harvester cluster or join the node to an existing Harvester cluster.
The following video shows a quick overview of an ISO installation.
Installation Steps
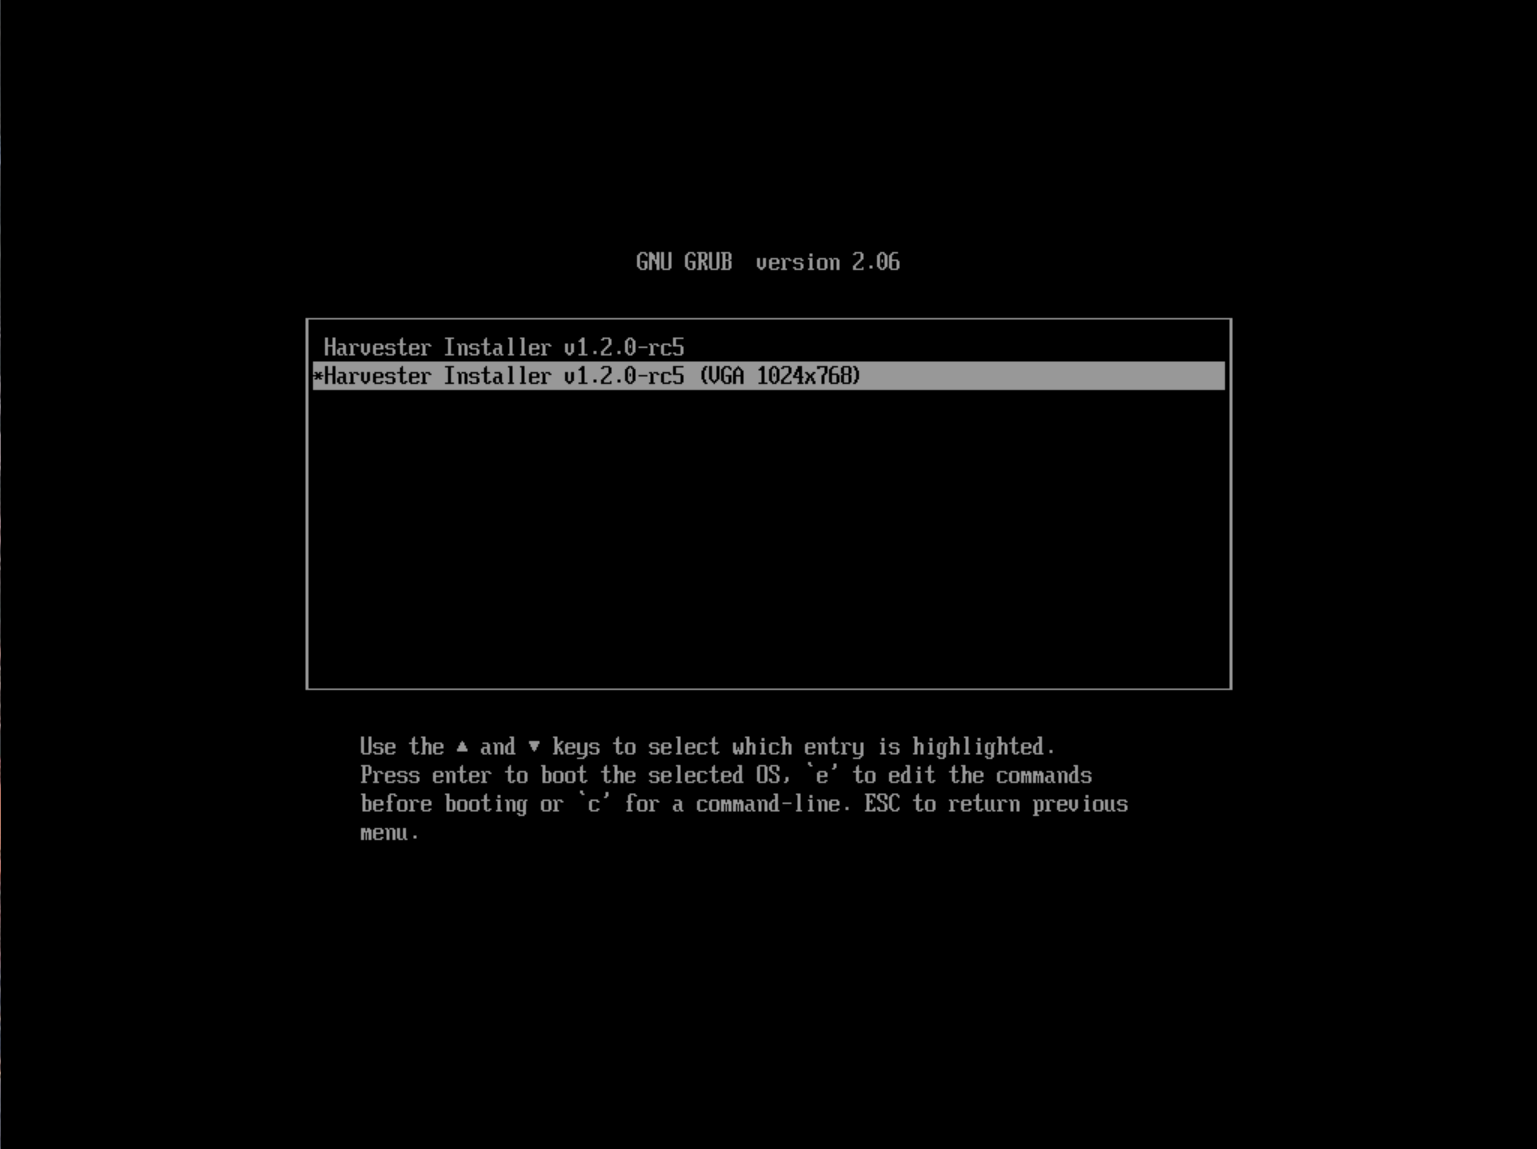
Mount the Harvester ISO file and boot the server by selecting the
Harvester Installeroption.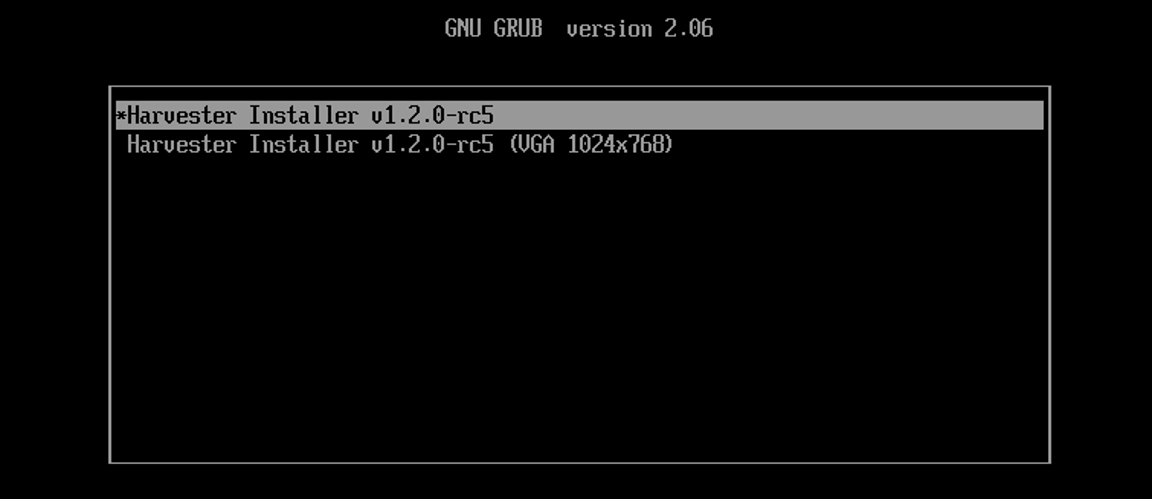
Use the arrow keys to choose an installation mode. By default, the first node will be the management node of the cluster.

Create a new Harvester cluster: creates an entirely new Harvester cluster.Join an existing Harvester cluster: joins an existing Harvester cluster. You need the VIP and cluster token of the cluster you want to join.Install Harvester binaries only: If you choose this option, additional setup is required after the first bootup.
infoWhen there are 3 nodes, the other 2 nodes added first are automatically promoted to management nodes to form an HA cluster. If you want to promote management nodes from different zones, you can add the node label
topology.kubernetes.io/zonein the os.labels config by providing a URL of Harvester configuration on the customize the host step. In this case, at least three different zones are required.Choose the installation disk you want to install the Harvester cluster on and the data disk you want to store VM data on. By default, Harvester uses GUID Partition Table (GPT) partitioning schema for both UEFI and BIOS. If you use the BIOS boot, then you will have the option to select Master boot record (MBR).
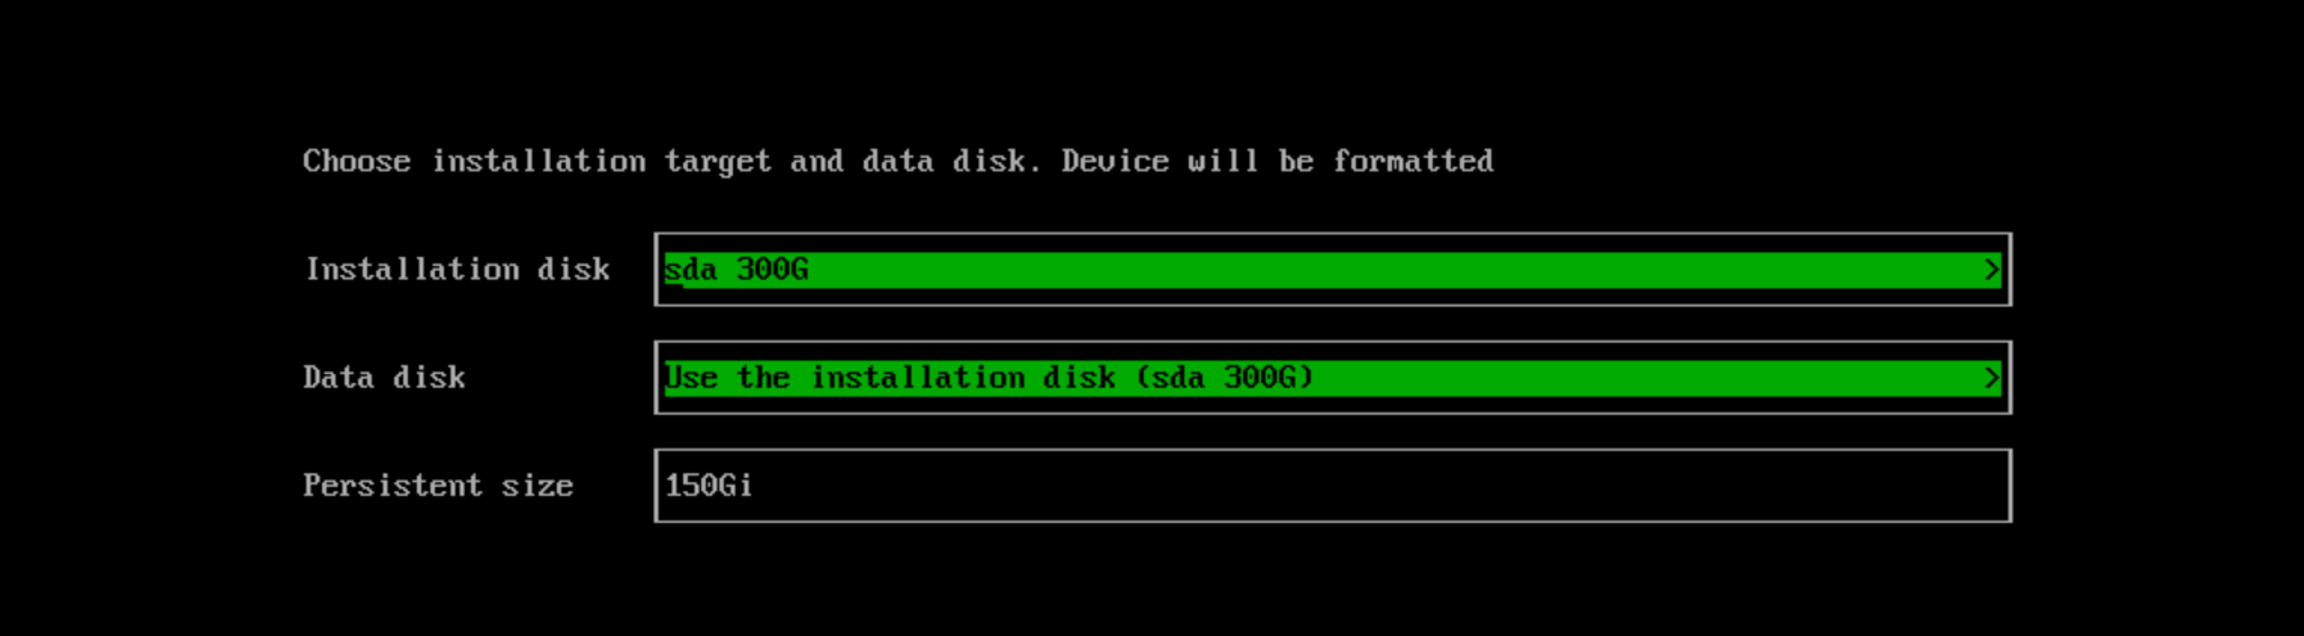
Installation disk: The disk to install the Harvester cluster on.Data disk: The disk to store VM data on. Choosing a separate disk to store VM data is recommended.Persistent size: If you only have one disk or use the same disk for both OS and VM data, you need to configure persistent partition size to store system packages and container images. The default and minimum persistent partition size is 150 GiB. You can specify a size like 200Gi or 153600Mi.
Configure the
HostNameof the node.
Configure network interface(s) for the management network. By default, Harvester creates a bonded NIC named
mgmt-bofor the built-in management cluster network, and the IP address can be configured via DHCP or statically assigned.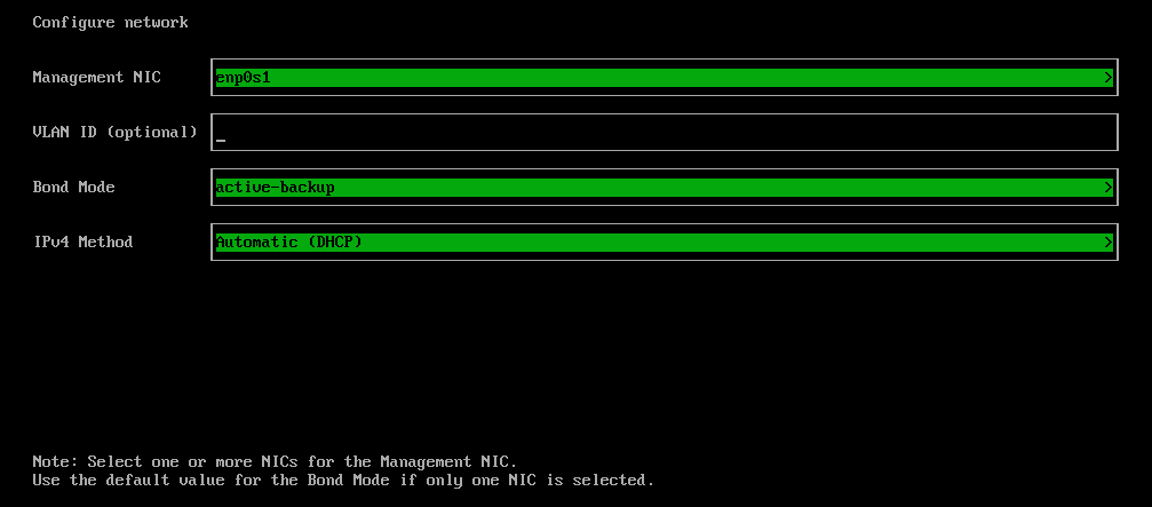 note
noteIt is not possible to change the node IP throughout the lifecycle of a Harvester cluster. If using DHCP, you must ensure the DHCP server always offers the same IP for the same node. If the node IP is changed, the related node cannot join the cluster and might even break the cluster.
In addition, you are required to add the routers option (
option routers) when configuring the DHCP server. This option is used to add the default route on the Harvester host. Without the default route, the node will fail to start. For example:Linux~ # ip route
default via 192.168.122.1 dev mgmt-br proto dhcpFor more information, see DHCP Server Configuration.
(Optional) Configure the
DNS Servers. Use commas as a delimiter to add more DNS servers. Leave it blank to use the default DNS server.
Configure the virtual IP (VIP) by selecting a
VIP Mode. This VIP is used to access the cluster or for other nodes to join the cluster.noteIf using DHCP to configure the IP address, you need to configure a static MAC-to-IP address mapping on your DHCP server to have a persistent virtual IP (VIP), and the VIP must be unique.

Configure the
Cluster token. This token is used for adding other nodes to the cluster.
Configure and confirm a
Passwordto access the node. The default SSH user israncher.
Configure
NTP serversto make sure all nodes' times are synchronized. This defaults to0.suse.pool.ntp.org. Use commas as a delimiter to add more NTP servers.
(Optional) If you need to use an HTTP proxy to access the outside world, enter the
Proxy address. Otherwise, leave this blank.
(Optional) You can choose to import SSH keys by providing
HTTP URL. For example, your GitHub public keyshttps://github.com/<username>.keyscan be used.
(Optional) If you need to customize the host with a Harvester configuration file, enter the
HTTP URLhere.
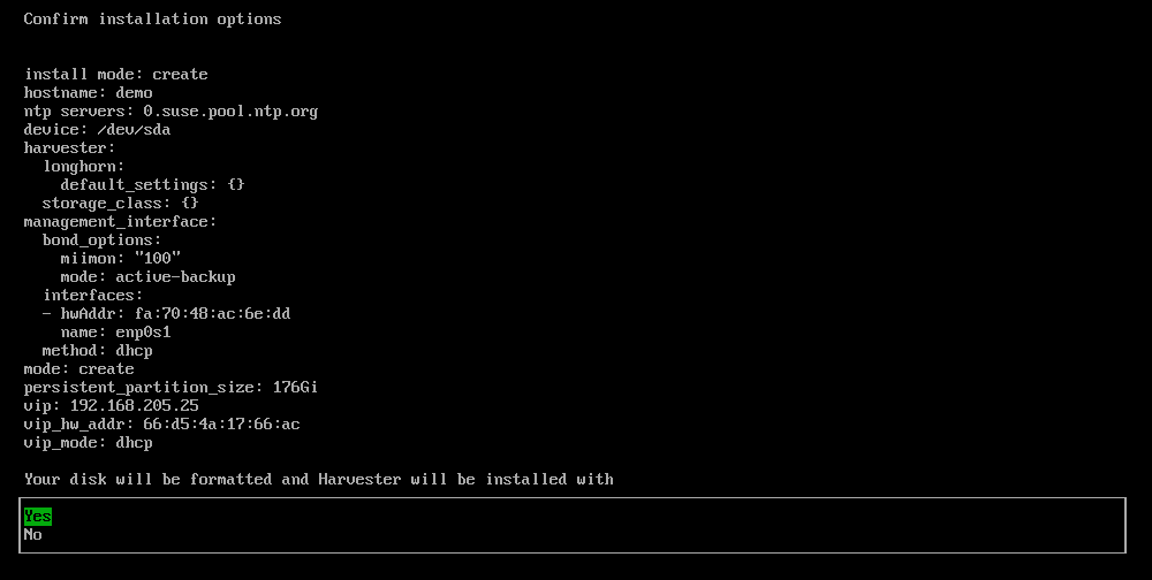
Review and confirm your installation options. After confirming the installation options, Harvester will be installed to your host. The installation may take a few minutes to be complete.
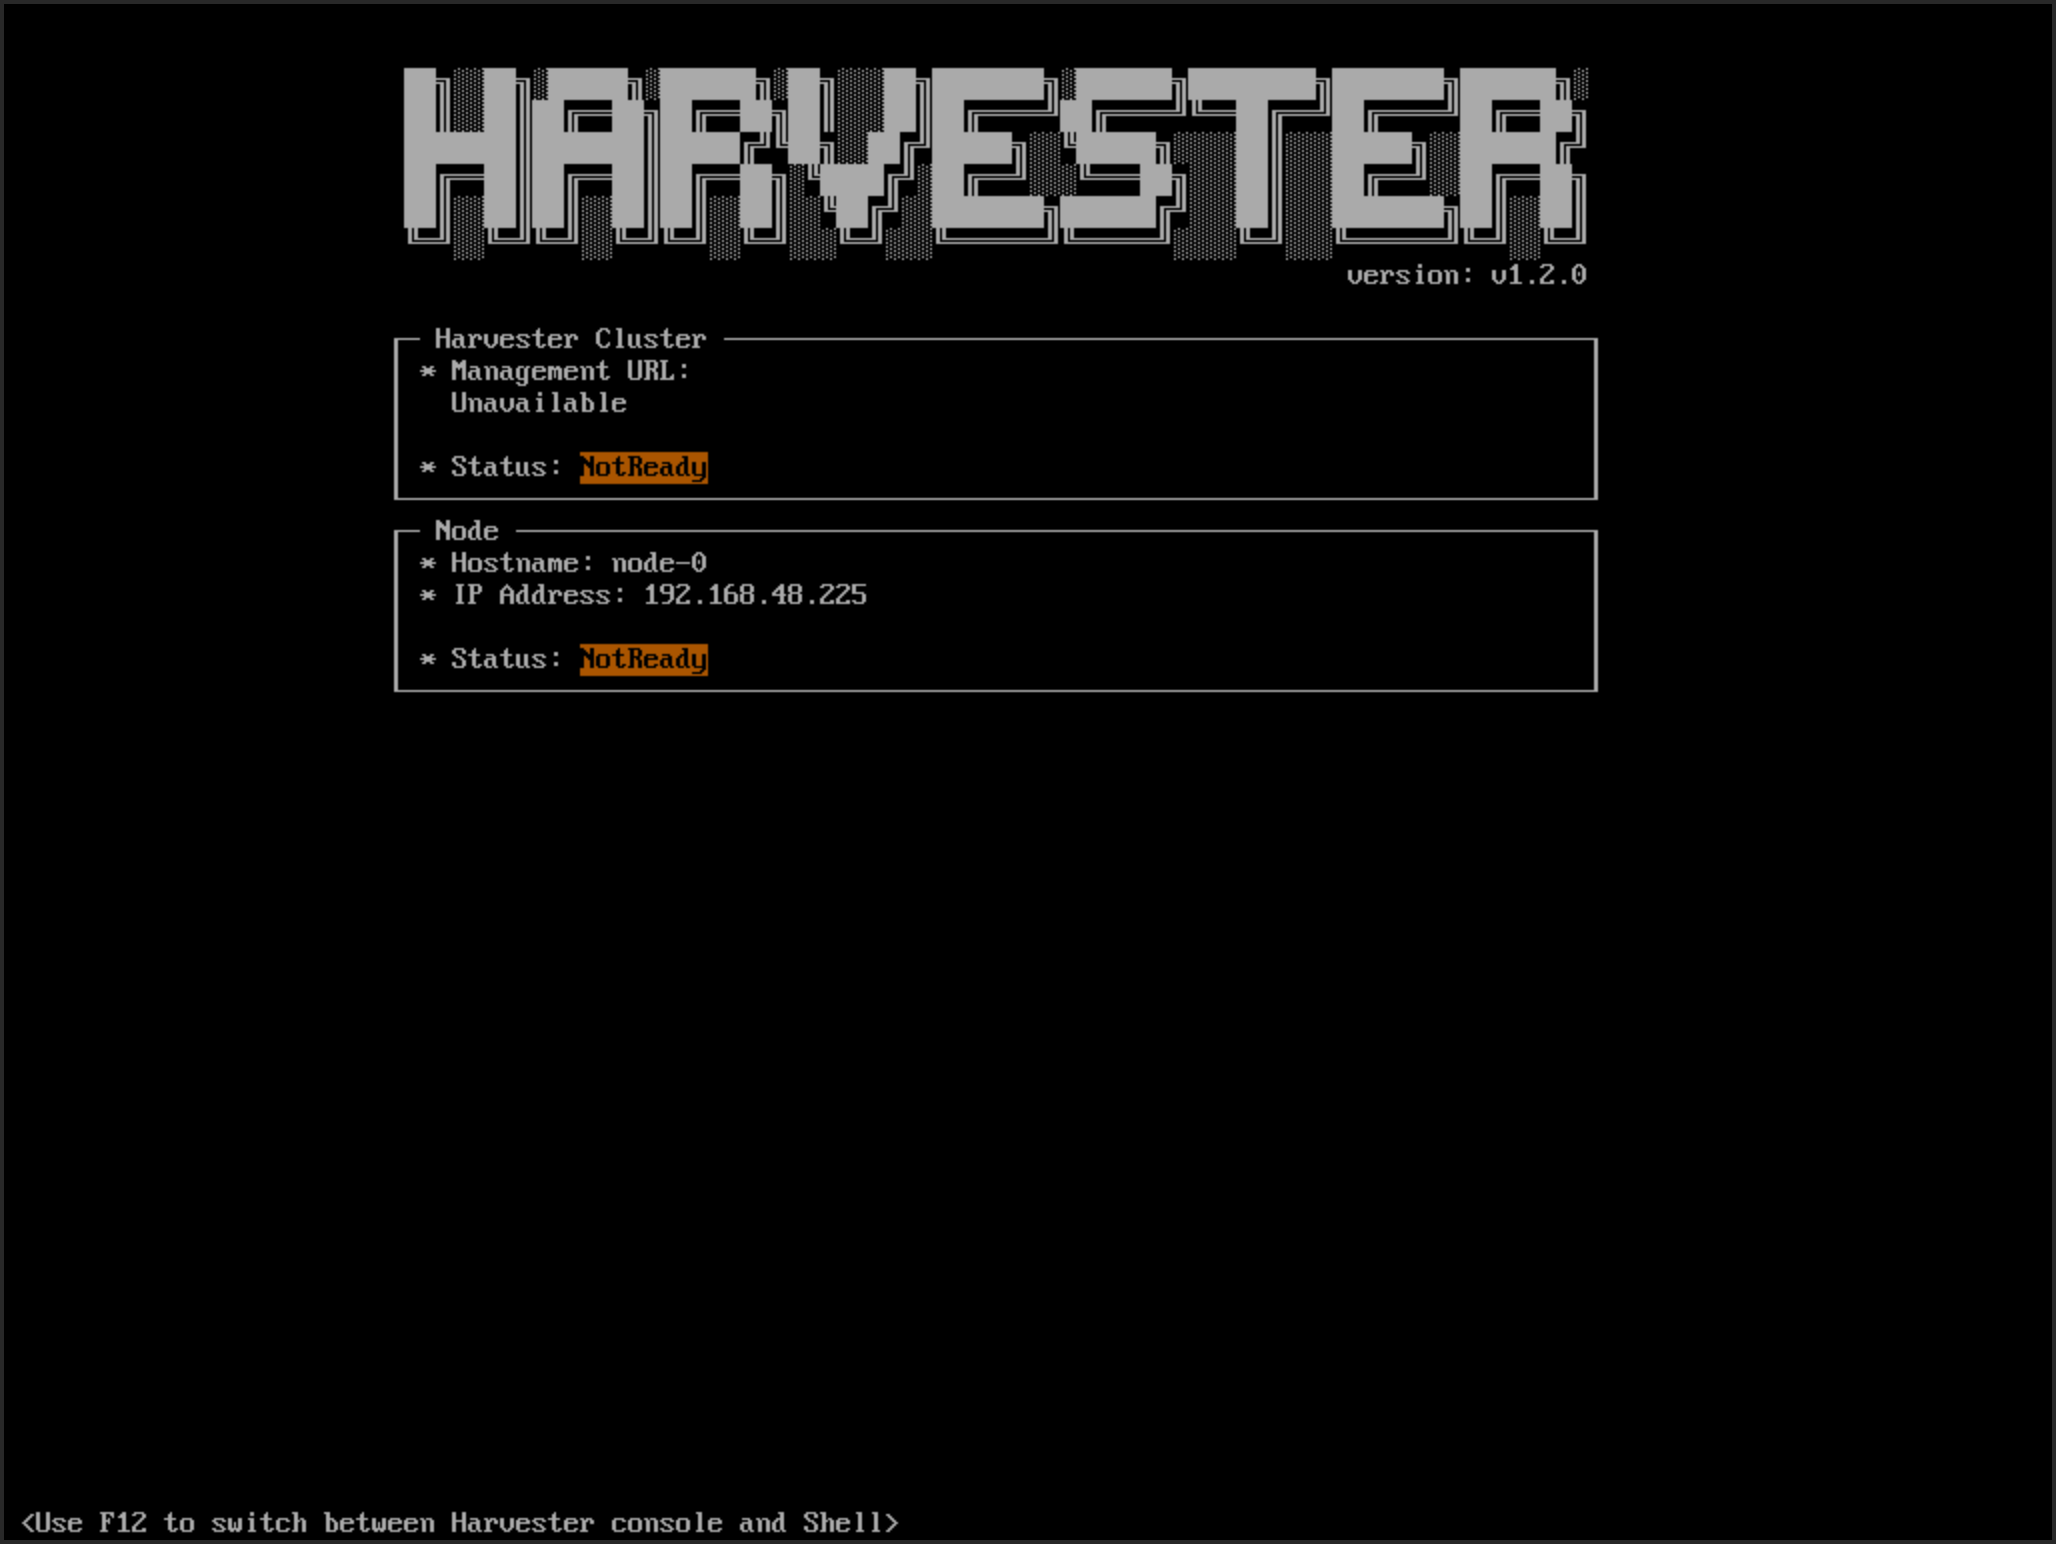
Once the installation is complete, your node restarts. After the restart, the Harvester console displays the management URL and status. The default URL of the web interface is
https://your-virtual-ip. You can useF12to switch from the Harvester console to the Shell and typeexitto go back to the Harvester console.noteChoosing
Install Harvester binaries onlyon the first page requires additional setup after the first bootup.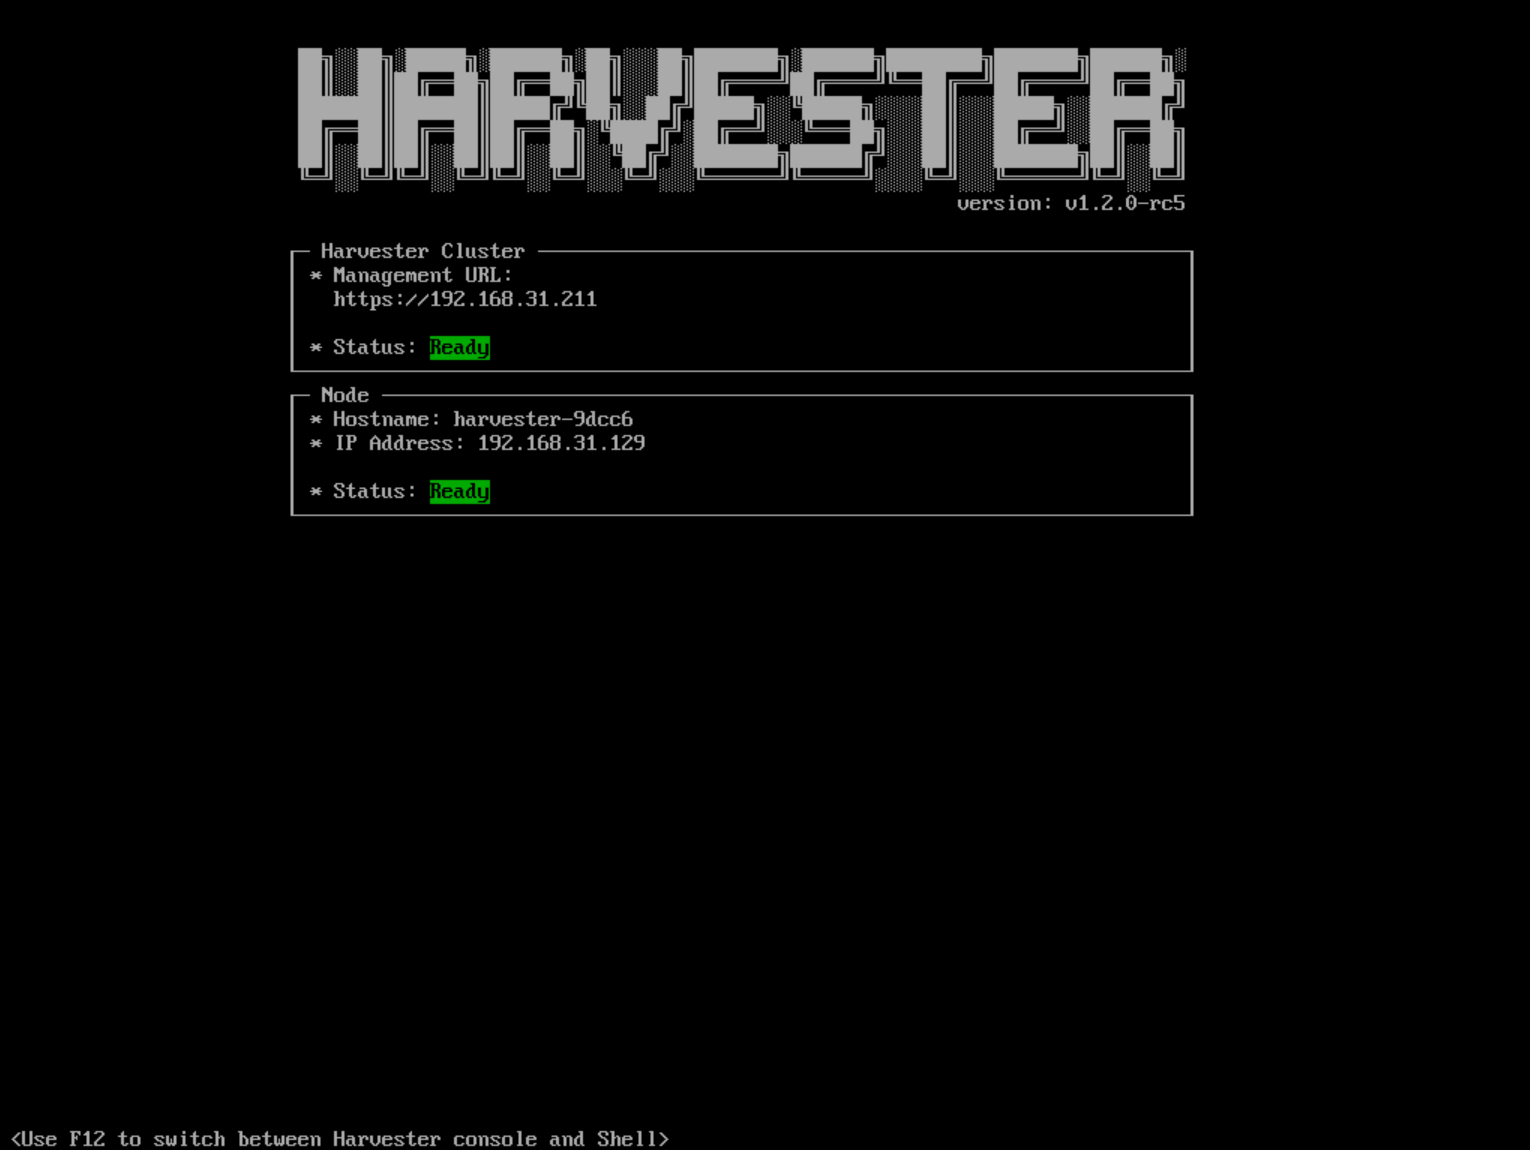
You will be prompted to set the password for the default
adminuser when logging in for the first time.
Known Issue
Installer may crash when using an older graphics card/monitor
In some cases, if you are using an older graphics card/monitor, you may encounter a panic: invalid dimensions error during ISO installation.

We are working on this known issue and planning a fix for a future release. You can try to use another GRUB entry to force it to use the resolution of 1024x768 when booting up.
If you are using a version earlier than v1.1.1, please try the following workaround:
Boot up with the ISO, and press
Eto edit the first menu entry: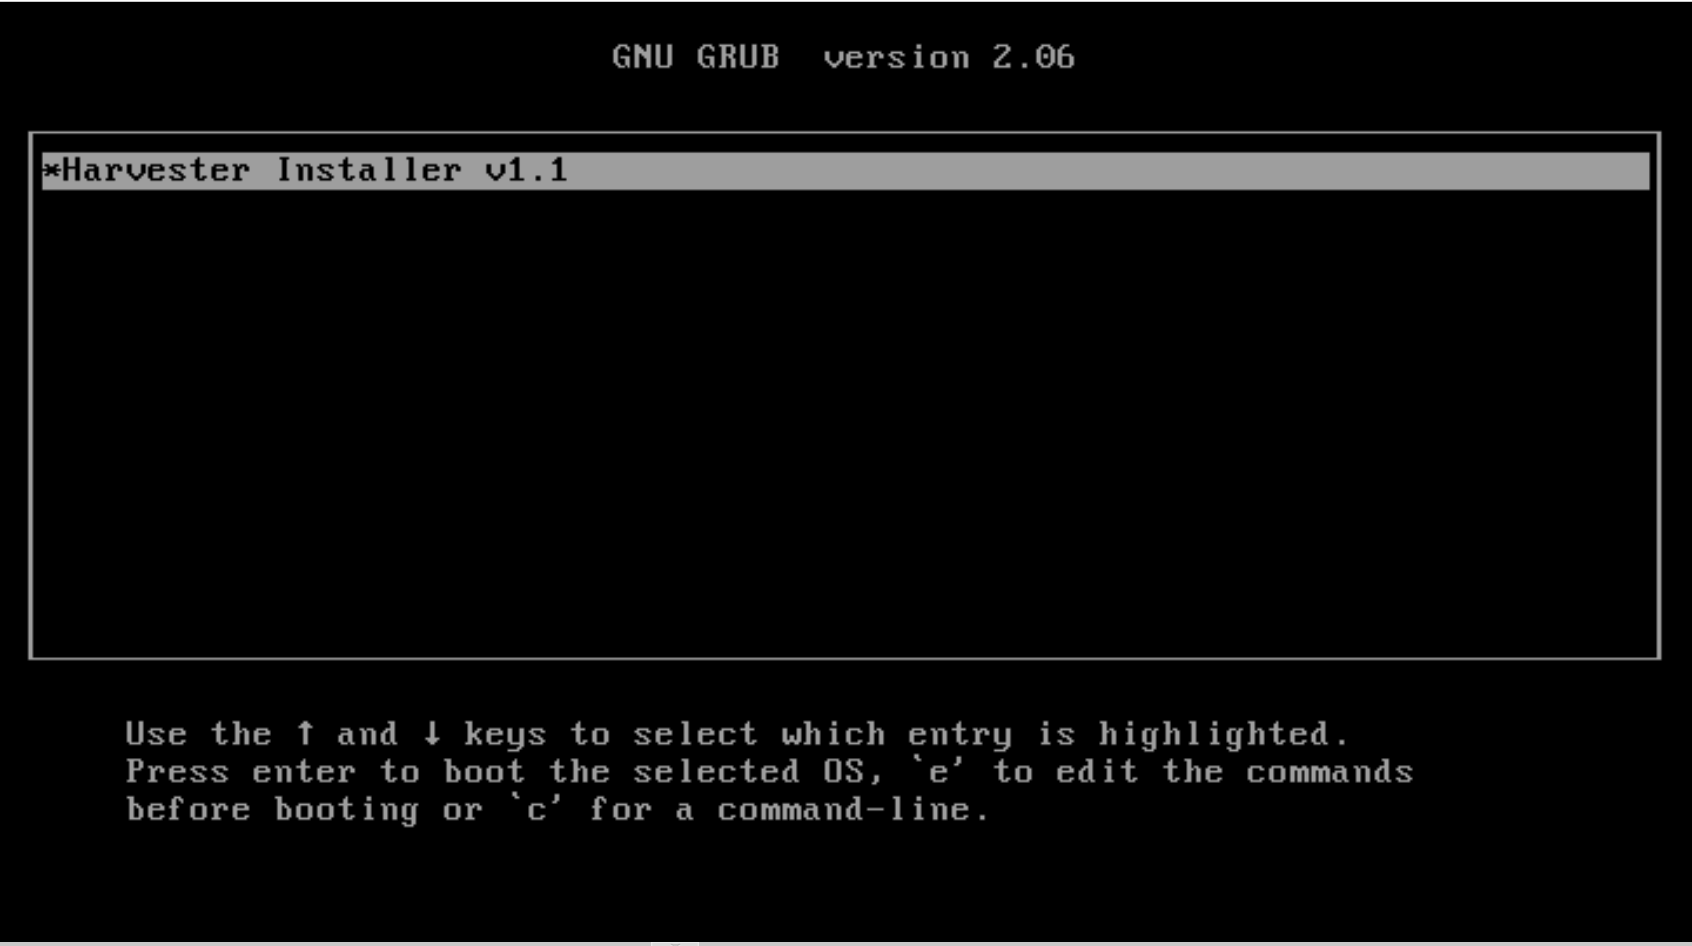
Append
vga=792to the line started with$linux: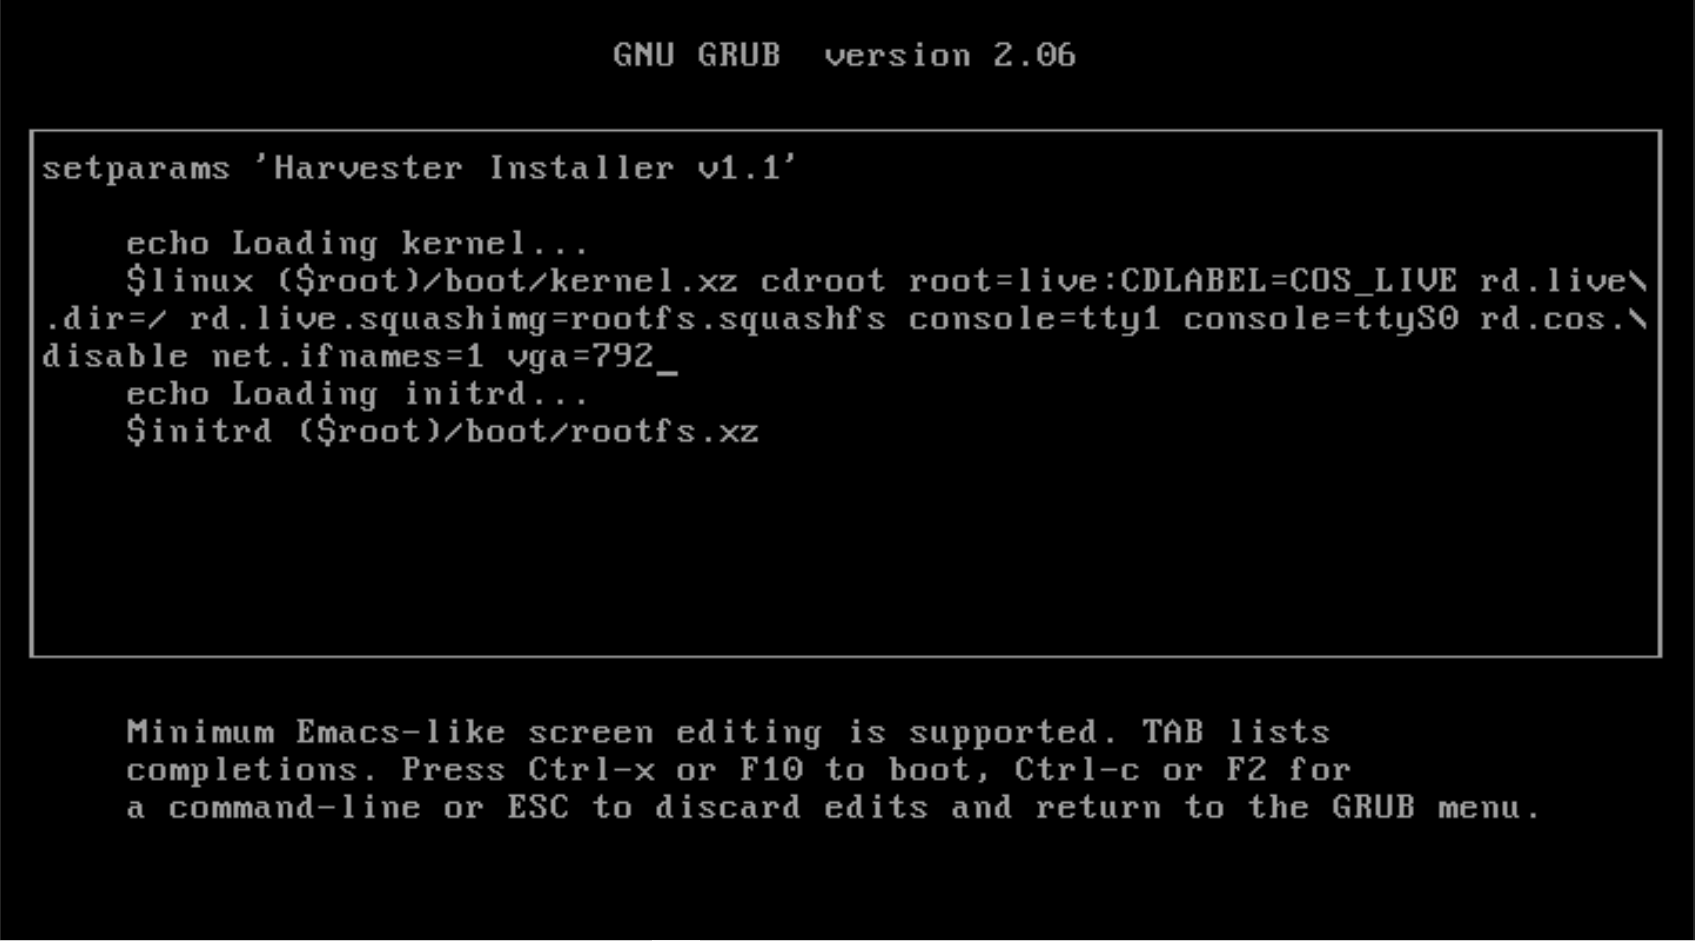
Press
Ctrl+XorF10to boot up.
Fail to join nodes using FQDN to a cluster which has custom SSL certificate configured
You may encounter that newly joined nodes stay in the Not Ready state indefinitely. This is likely the outcome if you already have a set of custom SSL certificates configured on the to-be-joined Harvester cluster and provide an FQDN instead of a VIP address for the management address during the Harvester installation.
You can check the SSL certificates on the Harvester dashboard's setting page or using the command line tool kubectl get settings.harvesterhci.io ssl-certificates to see if there is any custom SSL certificate configured (by default, it is empty).

The second thing to look at is the joining nodes. Try to get access to the nodes via consoles or SSH sessions and then check the log of rancherd:
$ journalctl -u rancherd.service
Oct 02 08:04:43 node-0 systemd[1]: Starting Rancher Bootstrap...
Oct 02 08:04:43 node-0 rancherd[2017]: time="2023-10-02T08:04:43Z" level=info msg="Loading config file [/usr/share/rancher/rancherd/config.yaml.d/50-defaults.yaml]"
Oct 02 08:04:43 node-0 rancherd[2017]: time="2023-10-02T08:04:43Z" level=info msg="Loading config file [/usr/share/rancher/rancherd/config.yaml.d/91-harvester-bootstrap-repo.yaml]"
Oct 02 08:04:43 node-0 rancherd[2017]: time="2023-10-02T08:04:43Z" level=info msg="Loading config file [/etc/rancher/rancherd/config.yaml]"
Oct 02 08:04:43 node-0 rancherd[2017]: time="2023-10-02T08:04:43Z" level=info msg="Bootstrapping Rancher (v2.7.5/v1.25.9+rke2r1)"
Oct 02 08:04:44 node-0 rancherd[2017]: time="2023-10-02T08:04:44Z" level=info msg="Writing plan file to /var/lib/rancher/rancherd/plan/plan.json"
Oct 02 08:04:44 node-0 rancherd[2017]: time="2023-10-02T08:04:44Z" level=info msg="Applying plan with checksum "
Oct 02 08:04:44 node-0 rancherd[2017]: time="2023-10-02T08:04:44Z" level=info msg="No image provided, creating empty working directory /var/lib/rancher/rancherd/plan/work/20231002-080444-applied.plan/_0"
Oct 02 08:04:44 node-0 rancherd[2017]: time="2023-10-02T08:04:44Z" level=info msg="Running command: /usr/bin/env [sh /var/lib/rancher/rancherd/install.sh]"
Oct 02 08:04:44 node-0 rancherd[2017]: time="2023-10-02T08:04:44Z" level=info msg="[stdout]: [INFO]  Using default agent configuration directory /etc/rancher/agent"
Oct 02 08:04:44 node-0 rancherd[2017]: time="2023-10-02T08:04:44Z" level=info msg="[stdout]: [INFO]  Using default agent var directory /var/lib/rancher/agent"
Oct 02 08:04:44 node-0 rancherd[2017]: time="2023-10-02T08:04:44Z" level=info msg="[stderr]: [WARN]  /usr/local is read-only or a mount point; installing to /opt/rancher-system-agent"
Oct 02 08:04:45 node-0 rancherd[2017]: time="2023-10-02T08:04:45Z" level=info msg="[stdout]: [INFO]  Determined CA is necessary to connect to Rancher"
Oct 02 08:04:45 node-0 rancherd[2017]: time="2023-10-02T08:04:45Z" level=info msg="[stdout]: [INFO]  Successfully downloaded CA certificate"
Oct 02 08:04:45 node-0 rancherd[2017]: time="2023-10-02T08:04:45Z" level=info msg="[stdout]: [INFO]  Value from https://192.168.48.240/cacerts is an x509 certificate"
Oct 02 08:04:45 node-0 rancherd[2017]: time="2023-10-02T08:04:45Z" level=info msg="[stderr]: curl: (60) SSL: no alternative certificate subject name matches target host name '192.168.48.240'"
Oct 02 08:04:45 node-0 rancherd[2017]: time="2023-10-02T08:04:45Z" level=info msg="[stderr]: More details here: https://curl.se/docs/sslcerts.html"
Oct 02 08:04:45 node-0 rancherd[2017]: time="2023-10-02T08:04:45Z" level=info msg="[stderr]: "
Oct 02 08:04:45 node-0 rancherd[2017]: time="2023-10-02T08:04:45Z" level=info msg="[stderr]: curl failed to verify the legitimacy of the server and therefore could not"
Oct 02 08:04:45 node-0 rancherd[2017]: time="2023-10-02T08:04:45Z" level=info msg="[stderr]: establish a secure connection to it. To learn more about this situation and"
Oct 02 08:04:45 node-0 rancherd[2017]: time="2023-10-02T08:04:45Z" level=info msg="[stderr]: how to fix it, please visit the web page mentioned above."
Oct 02 08:04:45 node-0 rancherd[2017]: time="2023-10-02T08:04:45Z" level=info msg="[stderr]: [ERROR]  000 received while testing Rancher connection. Sleeping for 5 seconds and trying again"
This is because rancherd will try to download the CA using the provided FQDN in the insecure mode from the embedded Rancher Manager on the Harvester cluster when bootstrapping and then use that CA to verify the received certificates for the following communications. However, the bootstrapping script /var/lib/rancher/rancherd/install.sh, which is also downloaded from the embedded Rancher Manager, has the VIP address configured:
#!/usr/bin/env sh

CATTLE_AGENT_BINARY_BASE_URL="https://192.168.48.240/assets"
CATTLE_SERVER=https://192.168.48.240
CATTLE_CA_CHECKSUM="be59358f796b09615b3f980cfe28ff96cae42a141289900bae494d869f363a67"
...
The nodes will query the embedded Rancher Manager via the VIP address instead of the FQDN provided during the Harvester installation. If the custom SSL certificate you configured doesn't contain a valid IP SAN extension, rancherd will fail at the exact point shown above.
To work around this, you need to configure the cluster with a valid IP SAN extension, i.e., include the VIP address in the IP SAN extension when generating the CSR or signing the certificate. After applying the new certificate on the cluster, rancherd can then proceed and finish its job. However, soon rancher-system-agent will complain that it cannot verify the certificate received from the embedded Rancher Manager:
$ journalctl -u rancher-system-agent.service
Oct 02 10:18:44 node-0 systemd[1]: rancher-system-agent.service: Scheduled restart job, restart counter is at 91.
Oct 02 10:18:44 node-0 systemd[1]: Stopped Rancher System Agent.
Oct 02 10:18:44 node-0 systemd[1]: Started Rancher System Agent.
Oct 02 10:18:44 node-0 rancher-system-agent[9620]: time="2023-10-02T10:18:44Z" level=info msg="Rancher System Agent version v0.3.3 (9e827a5) is starting"
Oct 02 10:18:44 node-0 rancher-system-agent[9620]: time="2023-10-02T10:18:44Z" level=info msg="Using directory /var/lib/rancher/agent/work for work"
Oct 02 10:18:44 node-0 rancher-system-agent[9620]: time="2023-10-02T10:18:44Z" level=info msg="Starting remote watch of plans"
Oct 02 10:18:44 node-0 rancher-system-agent[9620]: time="2023-10-02T10:18:44Z" level=info msg="Initial connection to Kubernetes cluster failed with error Get \"https://192.168.48.240/version\": x509: certificate signed by unknown authority, removing CA data and trying again"
Oct 02 10:18:44 node-0 rancher-system-agent[9620]: time="2023-10-02T10:18:44Z" level=fatal msg="error while connecting to Kubernetes cluster with nullified CA data: Get \"https://192.168.48.240/version\": x509: certificate signed by unknown authority"
Oct 02 10:18:44 node-0 systemd[1]: rancher-system-agent.service: Main process exited, code=exited, status=1/FAILURE
Oct 02 10:18:44 node-0 systemd[1]: rancher-system-agent.service: Failed with result 'exit-code'.
If you see a similar log output, you need to manually add the CA to the trust list on each joining node with the following commands:
# prepare the CA as embedded-rancher-ca.pem on the nodes
$ sudo cp embedded-rancher-ca.pem /etc/pki/trust/anchors/
$ sudo update-ca-certificates
After adding the CA to the trust list, the nodes can join to the cluster successfully.