Storage Network
Harvester uses Longhorn as its built-in storage system to provide block device volumes for VMs and Pods. If the user wishes to isolate Longhorn replication traffic from the Kubernetes cluster network (i.e. the management network) or other cluster-wide workloads. Users can allocate a dedicated storage network for Longhorn replication traffic to get better network bandwidth and performance.
For more information, please see Longhorn Storage Network
- Avoid configuring Longhorn settings directly, as this can result in unexpected or unwanted system behavior.
- You can only use the Longhorn Storage Network with the default Longhorn V1 Data Engine. Usage with the V2 Data Engine is not yet supported.
Prerequisites
There are some prerequisites before configuring the Harvester Storage Network setting.
- Well-configured Cluster Network and VLAN Config.
- Users have to ensure the Cluster Network is configured and VLAN Config will cover all nodes and ensure the network connectivity is working and expected in all nodes.
- All VMs should be stopped.
- We recommend checking the VM status with the following command and should get an empty result.
kubectl get -A vmi
- All pods that are attached to Longhorn Volumes should be stopped.
- All ongoing image uploads or downloads should be either completed or deleted.
If the Harvester cluster was upgraded from v1.0.3, please check if Whereabouts CNI is installed properly before you move on to the next step. We will always recommend following this guide to check. Issue 3168 describes that the Harvester cluster will not always install Whereabouts CNI properly.
- Verify the
ippools.whereabouts.cni.cncf.ioCRD exists with the following command.kubectl get crd ippools.whereabouts.cni.cncf.io
- If the Harvester cluster doesn't have
ippools.whereabouts.cni.cncf.io, please add these two CRDs before configuringstorage-networksetting.
kubectl apply -f https://raw.githubusercontent.com/harvester/harvester/v1.1.0/deploy/charts/harvester/dependency_charts/whereabouts/crds/whereabouts.cni.cncf.io_ippools.yaml
kubectl apply -f https://raw.githubusercontent.com/harvester/harvester/v1.1.0/deploy/charts/harvester/dependency_charts/whereabouts/crds/whereabouts.cni.cncf.io_overlappingrangeipreservations.yaml
Configuration Example
- VLAN ID
- Please check with your network switch setting, and provide a dedicated VLAN ID for Storage Network.
- Well-configured Cluster Network and VLAN Config
- Please refer Networking page for more details and configure
Cluster NetworkandVLAN Configbut notNetworks.
- Please refer Networking page for more details and configure
- IP range for Storage Network
- IP range should not conflict or overlap with Kubernetes cluster networks(
10.42.0.0/16,10.43.0.0/16,10.52.0.0/16and10.53.0.0/16are reserved). - IP range should be in IPv4 CIDR format and Longhorn pods use Storage Network as follows:
instance-managerpods: Longhorn Instance Manager components were consolidated in Longhorn v1.5.0. The Engine Instance Manager and Replica Instance Manager are now deprecated. One IP is required for each node. During an upgrade, two versions of these pods will exist (old and new), and the old version will be deleted once the upgrade is successful.backing-image-dspods: These are employed to process on-the-fly uploads and downloads of backing image data sources. These pods will be removed once the image uploads or downloads are completed.backing-image-managerpods: 1 IP per disk, similar to the instance manager pods. Two versions of these will coexist during an upgrade, and the old ones will be removed after the upgrade is completed.- The required number of IPs is calculated using a simple formula:
Required Number of IPs = (Number of Nodes * 2) + (Number of Disks * 2) + Number of Images to Download/Upload
- Example: If a cluster has five nodes with two disks each, and ten images will be uploaded simultaneously, the IP range should be greater than or equal to
/26((5 * 2) + (5 * 2) + 10 = 30). - Exclude IP addresses that Longhorn pods and the storage network must not use, such as addresses reserved for Harvester CSI RWX support, the gateway, and other components.
- IP range should not conflict or overlap with Kubernetes cluster networks(
We will take the following configuration as an example to explain the details of the Storage Network
- VLAN ID for Storage Network:
100 - Cluster Network:
storage - IP range:
192.168.0.0/24 - Exclude Address:
192.168.0.1/32
Configuration Process
Harvester will create Multus NetworkAttachmentDefinition from the configuration, stop pods related to Longhorn Volume, update Longhorn setting, and restart previous pods.
Before Applying Harvester Storage Network Setting
Here we have two cases.
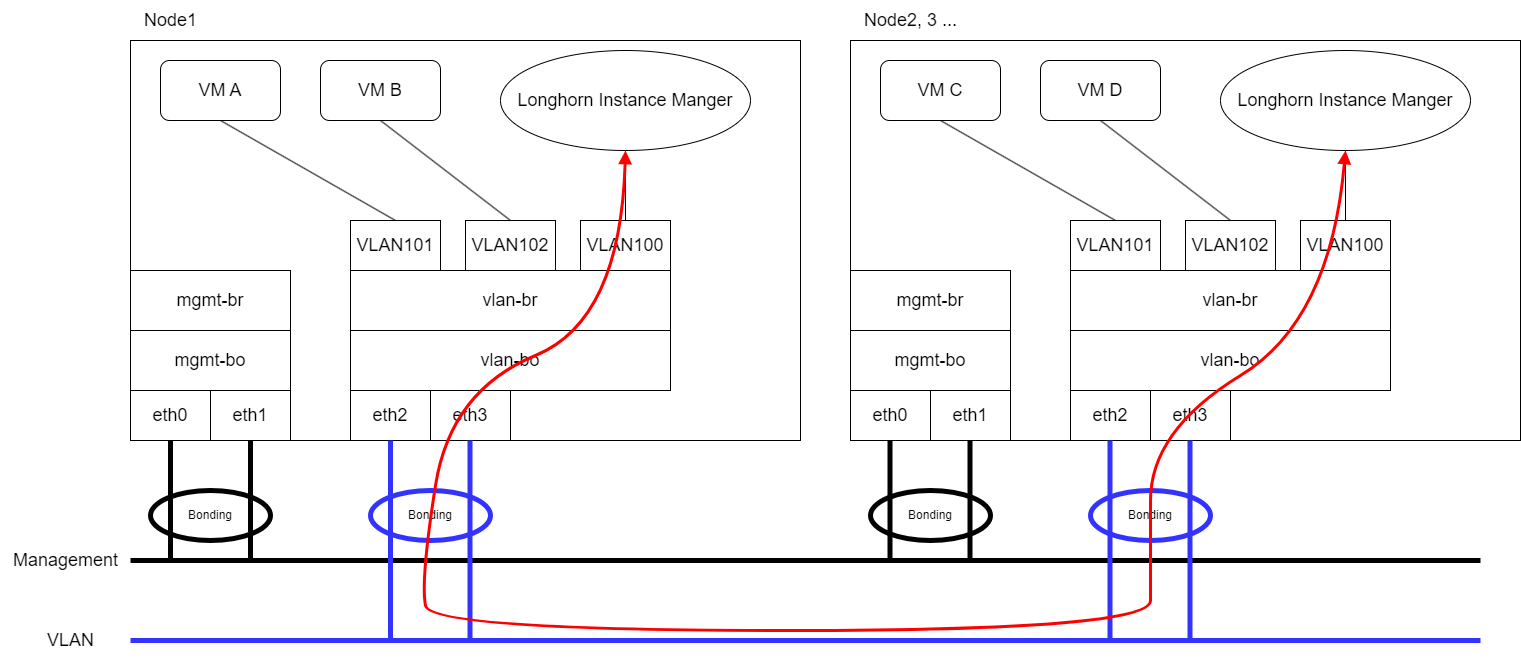
- Expect that VM VLAN traffic and Longhorn Storage Network use the same group of physical interfaces.
- Expect that VM VLAN traffic and Longhorn Storage Network use different physical interfaces.
Longhorn will send replication traffic through the specific interfaces shown as the red line in the figure.
Same Physical Interfaces
Take eth2 and eth3 as an example for VM VLAN traffic and Longhorn Storage Network simultaneously.
Please refer Networking page to configure ClusterNetwork and VLAN Config with eth2 and eth3 and remember the ClusterNetwork name for the further step.
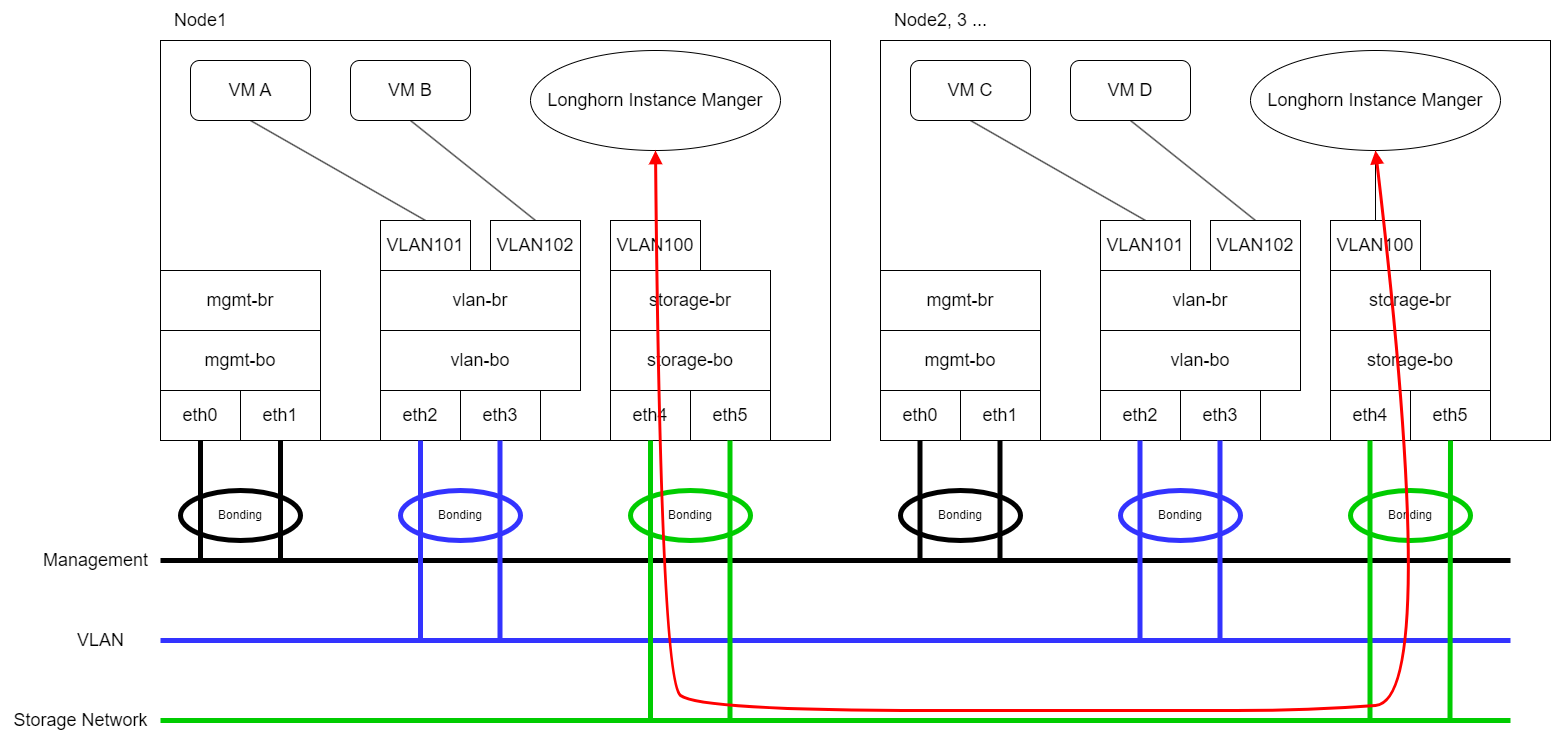
Different Physical Interfaces
eth2 and eth3 are for VM VLAN Traffic. eth4 and eth5 are for Longhorn Storage Network.
Please refer Networking page to configure ClusterNetwork and VLAN Config with eth4 and eth5 for Storage Network and remember the ClusterNetwork name for the further step.
Harvester Storage Network Setting
The storage-network setting allows you to configure the network used to isolate in-cluster storage traffic when segregation is required.
You can enable and disable the storage network using either the UI or the CLI. When the setting is enabled, you must construct a Multus NetworkAttachmentDefinition CRD by configuring certain fields.
Web UI
Using the Harvester UI to configure the storage-network setting is strongly recommended.
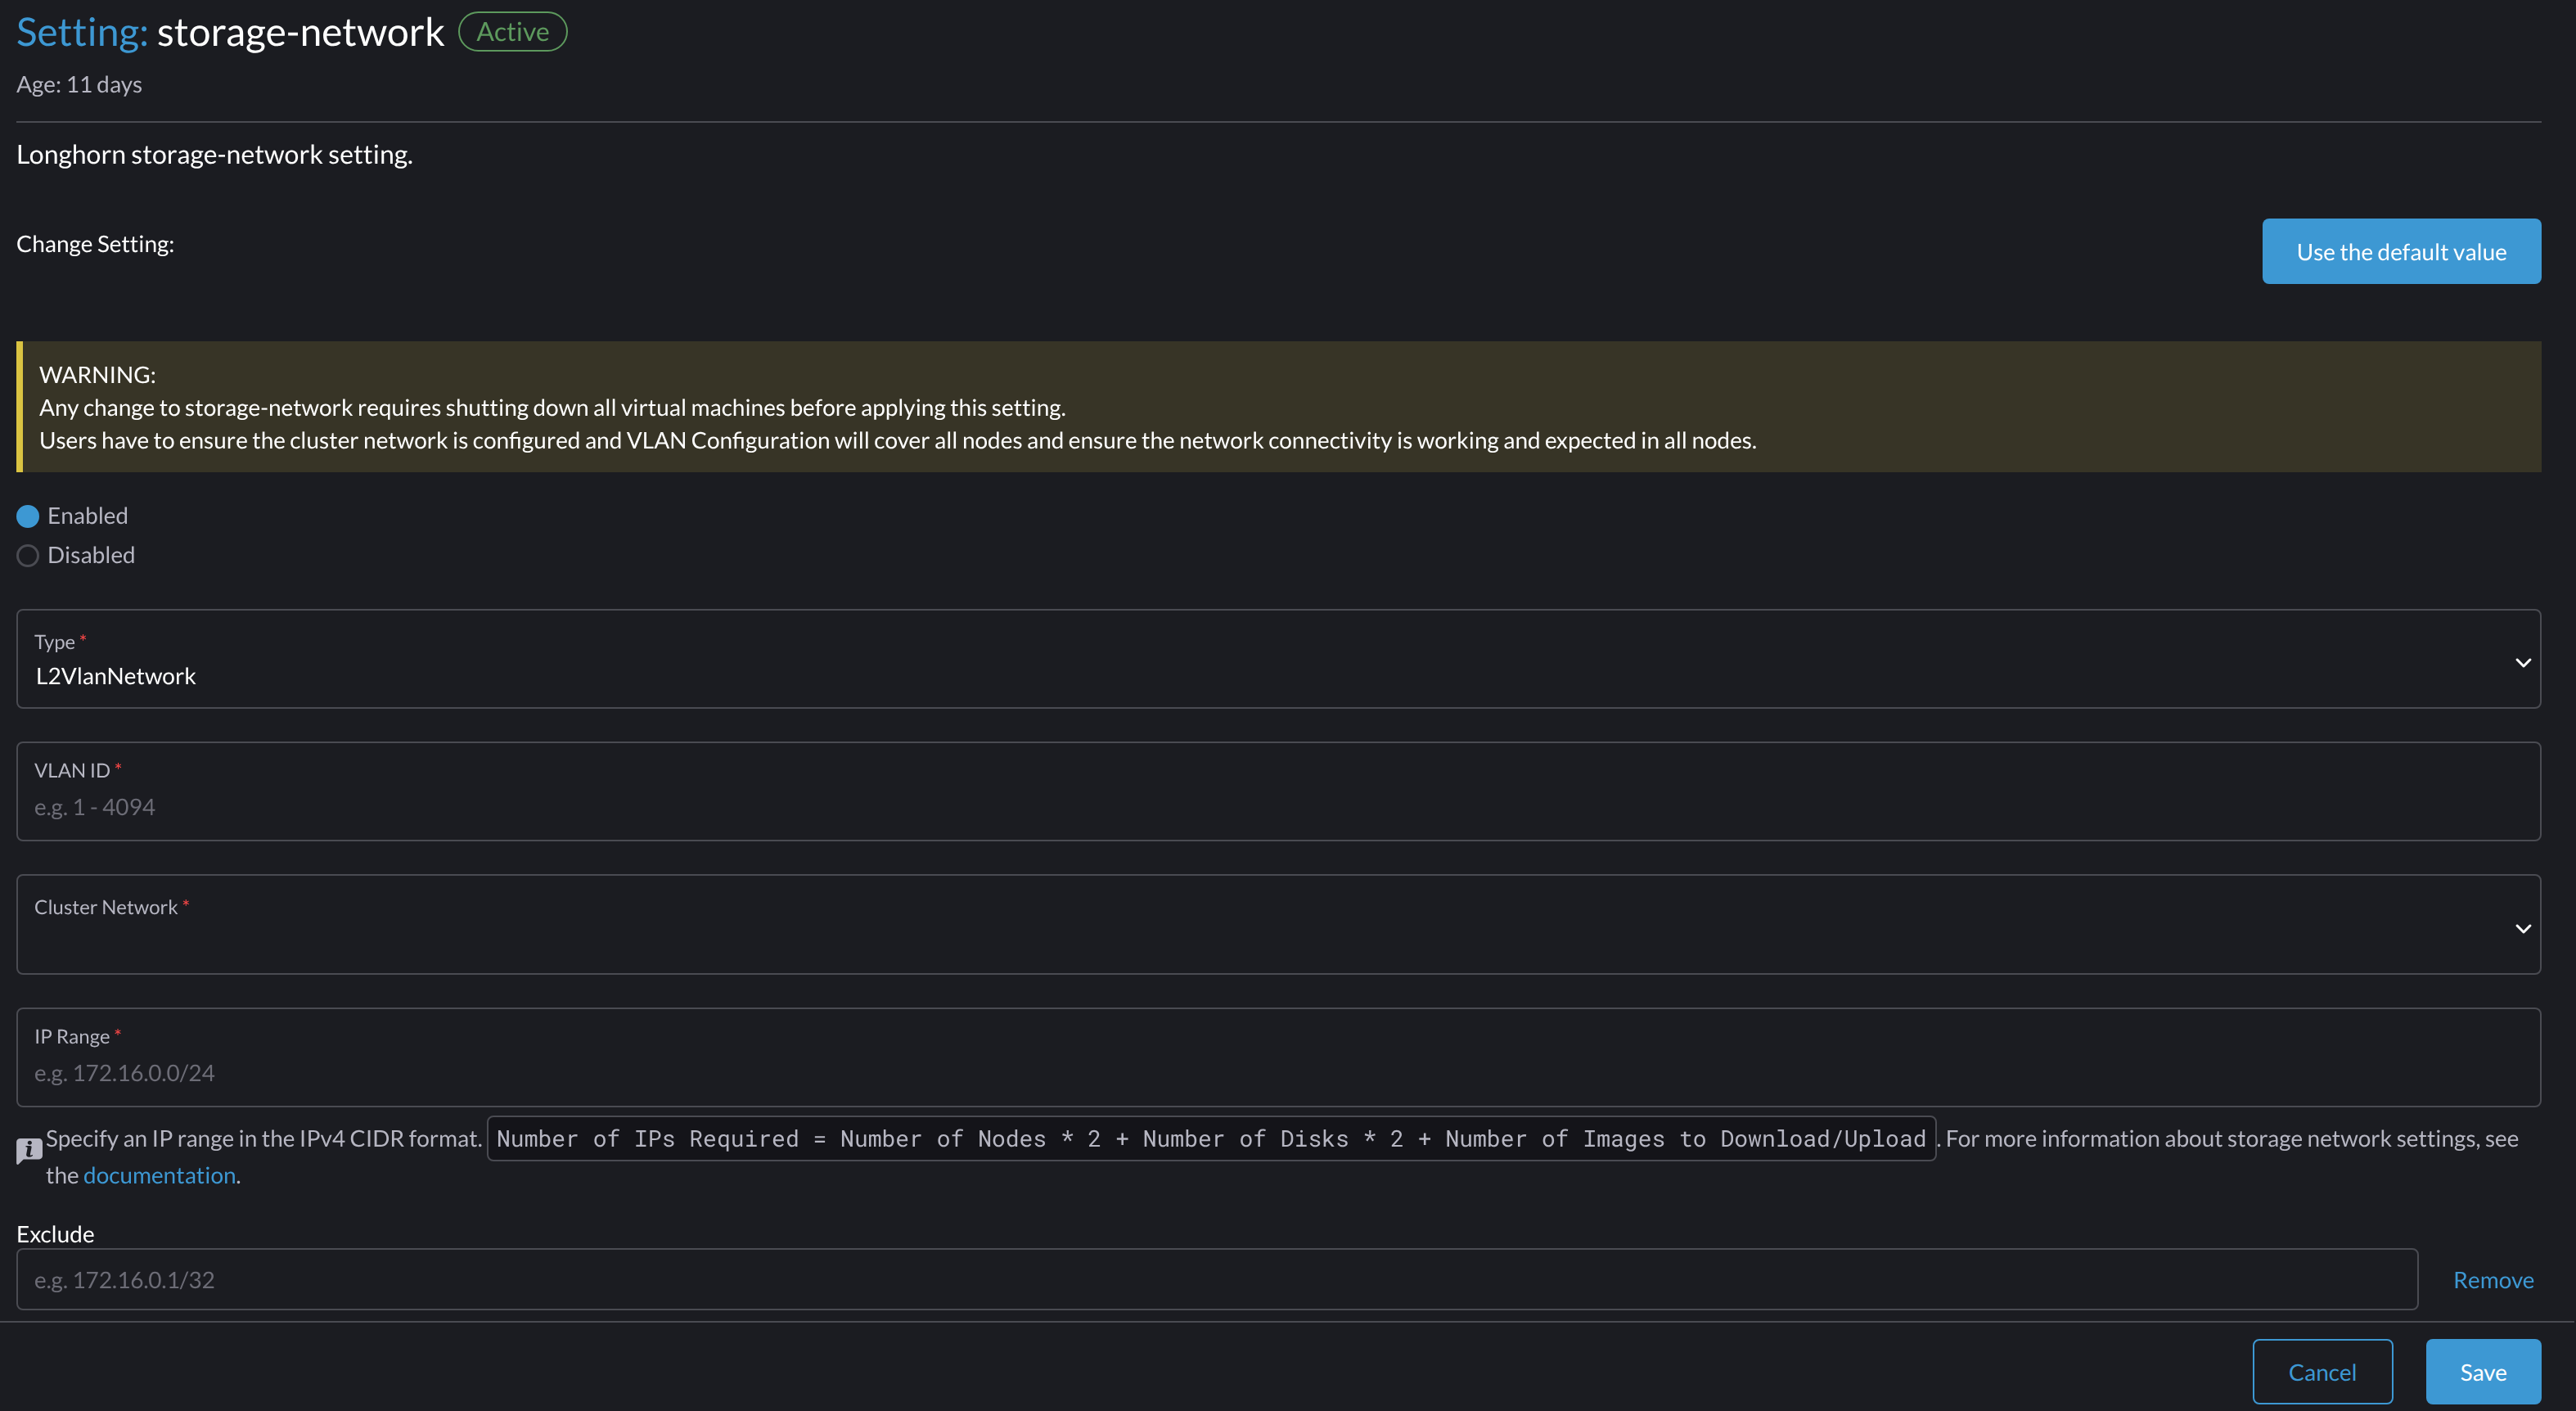
Enable the Storage Network
Go to Advanced > Settings > storage-network.
Select Enabled.
Configure the VLAN ID, Cluster Network, IP Range, and Exclude fields to construct a Multus
NetworkAttachmentDefinitionCRD.Click Save.
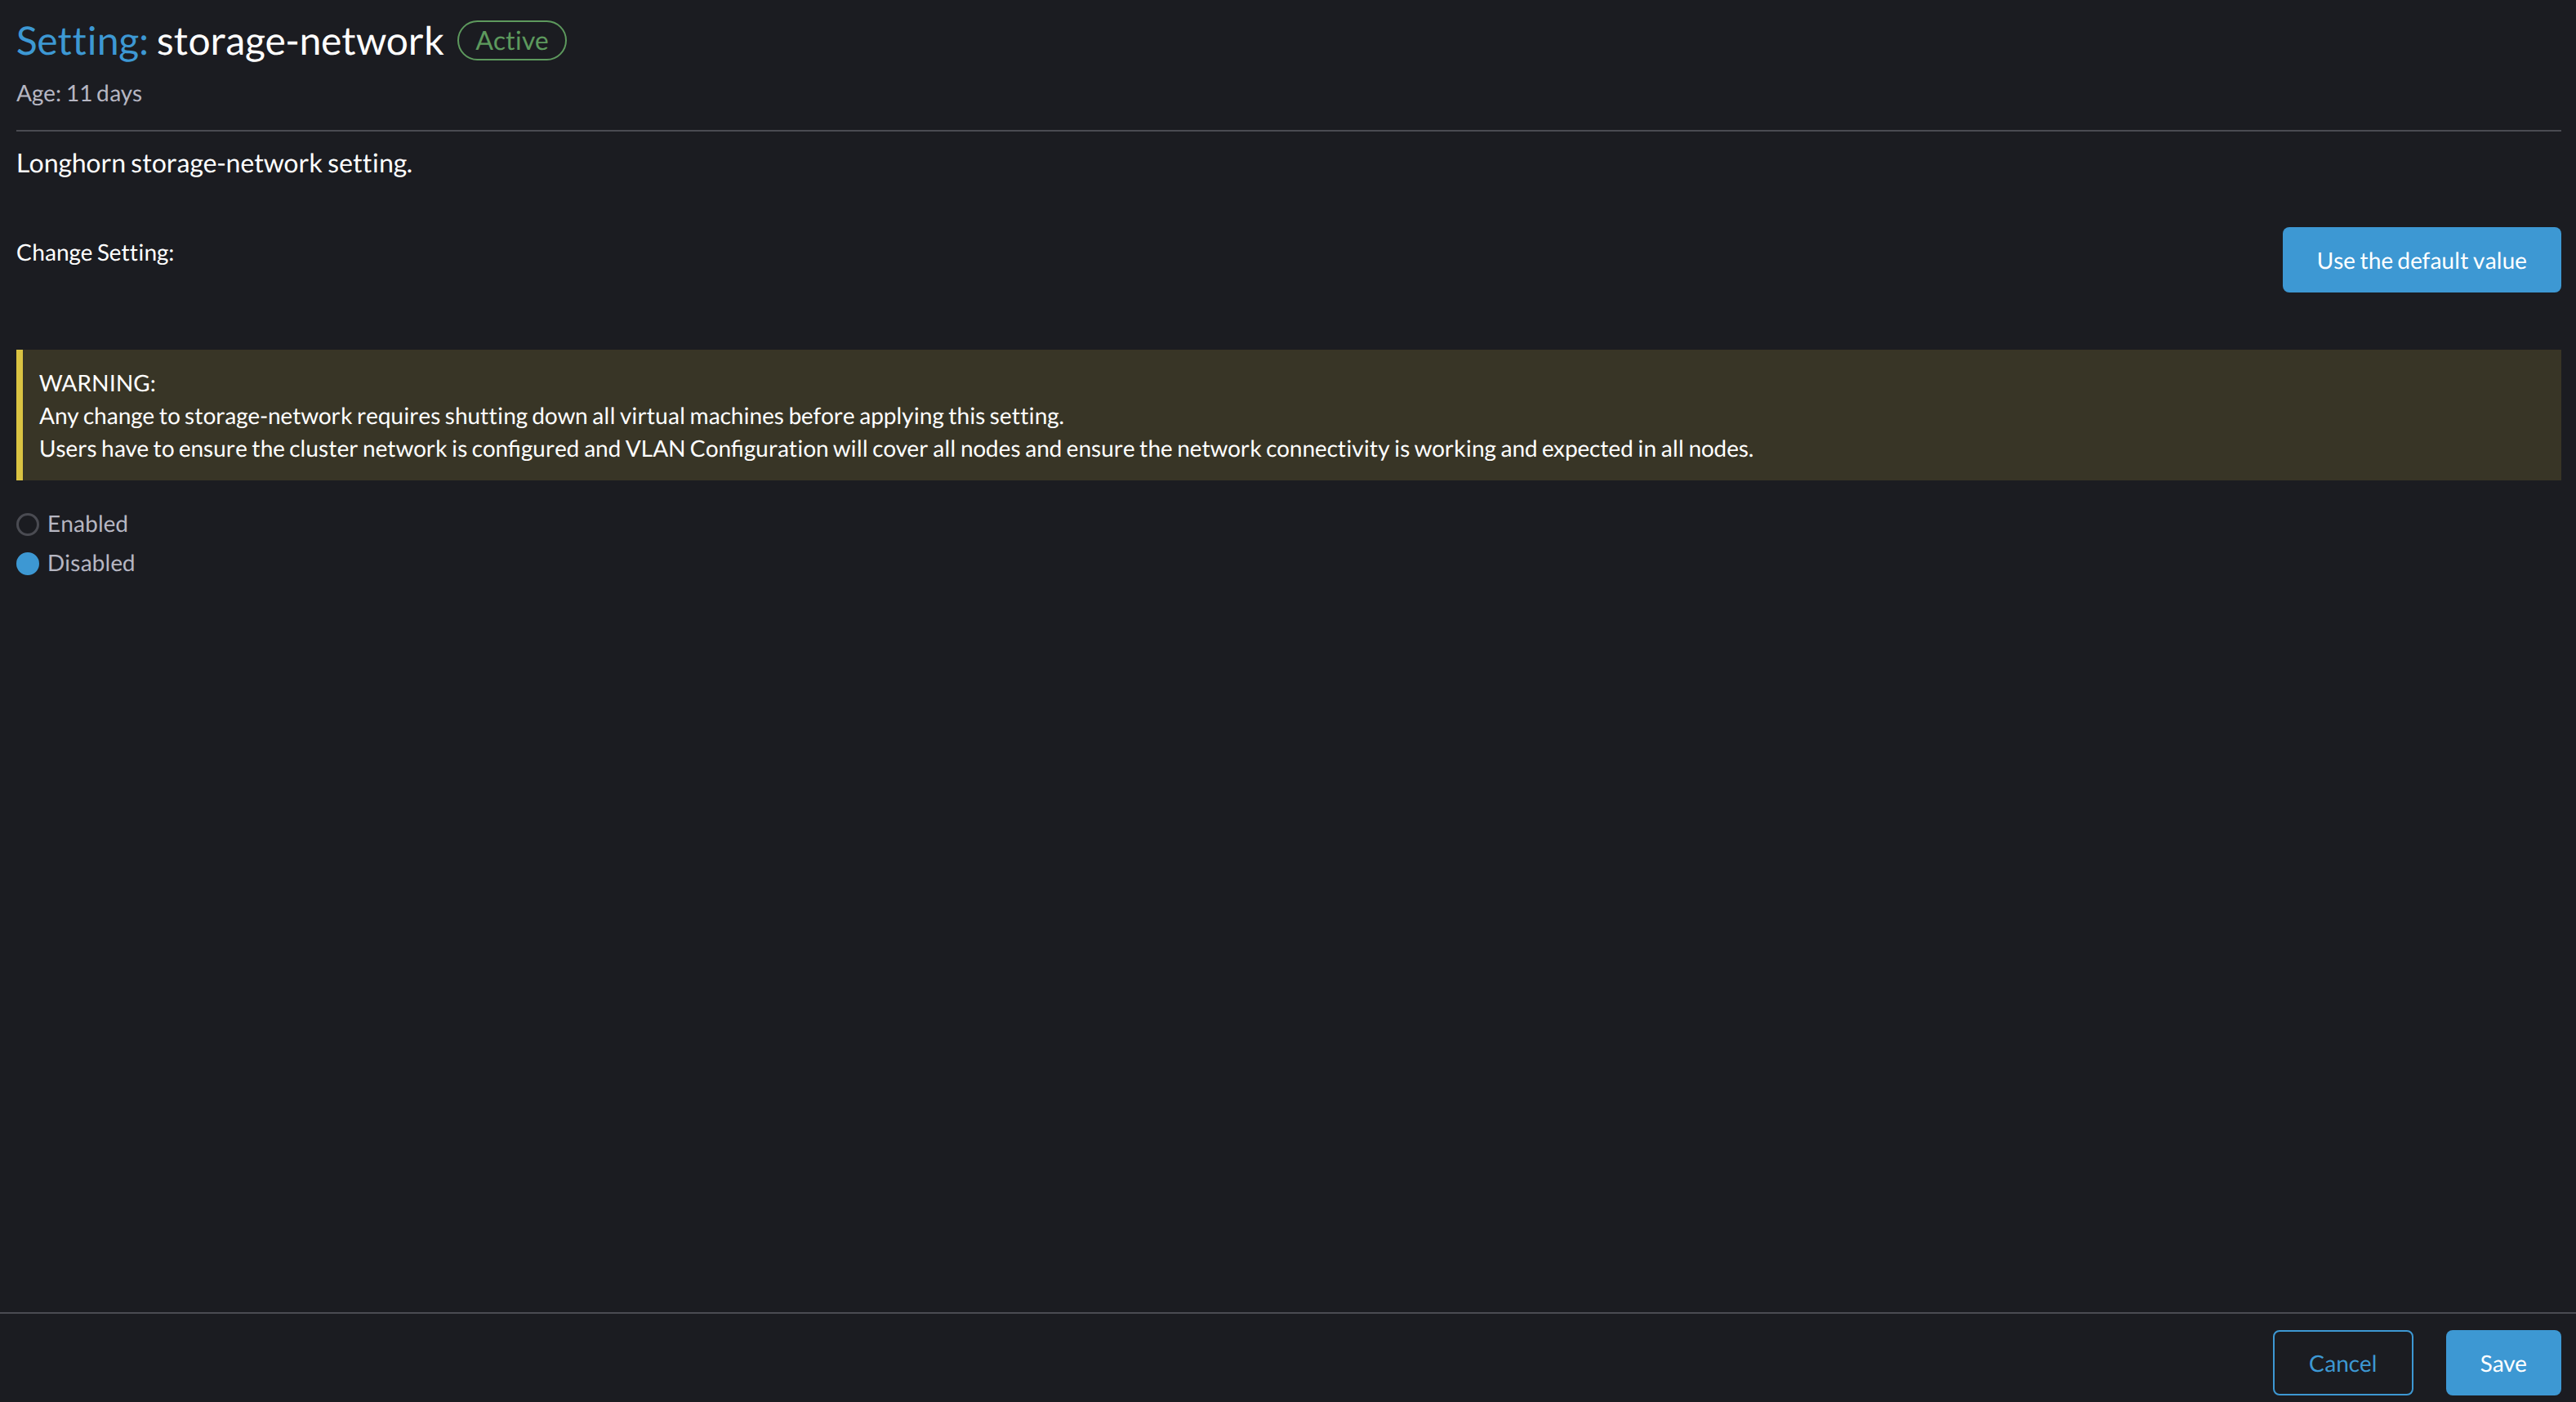
Disable the Storage Network
Go to Advanced > Settings > storage-network.
Select Disabled.
Click Save.
Once the storage network is disabled, Longhorn starts using the pod network for storage-related operations.
CLI
You can use the following command to configure the storage-network setting.
kubectl edit settings.harvesterhci.io storage-network
The value format is JSON string or empty string as shown in below:
{
    "vlan": 100,
    "clusterNetwork": "storage",
    "range": "192.168.0.0/24",
    "exclude":[
      "192.168.0.100/32"
    ]
}
The full configuration is like this example:
apiVersion: harvesterhci.io/v1beta1
kind: Setting
metadata:
  name: storage-network
value: '{"vlan":100,"clusterNetwork":"storage","range":"192.168.0.0/24", "exclude":["192.168.0.100/32"]}'
When the storage network is disabled, the full configuration is as follows:
apiVersion: harvesterhci.io/v1beta1
kind: Setting
metadata:
  name: storage-network
Harvester considers extra insignificant characters in a JSON string as a different configuration.
Specifying a valid value in the value field enables the storage network. Deleting the value field disables the storage network.
Change the MTU of the Storage Network
Follow the instructions in Change the MTU of a Network Configuration with an Attached Storage Network.
After Applying Harvester Storage Network Setting
After applying Harvester's Storage Network setting, Harvester will stop all pods that are related to Longhorn volumes. Currently, Harvester has some pods listed below that will be stopped during setting.
- Prometheus
- Grafana
- Alertmanager
- VM Import Controller
Harvester will also create a new NetworkAttachmentDefinition and update the Longhorn Storage Network setting.
Once the Longhorn setting is updated, Longhorn will restart all instance-manager-r, instance-manager-e, and backing-image-manager pods to apply the new network configuration, and Harvester will restart the pods.
Harvester will not start VM automatically. Users should check whether the configuration is completed or not in the next section and start VM manually on demand.
Verify Configuration is Completed
Step 1
Check if Harvester Storage Network setting's status is True and the type is configured.
kubectl get settings.harvesterhci.io storage-network -o yaml
Completed Setting Example:
apiVersion: harvesterhci.io/v1beta1
kind: Setting
metadata:
  annotations:
    storage-network.settings.harvesterhci.io/hash: da39a3ee5e6b4b0d3255bfef95601890afd80709
    storage-network.settings.harvesterhci.io/net-attach-def: ""
    storage-network.settings.harvesterhci.io/old-net-attach-def: ""
  creationTimestamp: "2022-10-13T06:36:39Z"
  generation: 51
  name: storage-network
  resourceVersion: "154638"
  uid: 2233ad63-ee52-45f6-a79c-147e48fc88db
status:
  conditions:
  - lastUpdateTime: "2022-10-13T13:05:17Z"
    reason: Completed
    status: "True"
    type: configured
Step 2
Verify the readiness of all Longhorn instance-manager-e, instance-manager-r, and backing-image-manager pods, and confirm that their networks are correctly configured.
Execute the following command to inspect a pod's details:
kubectl -n longhorn-system describe pod <pod-name>
If you encounter an event resembling the following one, the Storage Network might have run out of its available IPs:
Events:
  Type     Reason                  Age                    From     Message
  ----     ------                  ----                   ----     -------
  ....

  Warning  FailedCreatePodSandBox  2m58s                  kubelet  Failed to create pod sandbox: rpc error: code = Unknown desc = failed to setup network for
 sandbox "04e9bc160c4f1da612e2bb52dadc86702817ac557e641a3b07b7c4a340c9fc48": plugin type="multus" name="multus-cni-network" failed (add): [longhorn-system/ba
cking-image-ds-default-image-lxq7r/7d6995ee-60a6-4f67-b9ea-246a73a4df54:storagenetwork-sdfg8]: error adding container to network "storagenetwork-sdfg8": erro
r at storage engine: Could not allocate IP in range: ip: 172.16.0.1 / - 172.16.0.6 / range: net.IPNet{IP:net.IP{0xac, 0x10, 0x0, 0x0}, Mask:net.IPMask{0xff,
0xff, 0xff, 0xf8}}

  ....
Please reconfigure the Storage Network with a sufficient IP range.
If the Storage Network has run out of IPs, you might encounter the same error when you upload/download images. Please delete the related images and reconfigure the Storage Network with a sufficient IP range.
Step 3
Check the k8s.v1.cni.cncf.io/network-status annotations and ensure that an interface named lhnet1 exists, with an IP address within the designated IP range.
Users could use the following command to show all Longhorn Instance Manager to verify.
kubectl get pods -n longhorn-system -l longhorn.io/component=instance-manager -o yaml
Correct Network Example:
apiVersion: v1
kind: Pod
metadata:
  annotations:
    cni.projectcalico.org/containerID: 2518b0696f6635896645b5546417447843e14208525d3c19d7ec6d7296cc13cd
    cni.projectcalico.org/podIP: 10.52.2.122/32
    cni.projectcalico.org/podIPs: 10.52.2.122/32
    k8s.v1.cni.cncf.io/network-status: |-
      [{
          "name": "k8s-pod-network",
          "ips": [
              "10.52.2.122"
          ],
          "default": true,
          "dns": {}
      },{
          "name": "harvester-system/storagenetwork-95bj4",
          "interface": "lhnet1",
          "ips": [
              "192.168.0.3"
          ],
          "mac": "2e:51:e6:31:96:40",
          "dns": {}
      }]
    k8s.v1.cni.cncf.io/networks: '[{"namespace": "harvester-system", "name": "storagenetwork-95bj4",
      "interface": "lhnet1"}]'
    k8s.v1.cni.cncf.io/networks-status: |-
      [{
          "name": "k8s-pod-network",
          "ips": [
              "10.52.2.122"
          ],
          "default": true,
          "dns": {}
      },{
          "name": "harvester-system/storagenetwork-95bj4",
          "interface": "lhnet1",
          "ips": [
              "192.168.0.3"
          ],
          "mac": "2e:51:e6:31:96:40",
          "dns": {}
      }]
    kubernetes.io/psp: global-unrestricted-psp
    longhorn.io/last-applied-tolerations: '[{"key":"kubevirt.io/drain","operator":"Exists","effect":"NoSchedule"}]'

Omitted...
Step 4
The storage network is dedicated to internal communication between Longhorn pods, resulting in high performance and reliability. However, the storage network still relies on the external network infrastructure for connectivity (similar to how the VM VLAN network functions). When the external network is not connected and configured correctly, you may encounter the following issues:
The newly created VM becomes stuck at the
Not-Readystate.The
longhorn-managerpod logs include error messages.
Example:
longhorn-manager-j6dhh/longhorn-manager.log:2024-03-20T16:25:24.662251001Z time="2024-03-20T16:25:24Z" level=error msg="Failed rebuilding of replica 10.0.16.26:10000" controller=longhorn-engine engine=pvc-0a151c59-ffa9-4938-9c86-59ebb296bc88-e-c2a7fe77 error="proxyServer=10.52.6.33:8501 destination=10.0.16.23:10000: failed to add replica tcp://10.0.16.26:10000 for volume: rpc error: code = Unknown desc = failed to get replica 10.0.16.26:10000: rpc error: code = Unavailable desc = all SubConns are in TransientFailure, latest connection error: connection error: desc = \"transport: Error while dialing dial tcp 10.0.16.26:10000: connect: no route to host\"" node=oml-harvester-9 volume=pvc-0a151c59-ffa9-4938-9c86-59ebb296bc88
To test the communication between Longhorn pods, perform the following steps:
4.1 Obtain the storage network IP of each Longhorn Instance Manager pod identified in the previous step.
Example:
instance-manager-r-43f1624d14076e1d95cd72371f0316e2
storage network IP: 10.0.16.8

instance-manager-e-ba38771e483008ce61249acf9948322f
storage network IP: 10.0.16.14
4.2 Log in to those pods.
When you run the command ip addr, the output includes IPs that are identical to IPs in the pod annotations. In the following example, one IP is for the pod network, while the other is for the storage network.
Example:
$ kubectl exec -i -t -n longhorn-system instance-manager-e-ba38771e483008ce61249acf9948322f -- /bin/sh

$ ip addr
1: lo: <LOOPBACK,UP,LOWER_UP> mtu 65536 qdisc noqueue state UNKNOWN group default qlen 1000
    link/loopback 00:00:00:00:00:00 brd 00:00:00:00:00:00
    inet 127.0.0.1/8 scope host lo
...
3: eth0@if2277: <BROADCAST,MULTICAST,UP,LOWER_UP> mtu 1450 qdisc noqueue state UP group default  // pod network link
    link/ether 0e:7c:d6:77:44:72 brd ff:ff:ff:ff:ff:ff link-netnsid 0
    inet 10.52.6.146/32 scope global eth0
...
4: lhnet1@if2278: <BROADCAST,MULTICAST,UP,LOWER_UP> mtu 1500 qdisc noqueue state UP group default // storage network link, note the MTU value
    link/ether fe:92:4f:fb:dd:20 brd ff:ff:ff:ff:ff:ff link-netnsid 0
    inet 10.0.16.14/20 brd 10.0.31.255 scope global lhnet1
...

$ ip route
default via 169.254.1.1 dev eth0
10.0.16.0/20 dev lhnet1 proto kernel scope link src 10.0.16.14
169.254.1.1 dev eth0 scope link
The storage network link always inherites the MTU value from the attached cluster-network, no matter which MTU value has been set.
4.3 Start a simple HTTP server in one pod.
Example:
$ python3 -m http.server 8000 --bind 10.0.16.14 (replace with your pod storage network IP)
Explicitly bind the simple HTTP server to the storage network IP.
4.4 Test the HTTP server in another pod.
Example:
From instance-manager-r-43f1624d14076e1d95cd72371f0316e2 (IP 10.0.16.8)

$ curl http://10.0.16.14:8000
When the storage network is functioning correctly, the curl command returns a list of files on the HTTP server.
4.5 (Optional) Troubleshoot issues.
The storage network may malfunction because of issues with the external network, such as the following:
Physical NICs (installed on Harvester nodes) that are associated with the storage network were not added to the same VLAN in the external switches.
The external switches are not correctly connected and configured.
Start VM Manually
After verifying the configuration, users could start VM manually on demand.
Best Practices
When configuring an IP range for the storage network, ensure that the allocated IP addresses can service the future needs of the cluster. This is important because Longhorn pods (
instance-managerandbacking-image-manager) stop running when new nodes are added to the cluster or more disks are added to a node after the storage network is configured, and when the required number of IPs exceeds the allocated IPs. Resolving the issue involves reconfiguring the storage network with the correct IP range.Configure the storage network on a non-
mgmtcluster network to ensure complete separation of the Longhorn replication traffic from the Kubernetes control plane traffic. Usingmgmtis possible but not recommended because of the negative impact (resource and bandwidth contention) on the control plane network performance. Usemgmtonly if your cluster has NIC-related constraints and if you can completely segregate the traffic.