Troubleshooting
Overview
Here are some tips to troubleshoot a failed upgrade:
- Check version-specific upgrade notes. You can click the version in the support matrix table to see if there are any known issues.
- Dive into the upgrade design proposal. The following section briefly describes phases within an upgrade and possible diagnostic methods.
Upgrade Flow
The Harvester upgrade process involves several phases.
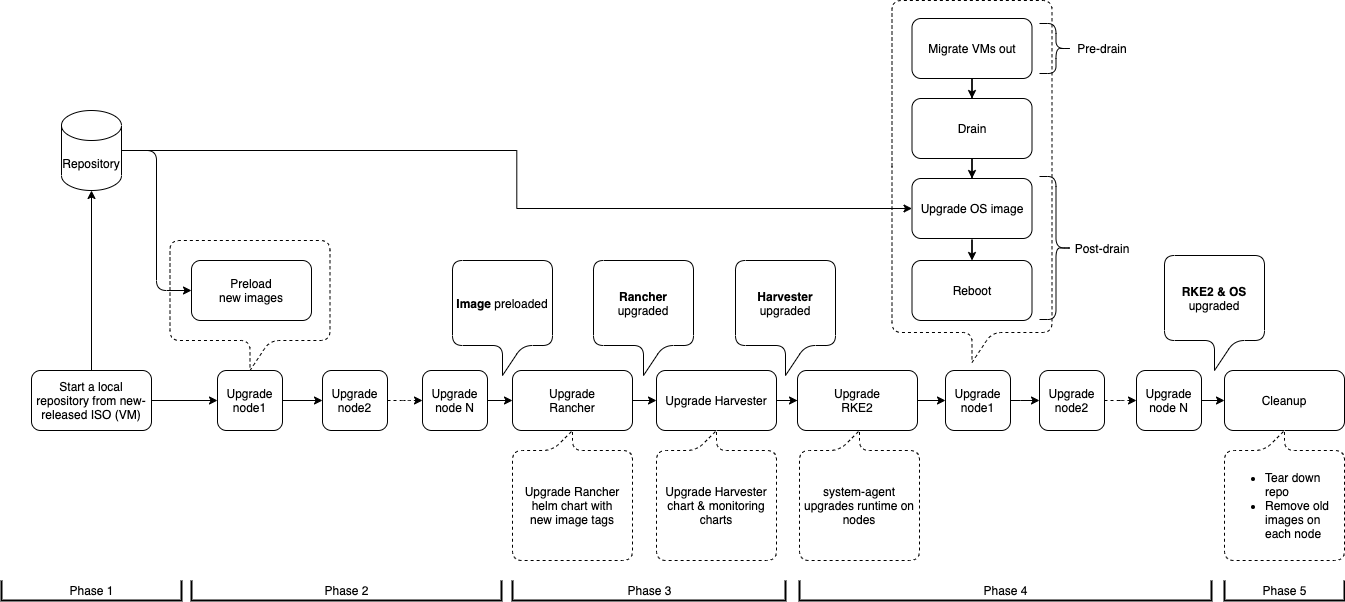
Phase 1: Provision an Upgrade Repository Virtual Machine
The Harvester controller downloads a release ISO file and uses it to provision a repository virtual machine. The virtual machine name uses the format upgrade-repo-hvst-xxxx.
Network speed and cluster resource utilization influence the amount of time required to complete this phase. Upgrades typically fail because of network speed issues.
If the upgrade fails at this point, check the status of the repository virtual machine and its corresponding pod before restarting the upgrade. You can check the status using the command kubectl get vm -n harvester-system.
Example:
$ kubectl get vm -n harvester-system
NAME                              AGE    STATUS     READY
upgrade-repo-hvst-upgrade-9gmg2   101s   Starting   False

$ kubectl get pods -n harvester-system | grep upgrade-repo-hvst
virt-launcher-upgrade-repo-hvst-upgrade-9gmg2-4mnmq     1/1     Running     0          4m44s
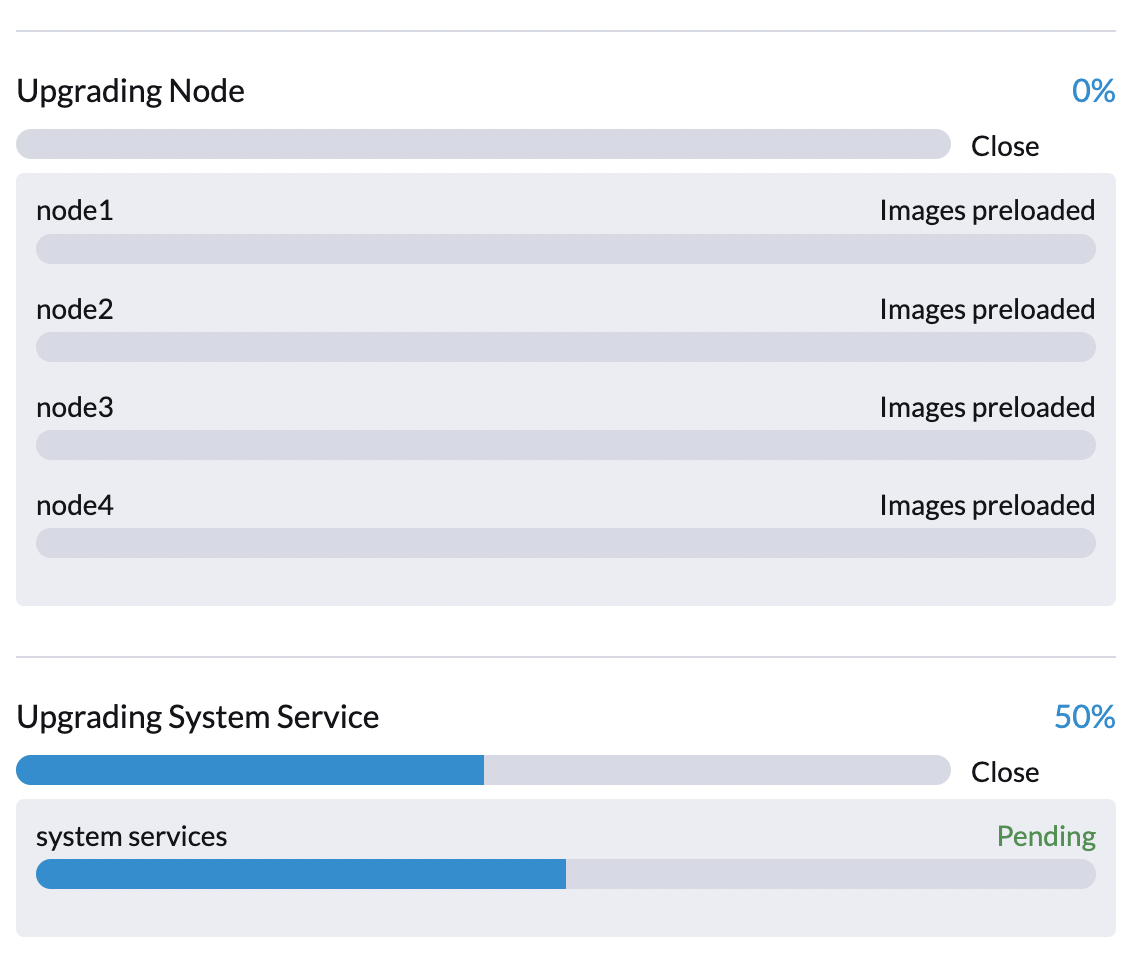
Phase 2: Preload Container Images
The Harvester controller creates jobs that download and preload container images from the repository virtual machine. These images are required for the next release.
Allow some time for the images to be downloaded and preloaded on all nodes.

If the upgrade fails at this point, check the job logs in the cattle-system namespace before restarting the upgrade. You can check the logs using the command kubectl get jobs -n cattle-system | grep prepare.
Example:
$ kubectl get jobs -n cattle-system | grep prepare
apply-hvst-upgrade-9gmg2-prepare-on-node1-with-2bbea1599a-f0e86   0/1           47s        47s
apply-hvst-upgrade-9gmg2-prepare-on-node4-with-2bbea1599a-041e4   1/1           2m3s       2m50s

$ kubectl logs jobs/apply-hvst-upgrade-9gmg2-prepare-on-node1-with-2bbea1599a-f0e86 -n cattle-system
...
Phase 3: Upgrade System Services
The Harvester controller creates a job that upgrades component Helm charts.
You can check the apply-manifest job using the command $ kubectl get jobs -n harvester-system -l harvesterhci.io/upgradeComponent=manifest.
Example:
$ kubectl get jobs -n harvester-system -l harvesterhci.io/upgradeComponent=manifest
NAME                                 COMPLETIONS   DURATION   AGE
hvst-upgrade-9gmg2-apply-manifests   0/1           46s        46s

$ kubectl logs jobs/hvst-upgrade-9gmg2-apply-manifests -n harvester-system
...
If the upgrade fails at this point, you must generate a support bundle before restarting the upgrade. The support bundle contains logs and resource manifests that can help identify the cause of the failure.
Phase 4: Upgrade Nodes
The Harvester controller creates the following jobs on each node:
- Multi-node clusters:
pre-drainjob: Live-migrates or shuts down virtual machines on the node. Once completed, the embedded Rancher service upgrades the RKE2 runtime on the node.post-drainjob: Upgrades and reboots the operating system.
- Single-node clusters:
single-node-upgradejob: Upgrades the operating system and RKE2 runtime. The job name uses the formathvst-upgrade-xxx-single-node-upgrade-<hostname>.
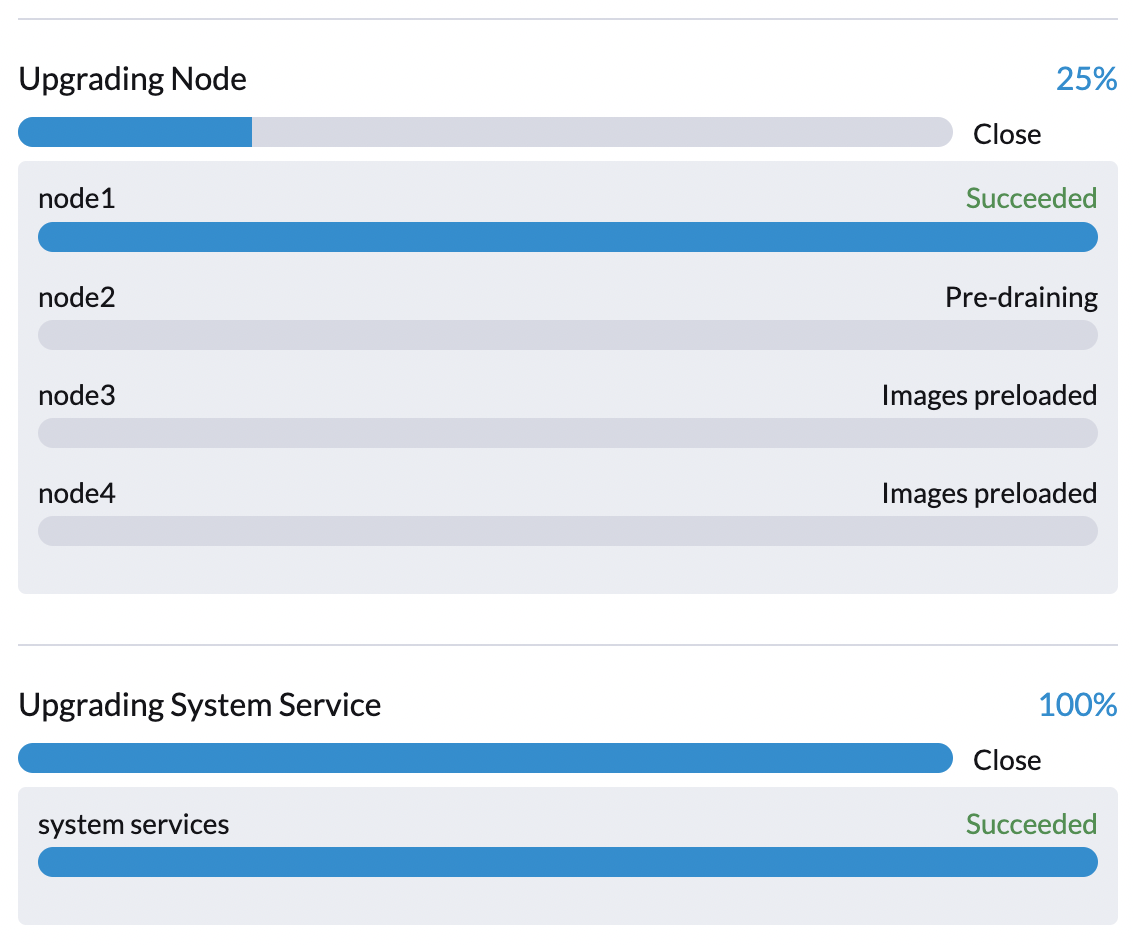
You can check the jobs running on each node by running the command kubectl get jobs -n harvester-system -l harvesterhci.io/upgradeComponent=node.
Example:
$ kubectl get jobs -n harvester-system -l harvesterhci.io/upgradeComponent=node
NAME                                  COMPLETIONS   DURATION   AGE
hvst-upgrade-9gmg2-post-drain-node1   1/1           118s       6m34s
hvst-upgrade-9gmg2-post-drain-node2   0/1           9s         9s
hvst-upgrade-9gmg2-pre-drain-node1    1/1           3s         8m14s
hvst-upgrade-9gmg2-pre-drain-node2    1/1           7s         85s

$ kubectl logs -n harvester-system jobs/hvst-upgrade-9gmg2-post-drain-node2
...
If the upgrade fails at this point, DO NOT restart the upgrade unless instructed by SUSE support.
Phase 5: Cleanup
The Harvester controller deletes the repository virtual machine and all files that are no longer necessary.
Common Operations
Stop the Ongoing Upgrade
You can stop the upgrade by performing the following steps:
Log in to a control plane node.
List the
UpgradeCRs in the cluster.# become root
$ sudo -i
# list the on-going upgrade
$ kubectl get upgrade.harvesterhci.io -n harvester-system -l harvesterhci.io/latestUpgrade=true
NAME AGE
hvst-upgrade-9gmg2 10mDelete the
UpgradeCR.$ kubectl delete upgrade.harvesterhci.io/hvst-upgrade-9gmg2 -n harvester-system
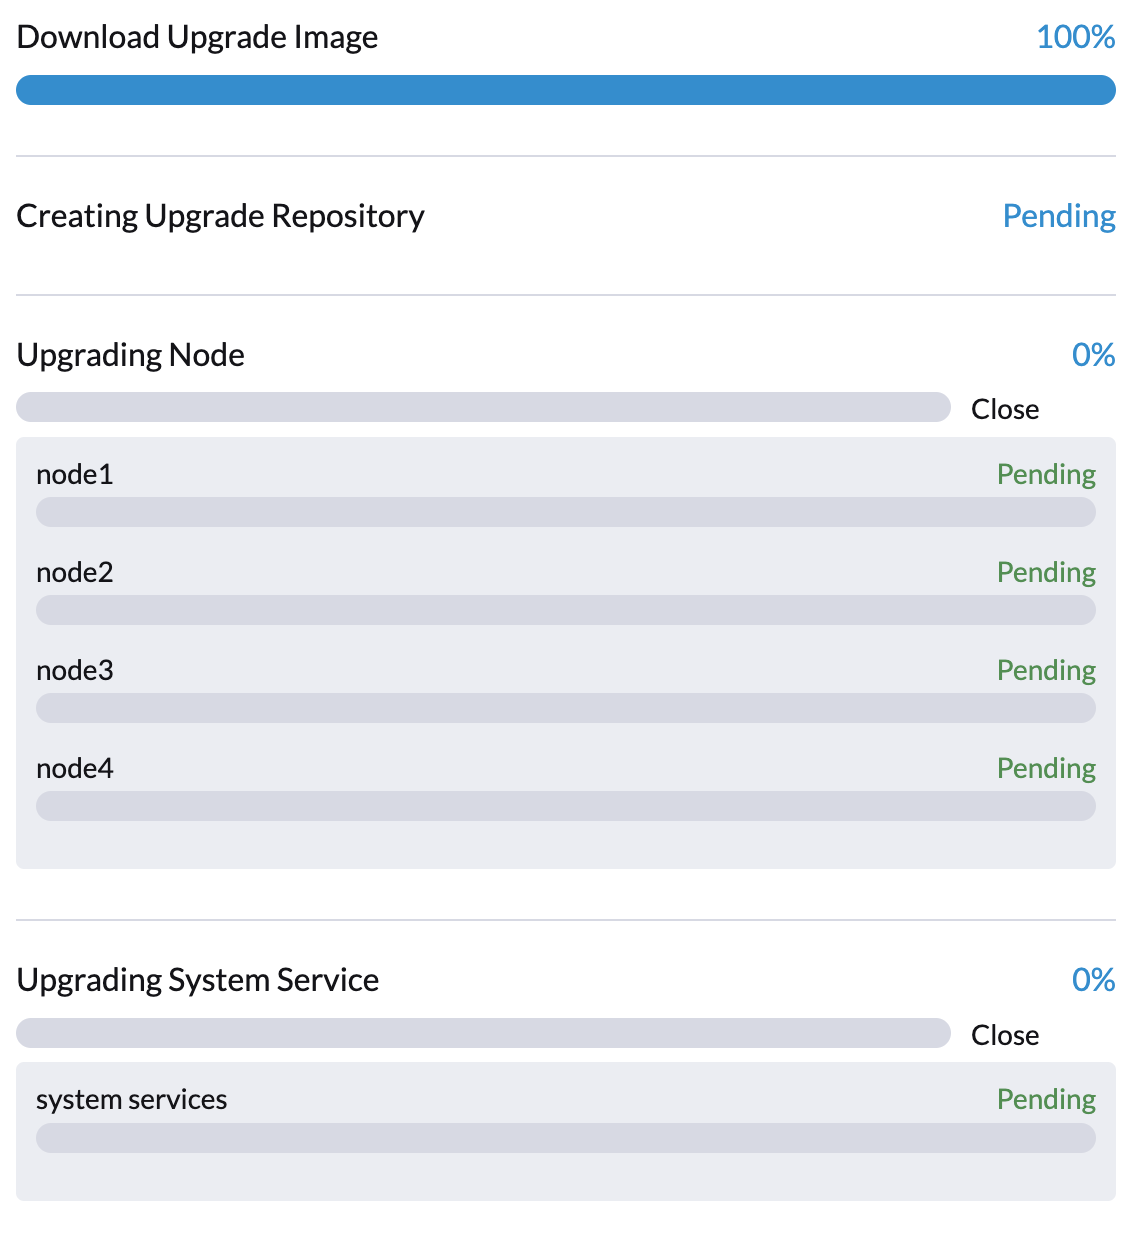
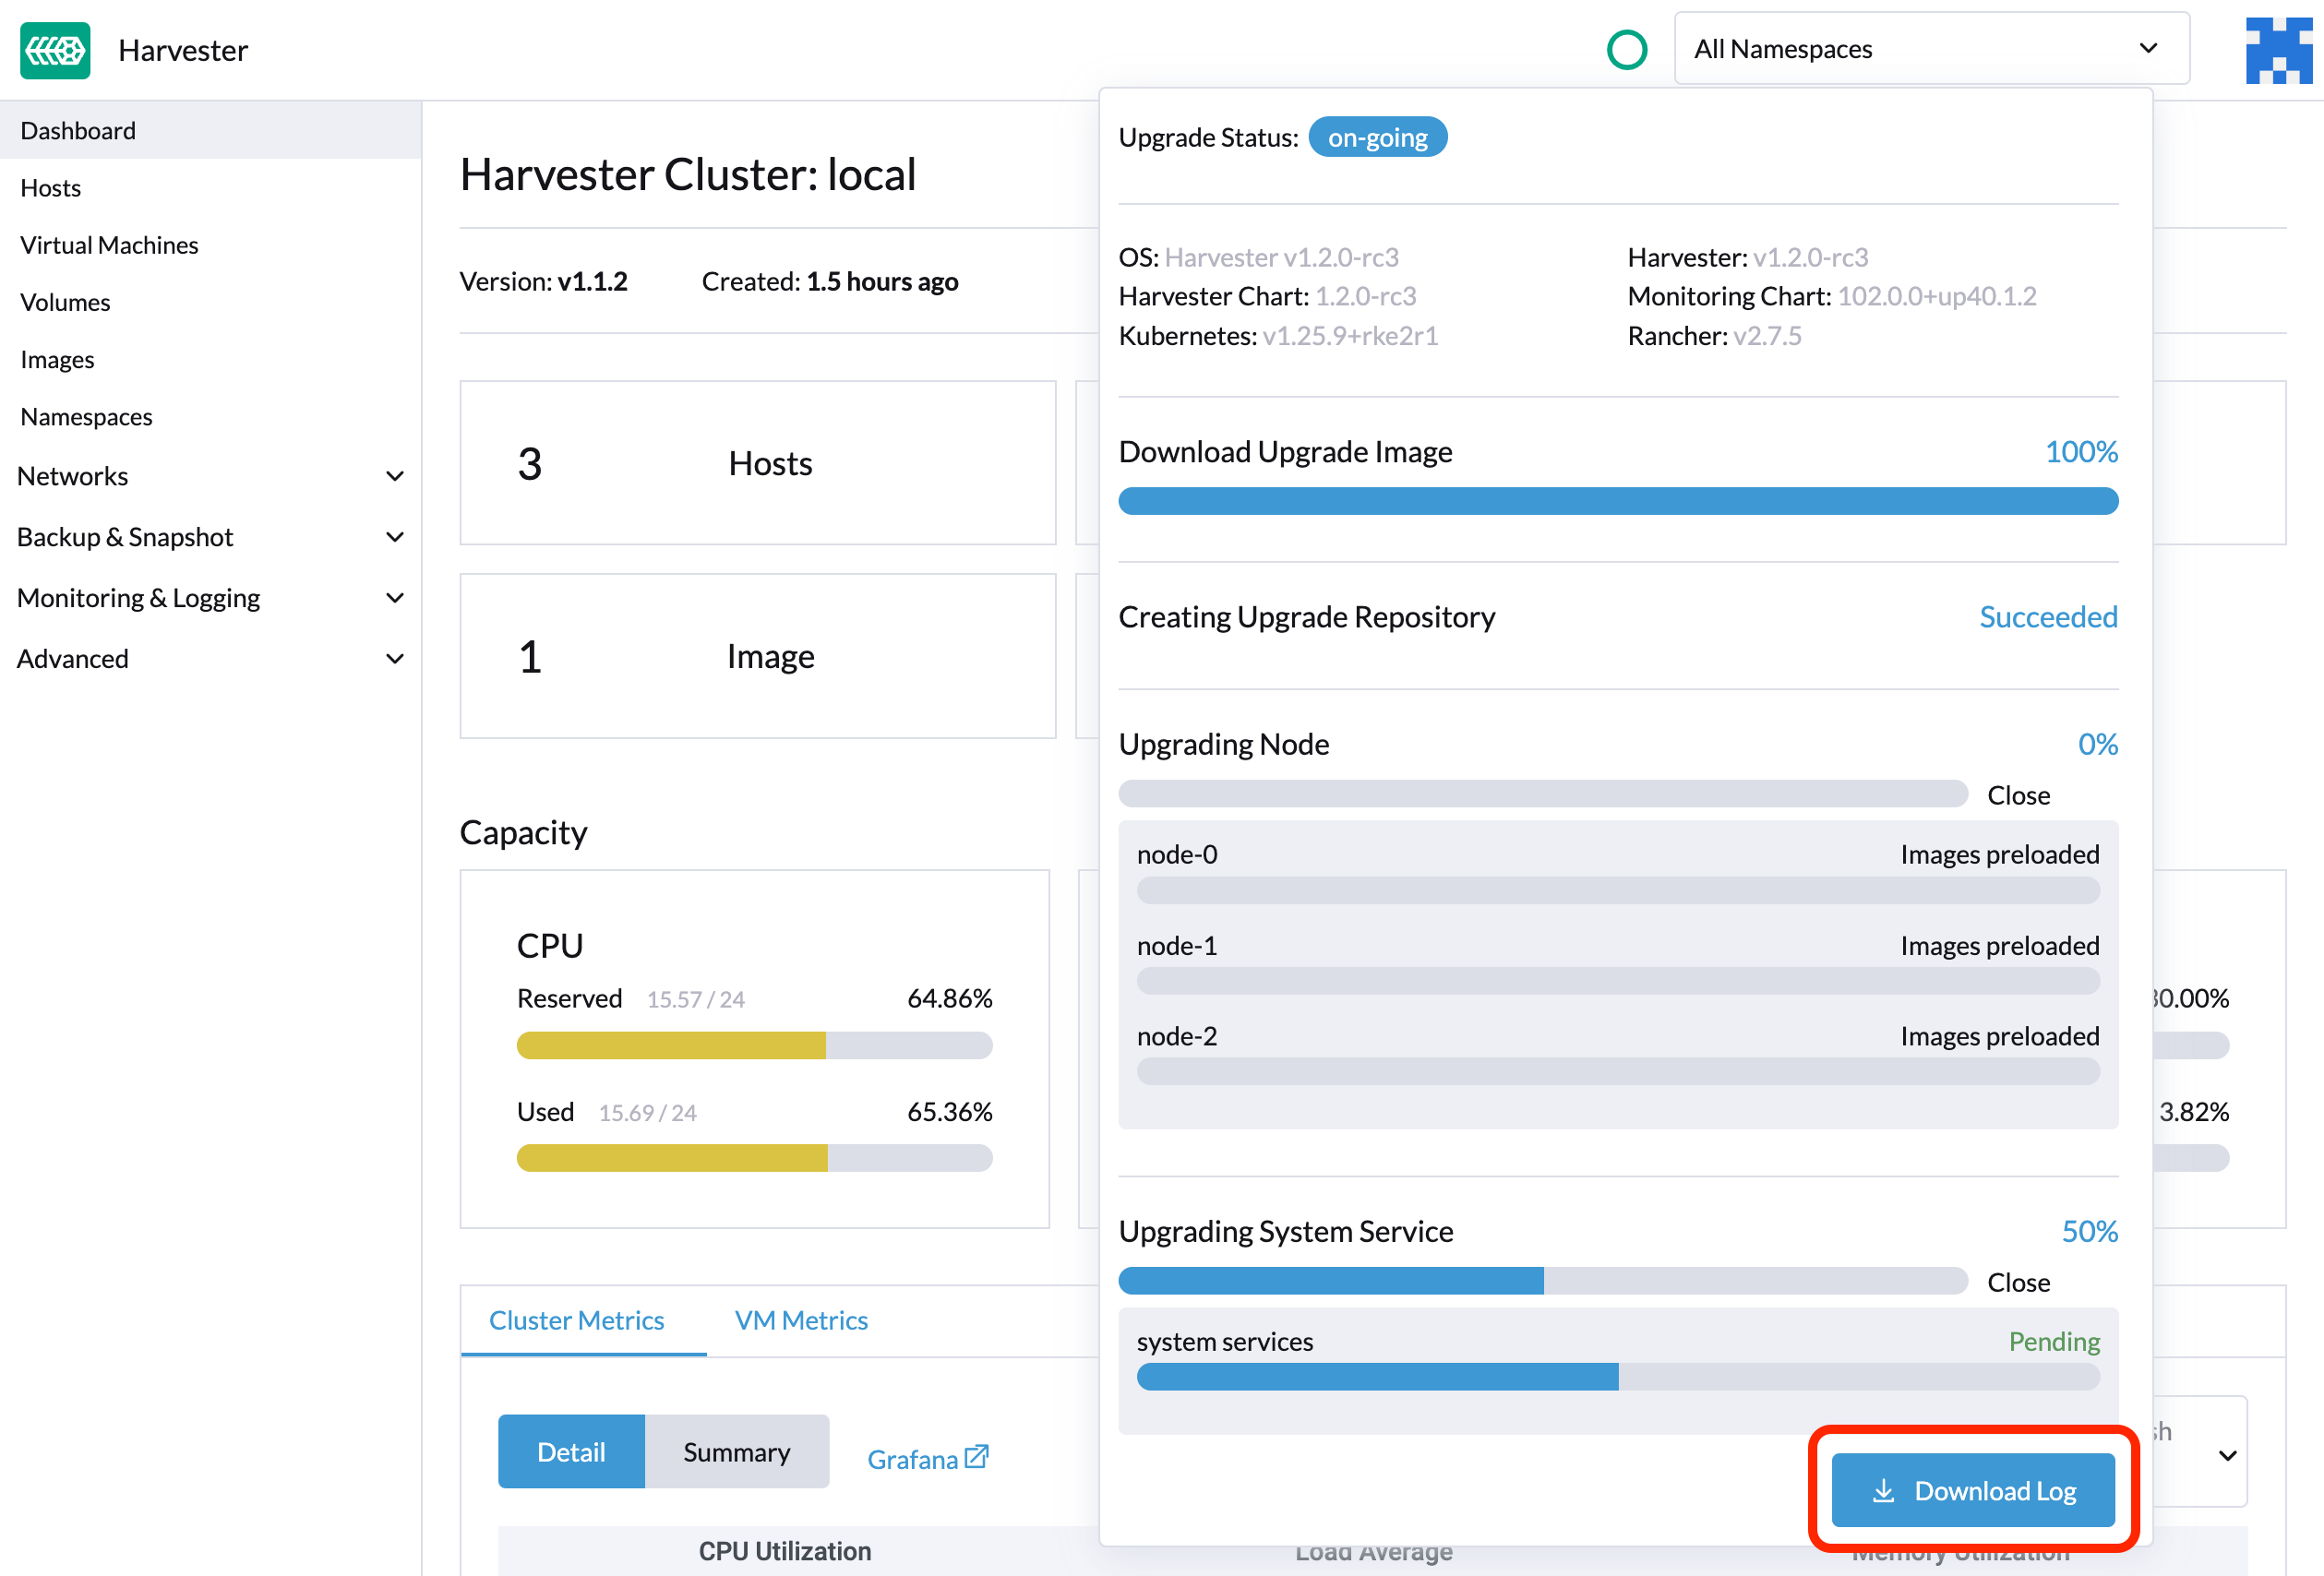
Download Upgrade Logs
Harvester automatically collects all the upgrade-related logs and display the upgrade procedure. By default, this is enabled. You can also choose to opt out of such behavior.

You can click the Download Log button to download the log archive during an upgrade.
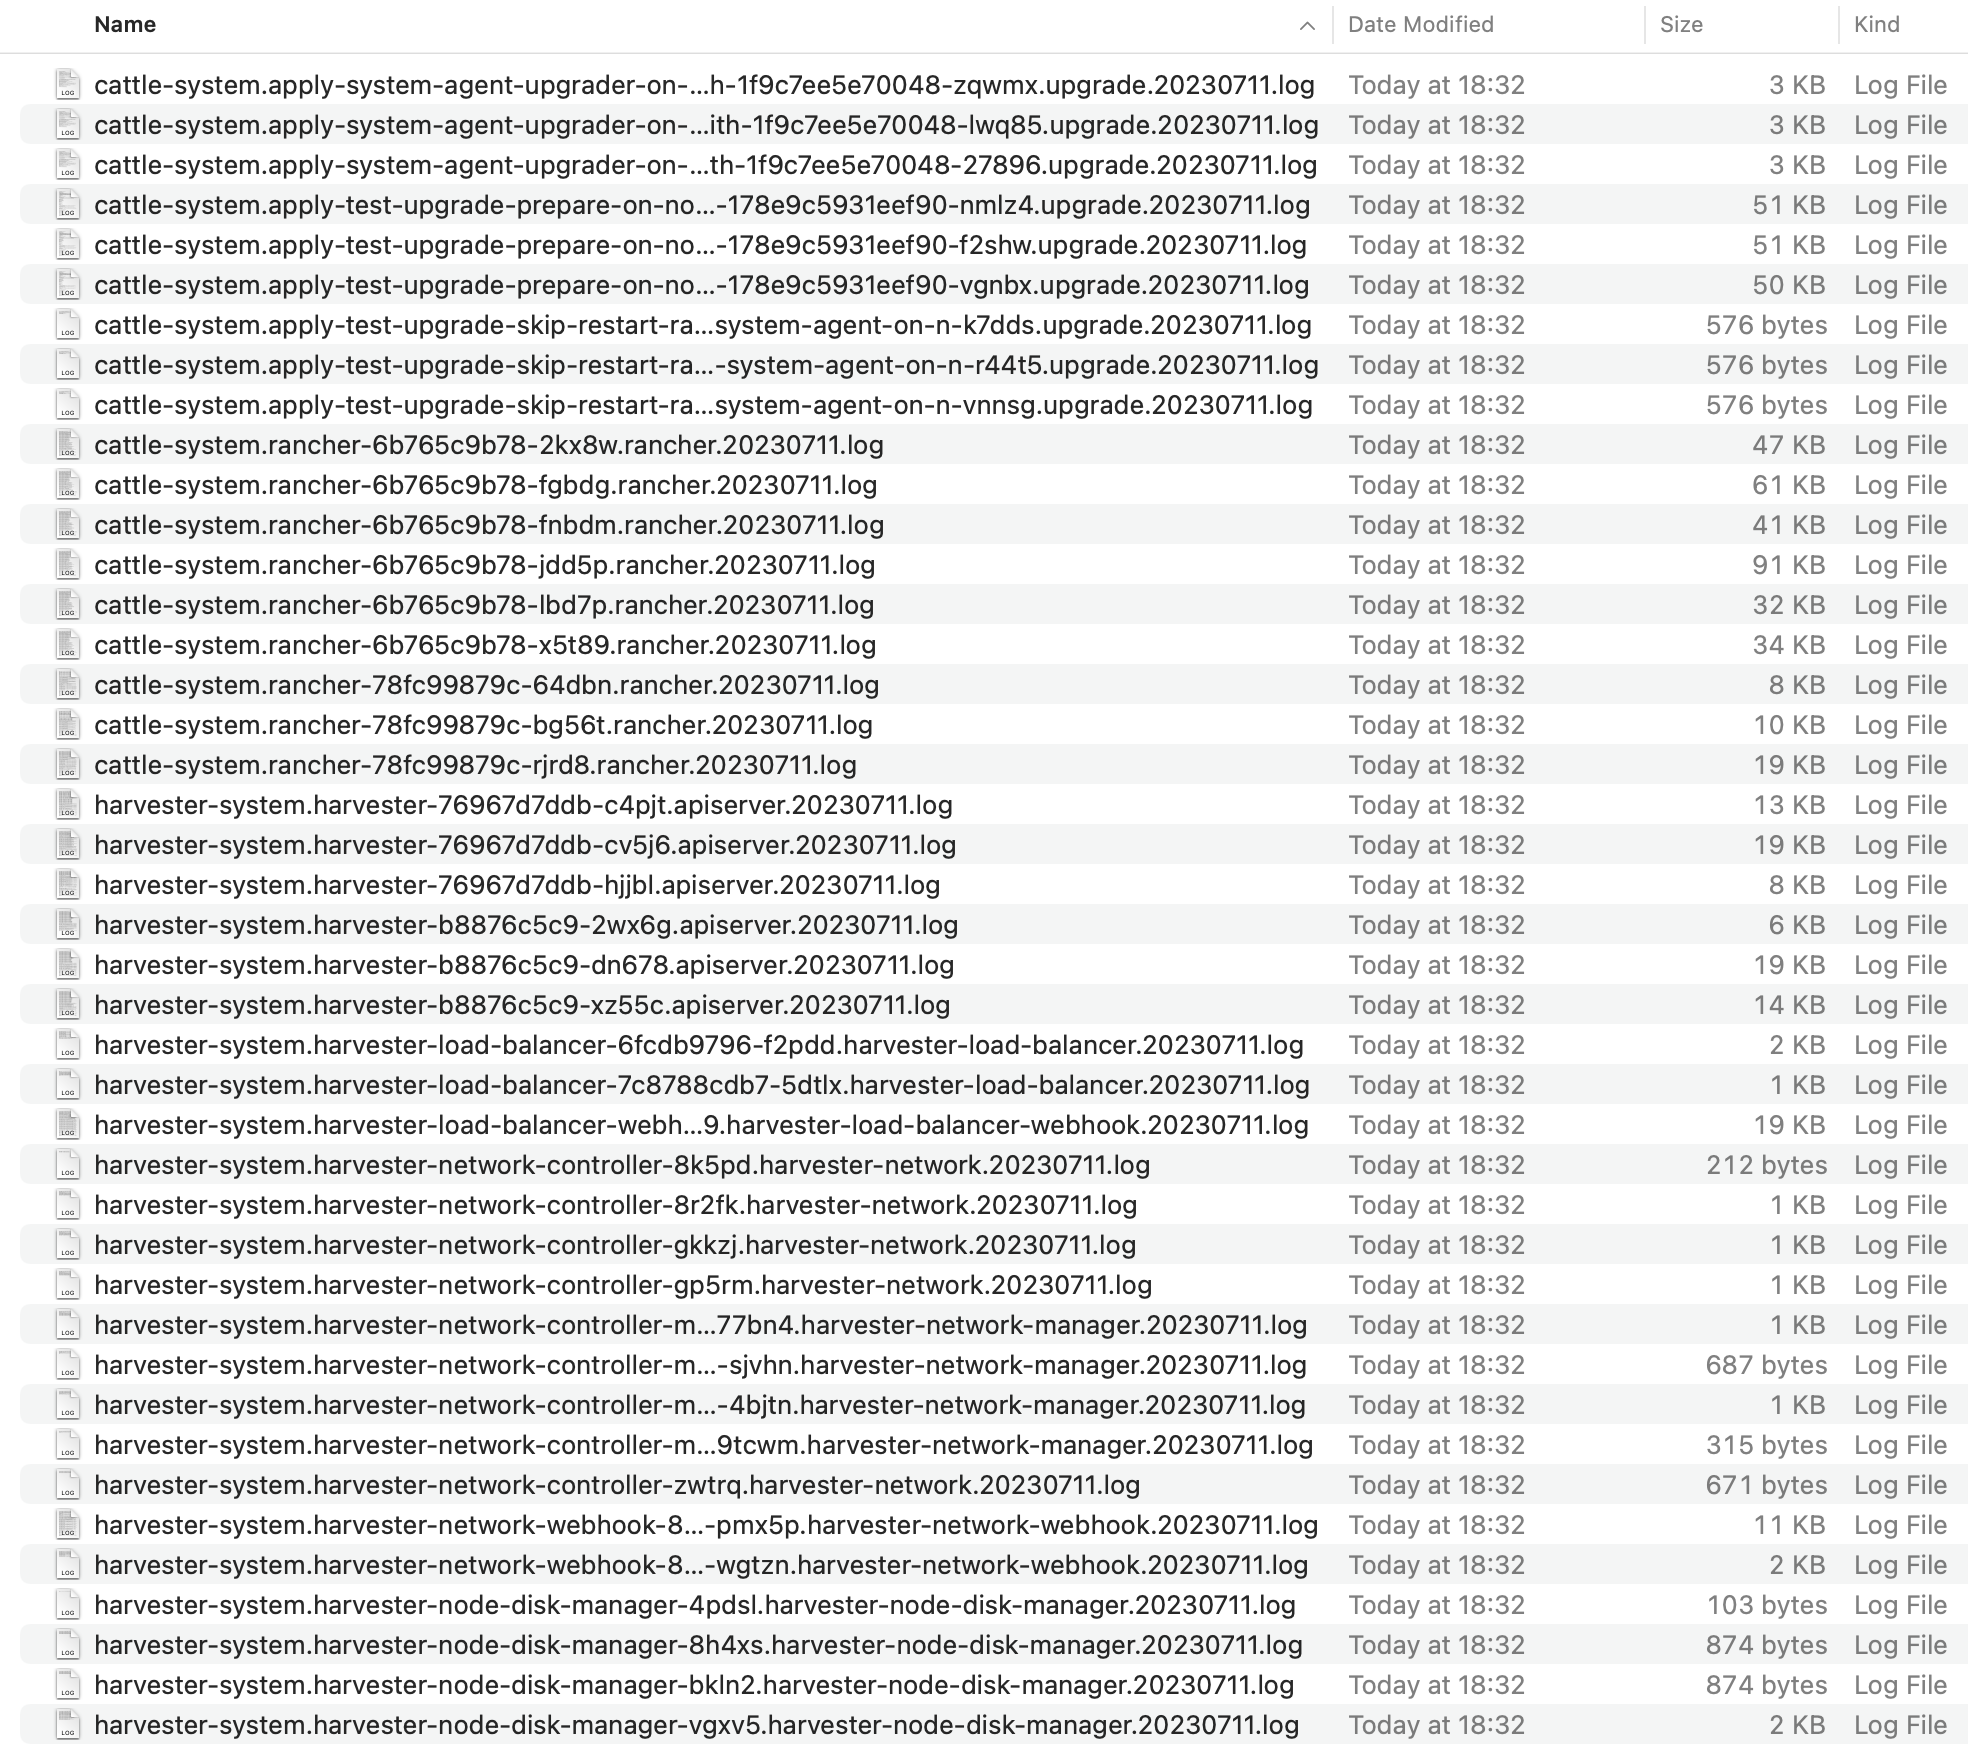
Log entries will be collected as files for each upgrade-related Pod, even for intermediate Pods. The support bundle provides a snapshot of the current state of the cluster, including logs and resource manifests, while the upgrade log preserves any logs generated during an upgrade. By combining these two, you can further investigate the issues during upgrades.
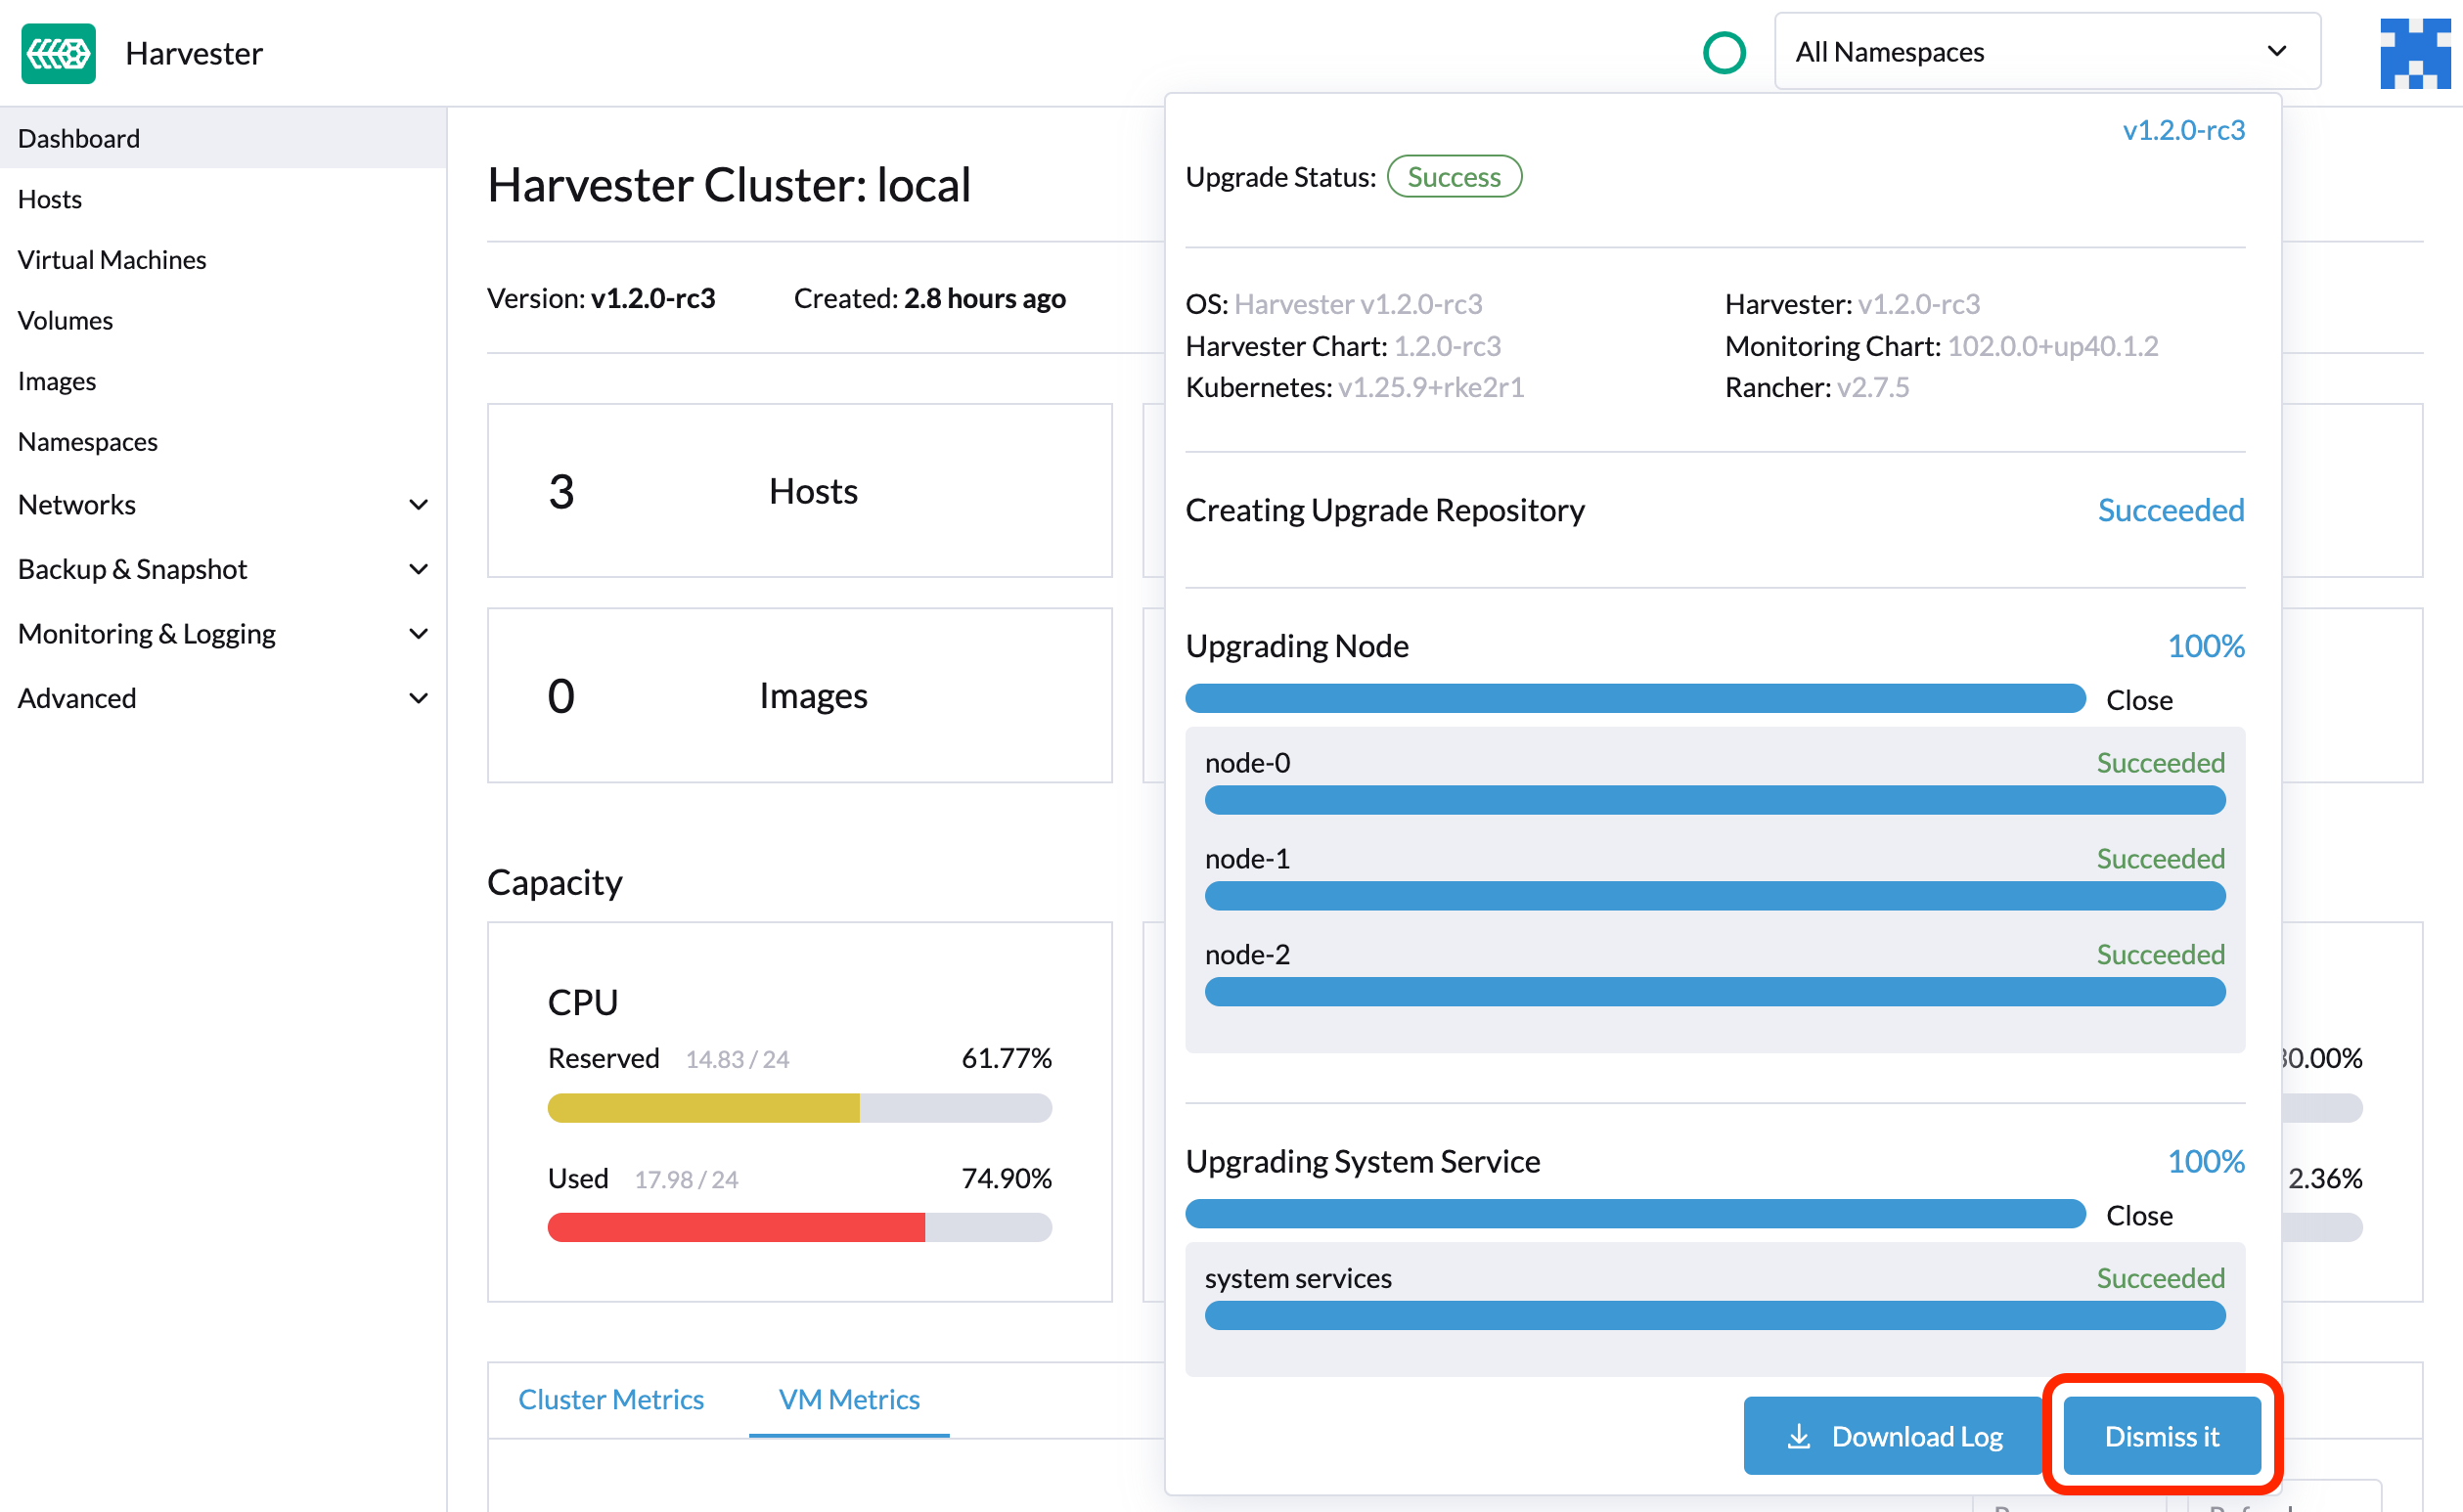
After the upgrade ends, Harvester stops collecting the upgrade logs to avoid occupying the disk space. In addition, you can click the Dismiss it button to purge the upgrade logs.
For more details, please refer to the upgrade log HEP.
The default size of the volume that stores upgrade-related logs is 1 GB. When errors occur, these logs may completely consume the volume's available space. To work around this issue, you can perform the following steps:
Detach the
log-archivevolume by scaling down thefluentdStatefulSet anddownloaderdeployment.# Locate the StatefulSet and Deployment
$ kubectl -n harvester-system get statefulsets -l harvesterhci.io/upgradeLogComponent=aggregator
NAME READY AGE
hvst-upgrade-xxxxx-upgradelog-infra-fluentd 1/1 43s
$ kubectl -n harvester-system get deployments -l harvesterhci.io/upgradeLogComponent=downloader
NAME READY UP-TO-DATE AVAILABLE AGE
hvst-upgrade-xxxxx-upgradelog-downloader 1/1 1 1 38s
# Scale down the resources to terminate any Pods using the volume
$ kubectl -n harvester-system scale statefulset hvst-upgrade-xxxxx-upgradelog-infra-fluentd --replicas=0
statefulset.apps/hvst-upgrade-xxxxx-upgradelog-infra-fluentd scaled
$ kubectl -n harvester-system scale deployment hvst-upgrade-xxxxx-upgradelog-downloader --replicas=0
deployment.apps/hvst-upgrade-xxxxx-upgradelog-downloader scaledExpand the volume size using the Longhorn UI.
# Here's how to find out the actual name of the target volume
$ kubectl -n harvester-system get pvc -l harvesterhci.io/upgradeLogComponent=log-archive -o jsonpath='{.items[].spec.volumeName}'
pvc-63355afb-ce61-46c4-8781-377cf962278a
For more information, see Volume Expansion in the Longhorn documentation.
Recover the
fluentdStatefulSet anddownloaderdeployment.$ kubectl -n harvester-system scale statefulset hvst-upgrade-xxxxx-upgradelog-infra-fluentd --replicas=1
statefulset.apps/hvst-upgrade-xxxxx-upgradelog-infra-fluentd scaled
$ kubectl -n harvester-system scale deployment hvst-upgrade-xxxxx-upgradelog-downloader --replicas=1
deployment.apps/hvst-upgrade-xxxxx-upgradelog-downloader scaled
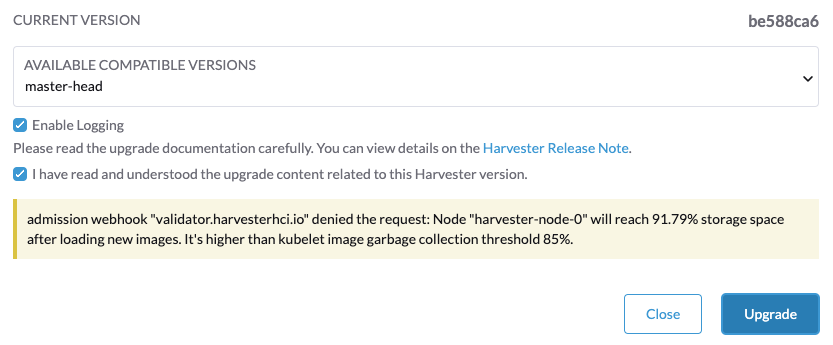
Clean Up Unused Images
The default value of imageGCHighThresholdPercent in KubeletConfiguration is 85. When disk usage exceeds 85%, the kubelet attempts to remove unused images.
New images are loaded to each Harvester node during upgrades. When disk usage exceeds 85%, these new images may be marked for cleanup because they are not used by any containers. In air-gapped environments, removal of new images from the cluster may break the upgrade process.
If you encounter the error message Node xxx will reach xx.xx% storage space after loading new images. It's higher than kubelet image garbage collection threshold 85%., run crictl rmi --prune to clean up unused images before starting a new upgrade.