Harvester Cloud Provider
RKE1 and RKE2 clusters can be provisioned in Rancher using the built-in Harvester Node Driver. Harvester provides load balancer and cluster Persistent Storage support to the guest Kubernetes cluster.
In this page we will learn:
- How to deploy the Harvester cloud provider in both RKE1 and RKE2.
- How to use the Harvester load balancer.
Deploying
Prerequisites
- The Kubernetes cluster is built on top of Harvester virtual machines.
- The Harvester virtual machines run as guest Kubernetes nodes are in the same namespace.
Deploying to the RKE1 Cluster with Harvester Node Driver
When spinning up an RKE cluster using the Harvester node driver, you can perform two steps to deploy the Harvester cloud provider:
Select
Harvester(Out-of-tree)option.
Install
Harvester Cloud Providerfrom the Rancher marketplace.
You should specify the Cluster name. The default value kubernetes will be set if no Cluster name is entered. The Cluster name is used to distinguish the ownership of the Harvester load balancers.
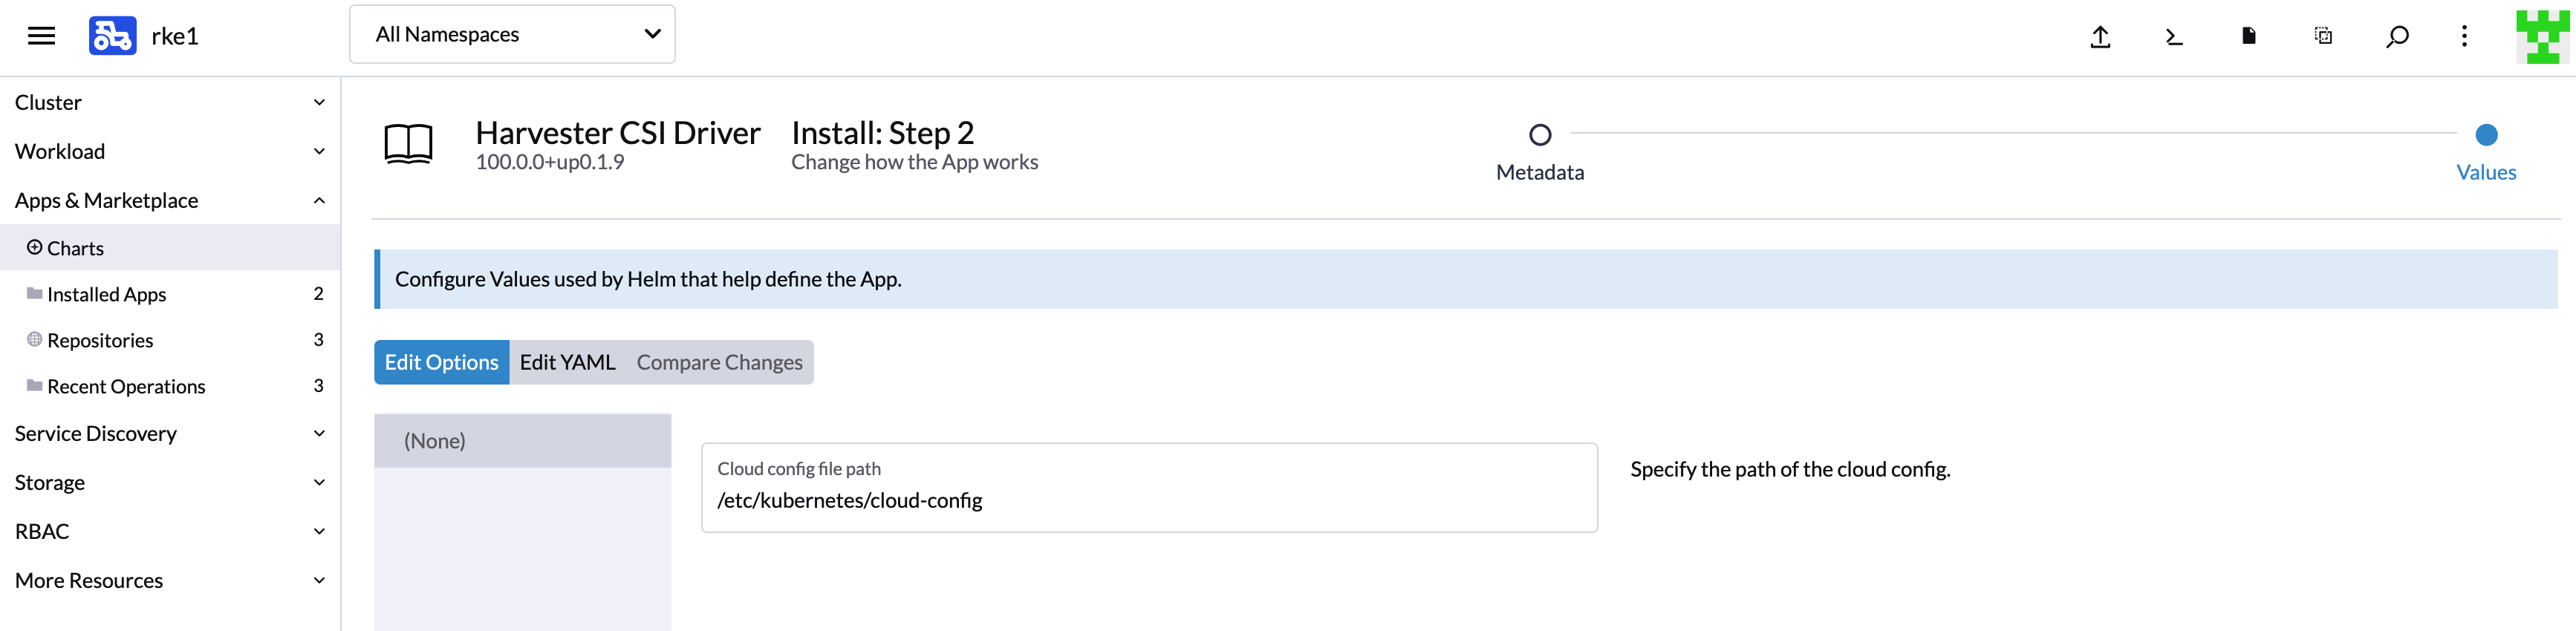
Install Harvester csi driver from the Rancher marketplace if needed.
Deploying to the RKE2 Cluster with Harvester Node Driver [Experimental]
When spinning up an RKE2 cluster using the Harvester node driver, select the Harvester cloud provider. The node driver will then help deploy both the CSI driver and CCM automatically.

Deploying to the K3s Cluster with Harvester Node Driver [Experimental]
Choose the Kubernetes version to be k3s and click the
Edit as YAMLbutton to config the K3s cluster YAML (For existing cluster, you can also click theEdit YAMLbutton to update it):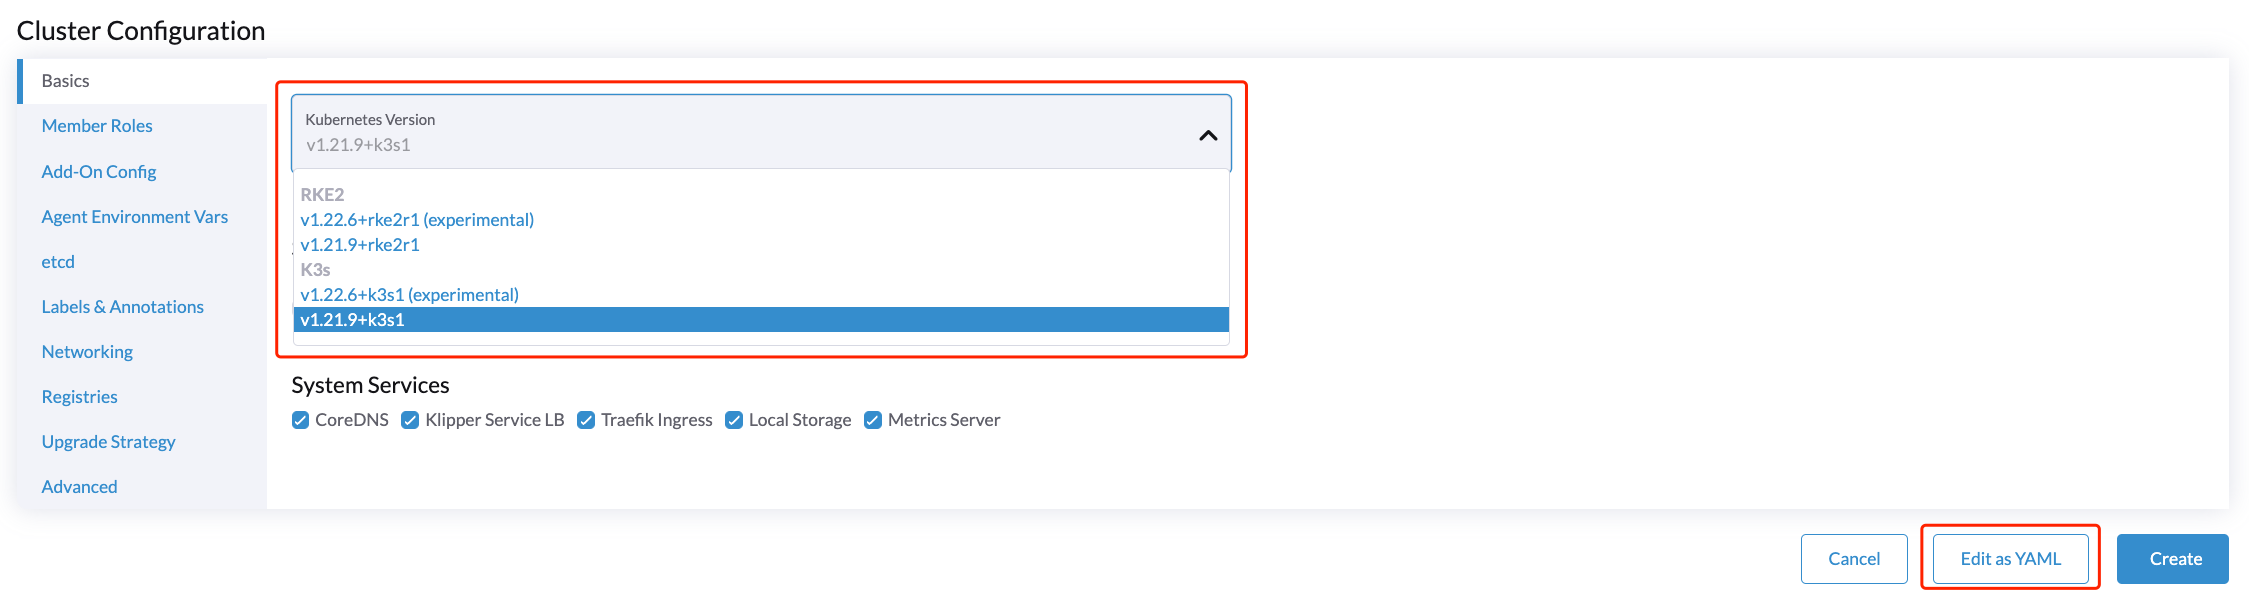
Edit K3s cluster YAML.
- Set
disable-cloud-provider: trueto disable default k3s cloud provider. - Add
cloud-provider=externalto use harvester cloud provider.
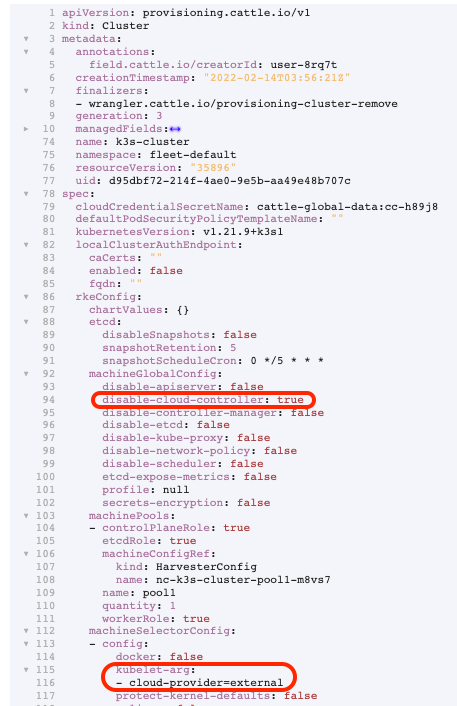
- Set
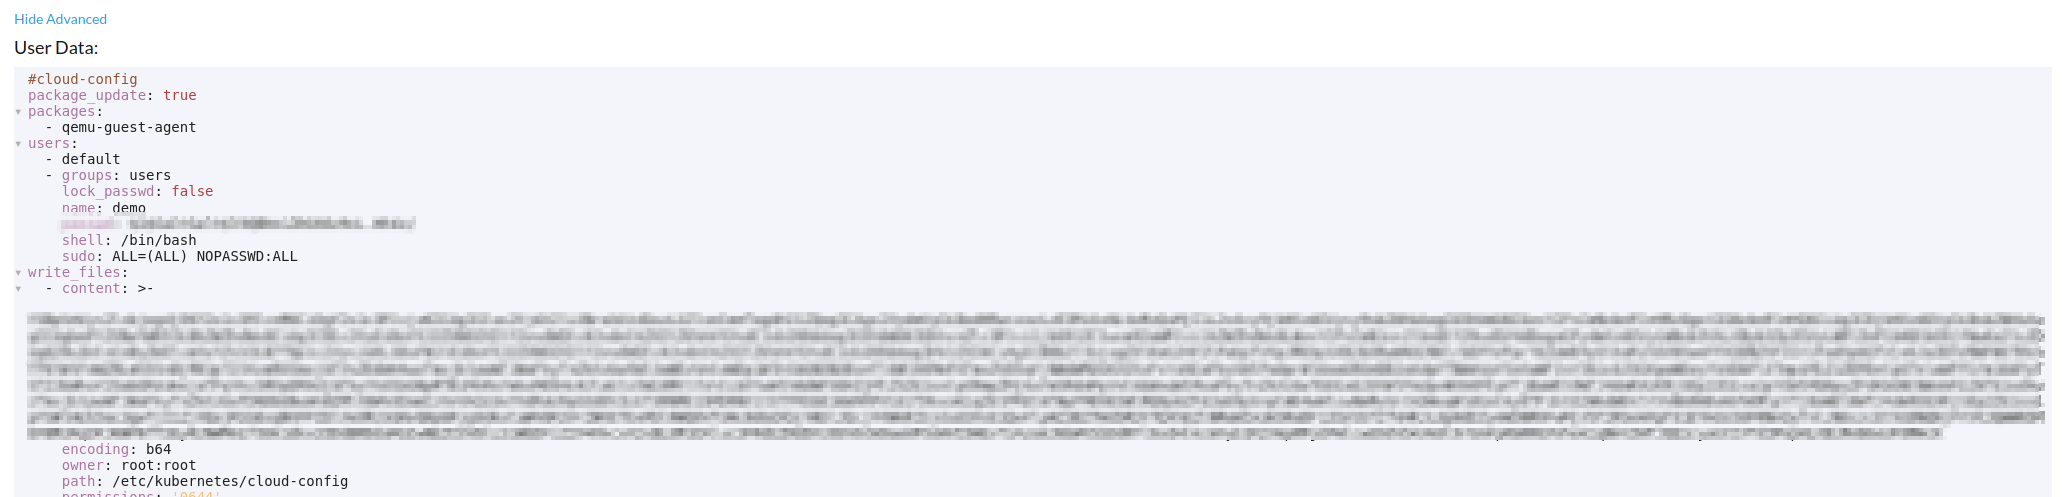
Generate addon configuration and put it in K3s VMs
/etc/kubernetes/cloud-config.
Deploy external cloud provider
Deploying external cloud provider is similar for both RKE2 and K3s based clusters.
Once the in-tree cloud provider has been disabled by following the above steps, you can deploy the external cloud provider via:

A sample additional manifest is as follows:
apiVersion: helm.cattle.io/v1
kind: HelmChart
metadata:
  name: harvester-cloud-provider
  namespace: kube-system
spec:
  targetNamespace: kube-system
  bootstrap: true
  repo: https://charts.harvesterhci.io/
  chart: harvester-cloud-provider
  version: 0.1.12
  helmVersion: v3
The cloud provider needs a kubeconfig file to work, a limited scoped one can be generated using the generate_addon.sh script available in the harvester/cloud-provider-harvester repo.
NOTE: The script needs access to the harvester cluster kubeconfig to work. In addition the namespace needs to be the namespace in which the workload cluster will be created.
# depend on kubectl to operate the Harvester cluster
./deploy/generate_addon.sh <serviceaccount name> <namespace>
The output will look as follows:
(⎈ |local:default)➜  cloud-provider-harvester git:(master) ✗ ./deploy/generate_addon.sh harvester-cloud-provider default
Creating target directory to hold files in ./tmp/kube...done
Creating a service account in default namespace: harvester-cloud-provider
W0506 16:44:15.429068 3008674 helpers.go:598] --dry-run is deprecated and can be replaced with --dry-run=client.
serviceaccount/harvester-cloud-provider configured

Creating a role in default namespace: harvester-cloud-provider
role.rbac.authorization.k8s.io/harvester-cloud-provider unchanged

Creating a rolebinding in default namespace: harvester-cloud-provider
W0506 16:44:23.798293 3008738 helpers.go:598] --dry-run is deprecated and can be replaced with --dry-run=client.
rolebinding.rbac.authorization.k8s.io/harvester-cloud-provider configured

Getting secret of service account harvester-cloud-provider on default
Secret name: harvester-cloud-provider-token-5zkk9

Extracting ca.crt from secret...done
Getting user token from secret...done
Setting current context to: local
Cluster name: local
Endpoint: https://HARVESTER_ENDPOINT/k8s/clusters/local

Preparing k8s-harvester-cloud-provider-default-conf
Setting a cluster entry in kubeconfig...Cluster "local" set.
Setting token credentials entry in kubeconfig...User "harvester-cloud-provider-default-local" set.
Setting a context entry in kubeconfig...Context "harvester-cloud-provider-default-local" created.
Setting the current-context in the kubeconfig file...Switched to context "harvester-cloud-provider-default-local".
########## cloud config ############
apiVersion: v1
clusters:
- cluster:
    certificate-authority-data: CACERT
    server: https://HARVESTER-ENDPOINT/k8s/clusters/local
  name: local
contexts:
- context:
    cluster: local
    namespace: default
    user: harvester-cloud-provider-default-local
  name: harvester-cloud-provider-default-local
current-context: harvester-cloud-provider-default-local
kind: Config
preferences: {}
users:
- name: harvester-cloud-provider-default-local
  user:
    token: TOKEN
This cloud-config file can now be injected via the user-data available in the advanced options for the nodepool.
With these settings in place a K3s / RKE2 cluster should provision successfully while using the external cloud provider.
Upgrade Cloud Provider
Upgrade RKE2
The cloud provider can be upgraded by upgrading the RKE2 version. You can upgrade the RKE2 cluster via the Rancher UI as follows:
- Click ☰ > Cluster Management.
- Find the guest cluster that you want to upgrade and select ⋮ > Edit Config.
- Select Kubernetes Version.
- Click Save.
Upgrade RKE/K3s
RKE/K3s upgrade cloud provider via the Rancher UI, as follows:
- Click ☰ > RKE/K3s Cluster > Apps > Installed Apps.
- Find the cloud provider chart and select ⋮ > Edit/Upgrade.
- Select Version.
- Click Next > Update.
Load Balancer Support
After deploying the Harvester Cloud provider, you can use the Kubernetes LoadBalancer service to expose a microservice inside the guest cluster to the external world. When you create a Kubernetes LoadBalancer service, a Harvester load balancer is assigned to the service and you can edit it through the Add-on Config in the Rancher UI.
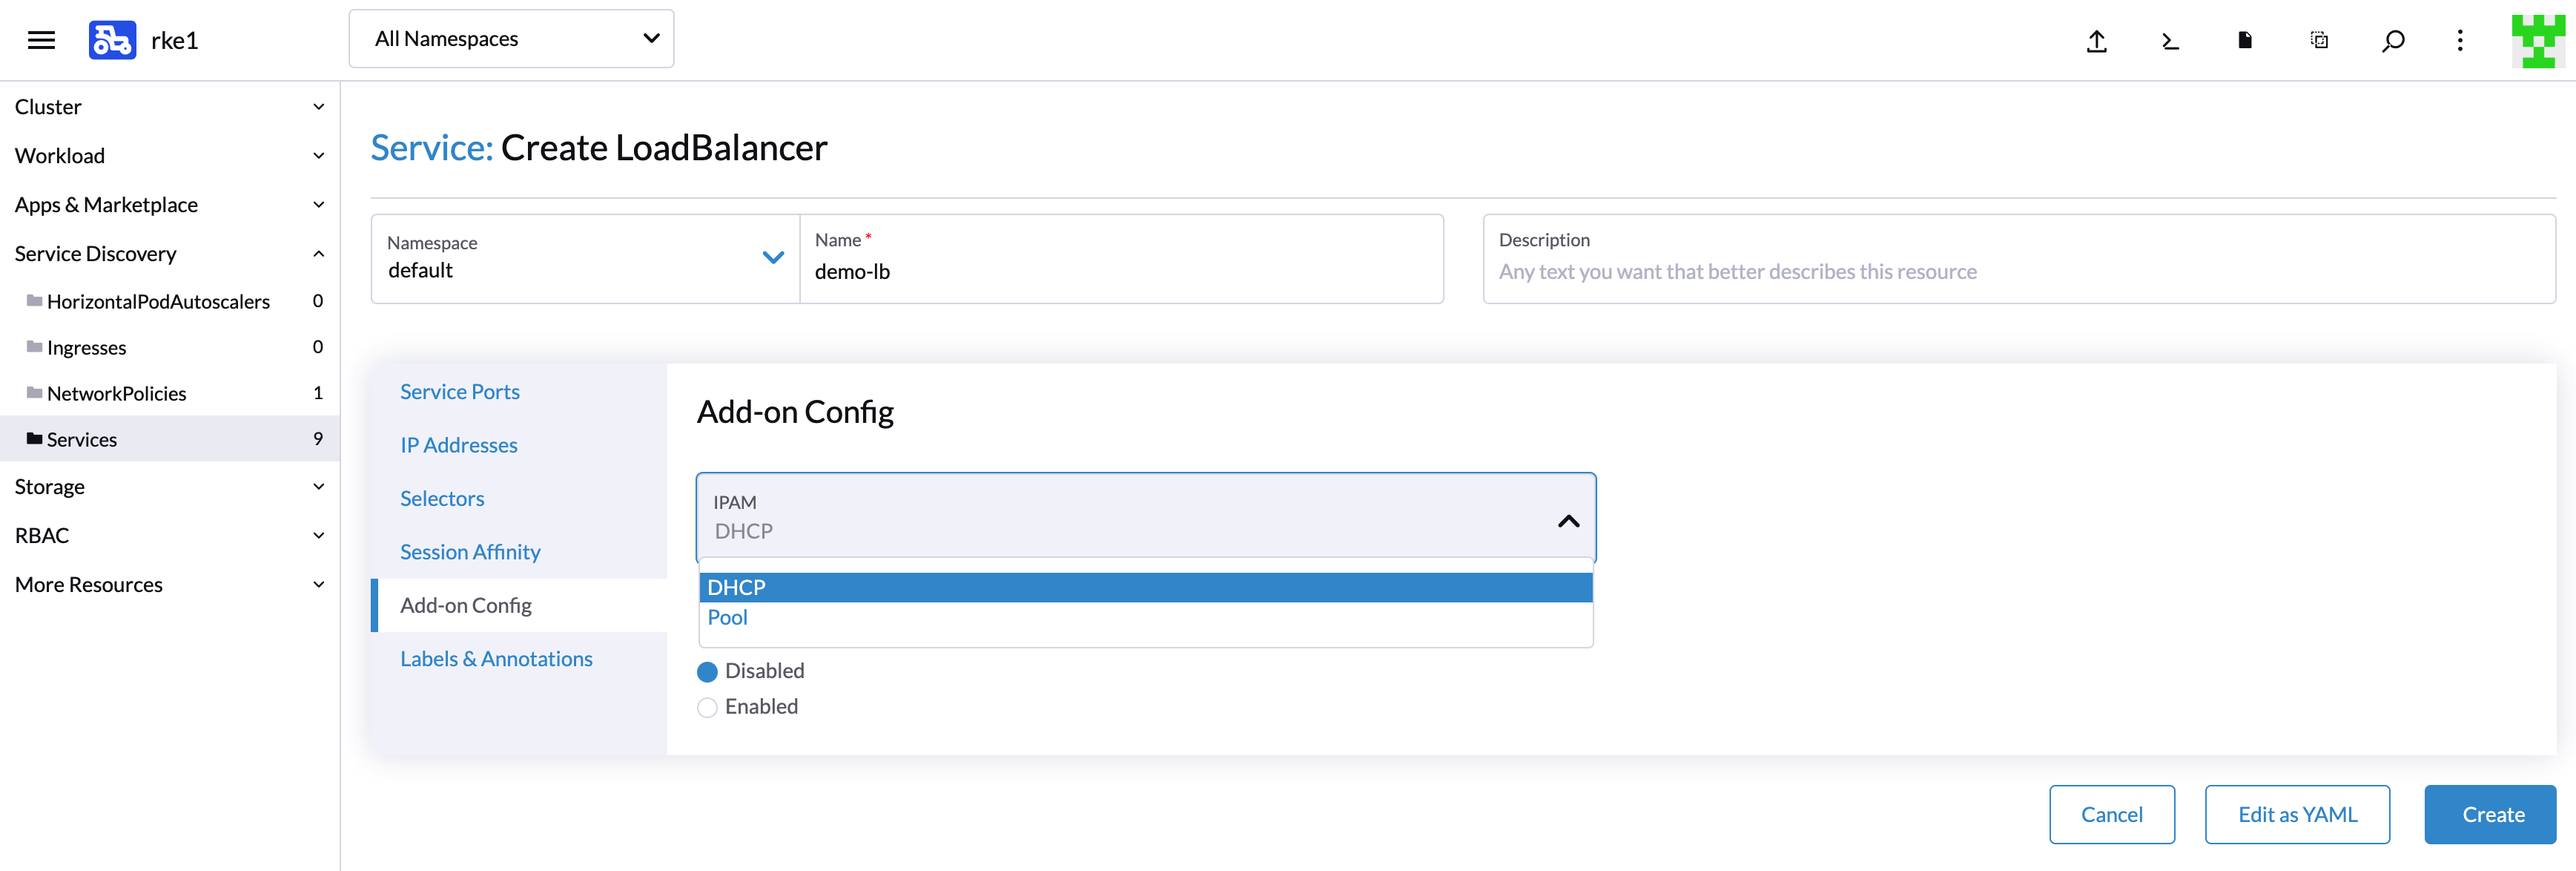
IPAM
Harvester's built-in load balancer supports both pool and dhcp modes. You can select the mode in the Rancher UI. Harvester adds the annotation cloudprovider.harvesterhci.io/ipam to the service behind.
pool: You should configure an IP address pool in Harvester in advance. The Harvester LoadBalancer controller will allocate an IP address from the IP address pool for the load balancer.

dhcp: A DHCP server is required. The Harvester LoadBalancer controller will request an IP address from the DHCP server.
It is not allowed to modify the IPAM mode. You need to create a new service if you want to modify the IPAM mode.
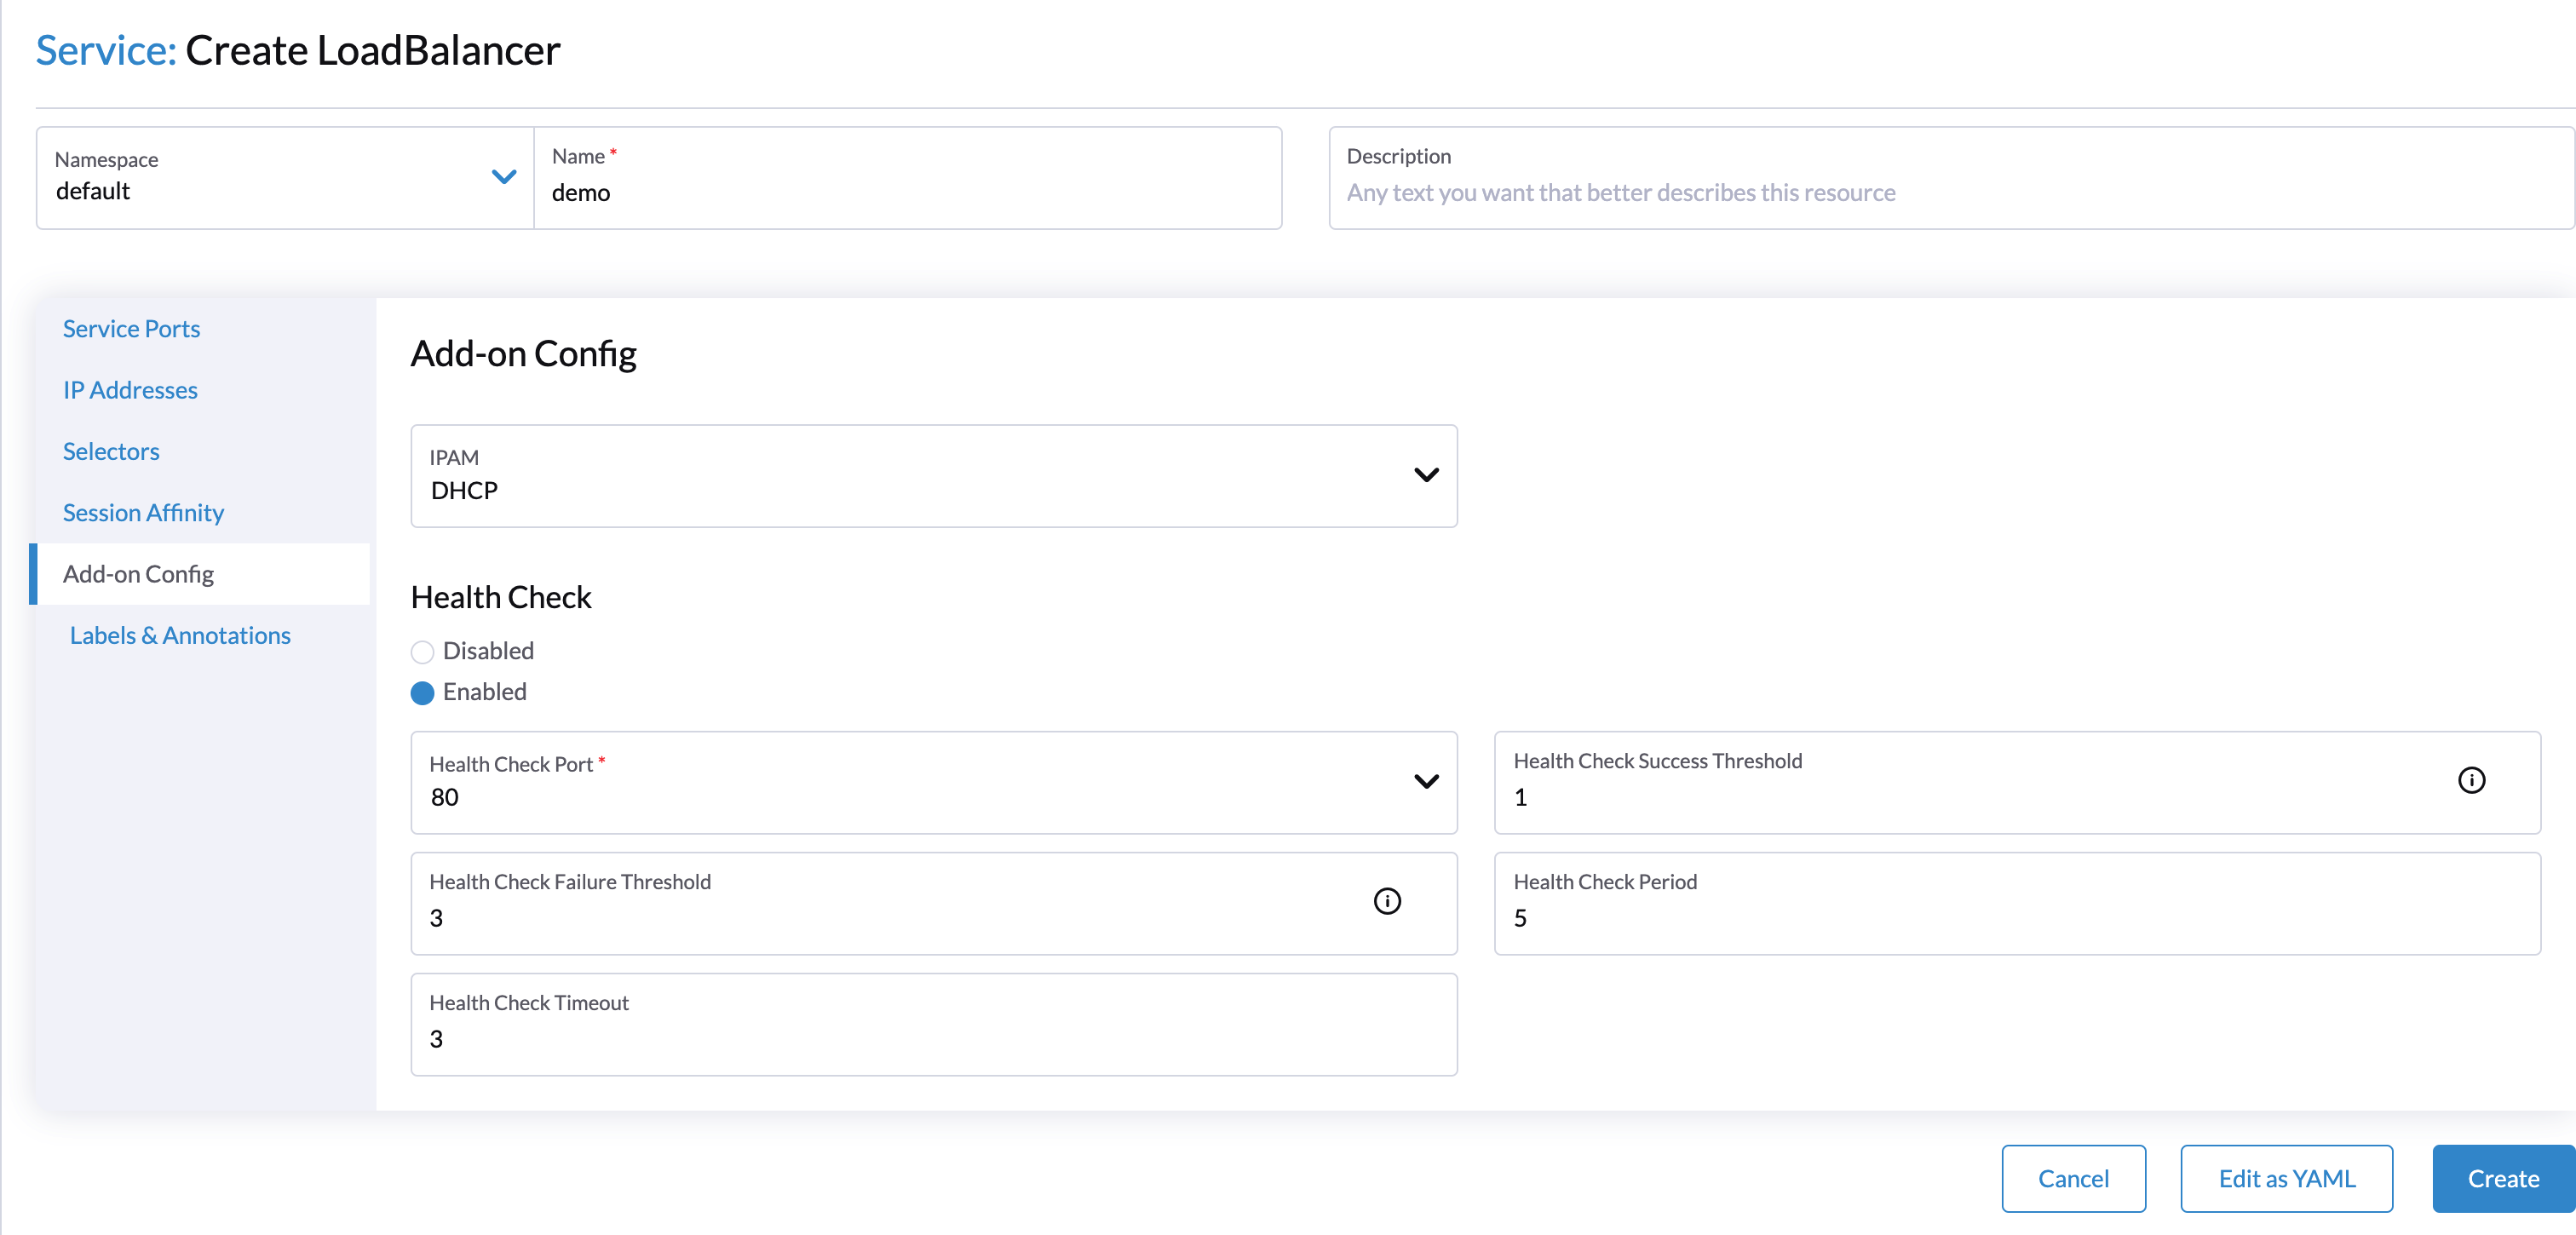
Health Checks
The Harvester load balancer supports TCP health checks. You can specify the parameters in the Rancher UI if you enable the Health Check option.
Alternatively, you can specify the parameters by adding annotations to the service manually. The following annotations are supported:
| Annotation Key | Value Type | Required | Description |
|---|---|---|---|
cloudprovider.harvesterhci.io/healthcheck-port | string | true | Specifies the port. The prober will access the address composed of the backend server IP and the port. |
cloudprovider.harvesterhci.io/healthcheck-success-threshold | string | false | Specifies the health check success threshold. The default value is 1. The backend server will start forwarding traffic if the number of times the prober continuously detects an address successfully reaches the threshold. |
cloudprovider.harvesterhci.io/healthcheck-failure-threshold | string | false | Specifies the health check failure threshold. The default value is 3. The backend server will stop forwarding traffic if the number of health check failures reaches the threshold. |
cloudprovider.harvesterhci.io/healthcheck-periodseconds | string | false | Specifies the health check period. The default value is 5 seconds. |
cloudprovider.harvesterhci.io/healthcheck-timeoutseconds | string | false | Specifies the timeout of every health check. The default value is 3 seconds. |