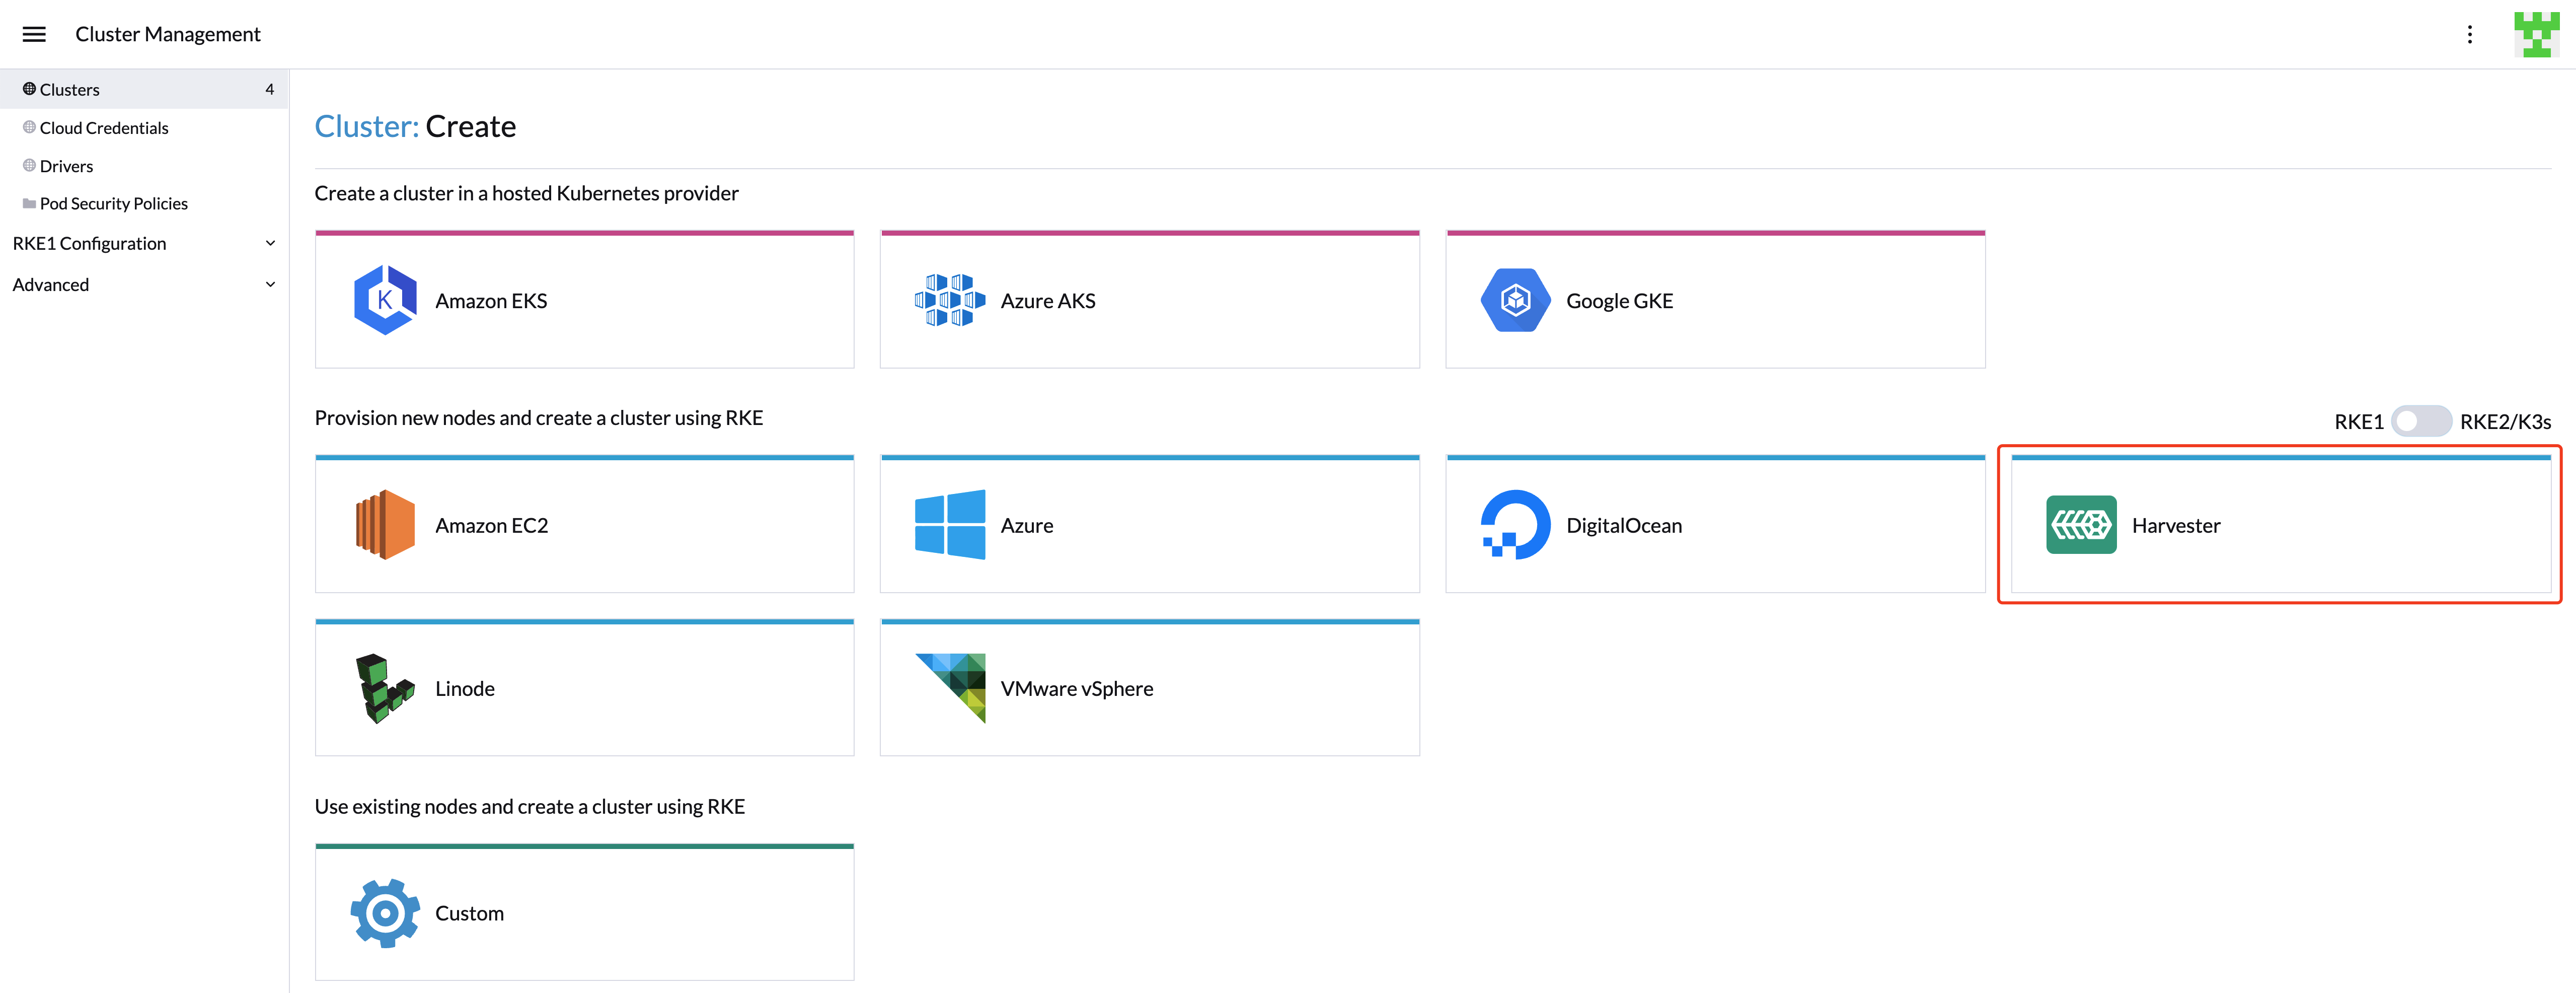
Harvester Node Driver
The Harvester node driver is used to provision VMs in the Harvester cluster. In this section, you'll learn how to configure Rancher to use the Harvester node driver to launch and manage Kubernetes clusters.
A node driver is the same as a Docker Machine driver, and the project repo is available at harvester/docker-machine-driver-harvester.
You can now provision RKE1/RKE2 Kubernetes clusters in Rancher v2.6.3+ with the built-in Harvester node driver.
Additionally, Harvester now can provide built-in Load Balancer support as well as Harvester cluster storage passthrough support to the guest Kubernetes cluster.
While you can upload and view .ISO images in the Harvester UI, the same capability is not available in the Rancher UI. For more information on this, see the Rancher docs.
Harvester Node Driver
The Harvester node driver is enabled by default from Rancher v2.6.3. You can go to Cluster Management > Drivers > Node Drivers page to manage the Harvester node driver manually.
When the Harvester node driver is enabled, you can create Kubernetes clusters on top of the Harvester cluster and manage them from Rancher.
Support Matrix
Refer to Rancher Downstream Cluster Support Matrix
Known Issues
Volumes created by the Harvester CSI driver in the host Harvester cluster would be deleted after editing/deleting the guest cluster
| Status | Last updated |
|---|---|
| Resolved(Rancher >=v2.7.2) | 2023-05-08 |
Workaround: You can temporarily change the Harvester node driver version to v0.6.3 from the Rancher UI.
- Go to the Rancher UI and click
Cluster Management>Drivers>Node Drivers. In theNode Driverslist, findHarvesterand then click⋮>View in API. - Click
Edit. - Uncheck the
builtincheckbox. - Change the
*urltohttps://releases.rancher.com/harvester-node-driver/v0.6.3/docker-machine-driver-harvester-amd64.tar.gz. - Change the
checksumto159516f8f438e9b1726418ec8608625384aba1857bc89dff4a6ff16b31357c28. - Click
Show Request>Send Request. - Click
Reloaduntil the value ofstatus.appliedChecksumandstatus.appliedURLchange to the value we set.
Changes to the node driver cannot be persisted. In other words, the changes will be lost after you restart the Rancher container.
To use this workaround, you need to ensure that the connection to the url is stable. If your environment is an air-gapped environment, you need to download the file and host it on the Intranet.
Starting with v0.6.3, the Harvester node driver has removed the qemu-guest-agent auto-injection from the backend. If the image you are using does not contain the qemu-guest-agent package, you can use userdata config to install and boot qemu-guest-agent. Otherwise, the cluster will not be provisioned successfully.
#cloud-config
package_update: true
packages:
- qemu-guest-agent
runcmd:
- - systemctl
  - enable
  - '--now'
  - qemu-guest-agent.service
Resolution: Rancher v2.7.2 has been released with the fixed node driver version v0.6.3 for this issue. And Rancher v2.7.2 UI will do the qemu-guest-agent auto-injection.
Affected versions:
- Rancher: v2.6.x,v2.7.0,v2.7.1
RKE1 Kubernetes Cluster
Click to learn how to create RKE1 Kubernetes Clusters.
RKE2 Kubernetes Cluster
Click to learn how to create RKE2 Kubernetes Clusters.
K3s Kubernetes Cluster
Click to learn how to create k3s Kubernetes Clusters.
Topology Spread Constraints
Available as of v1.0.3
In your guest Kubernetes cluster, you can use topology spread constraints to control how workloads are spread across the Harvester VMs among failure-domains such as regions and zones. This can help to achieve high availability as well as efficient resource utilization of your cluster resources.
The minimum RKE2 versions required to support the sync topology label feature are as follows:
| Supported RKE2 Version |
|---|
| >= v1.24.3+rke2r1 |
| >= v1.23.9+rke2r1 |
| >= v1.22.12+rke2r1 |
In addition, the cloud provider version installed via the Apps of RKE/K3s must be >= v0.1.4
Sync Topology Labels to the Guest Cluster Node
During the cluster installation, the Harvester node driver will automatically help synchronize topology labels from VM nodes to guest cluster nodes. Currently, only region and zone topology labels are supported.
Label synchronization will only take effect during guest node initialization. To avoid node drifts to another region or zone, it is recommended to add the node affinity rules during the cluster provisioning, so that the VMs can be scheduled to the same zone even after rebuilding.
Configuring topology labels on the Harvester nodes through
Hosts > Edit Config > Labels. e.g., add the topology labels as follows:topology.kubernetes.io/region: us-east-1
topology.kubernetes.io/zone: us-east-1a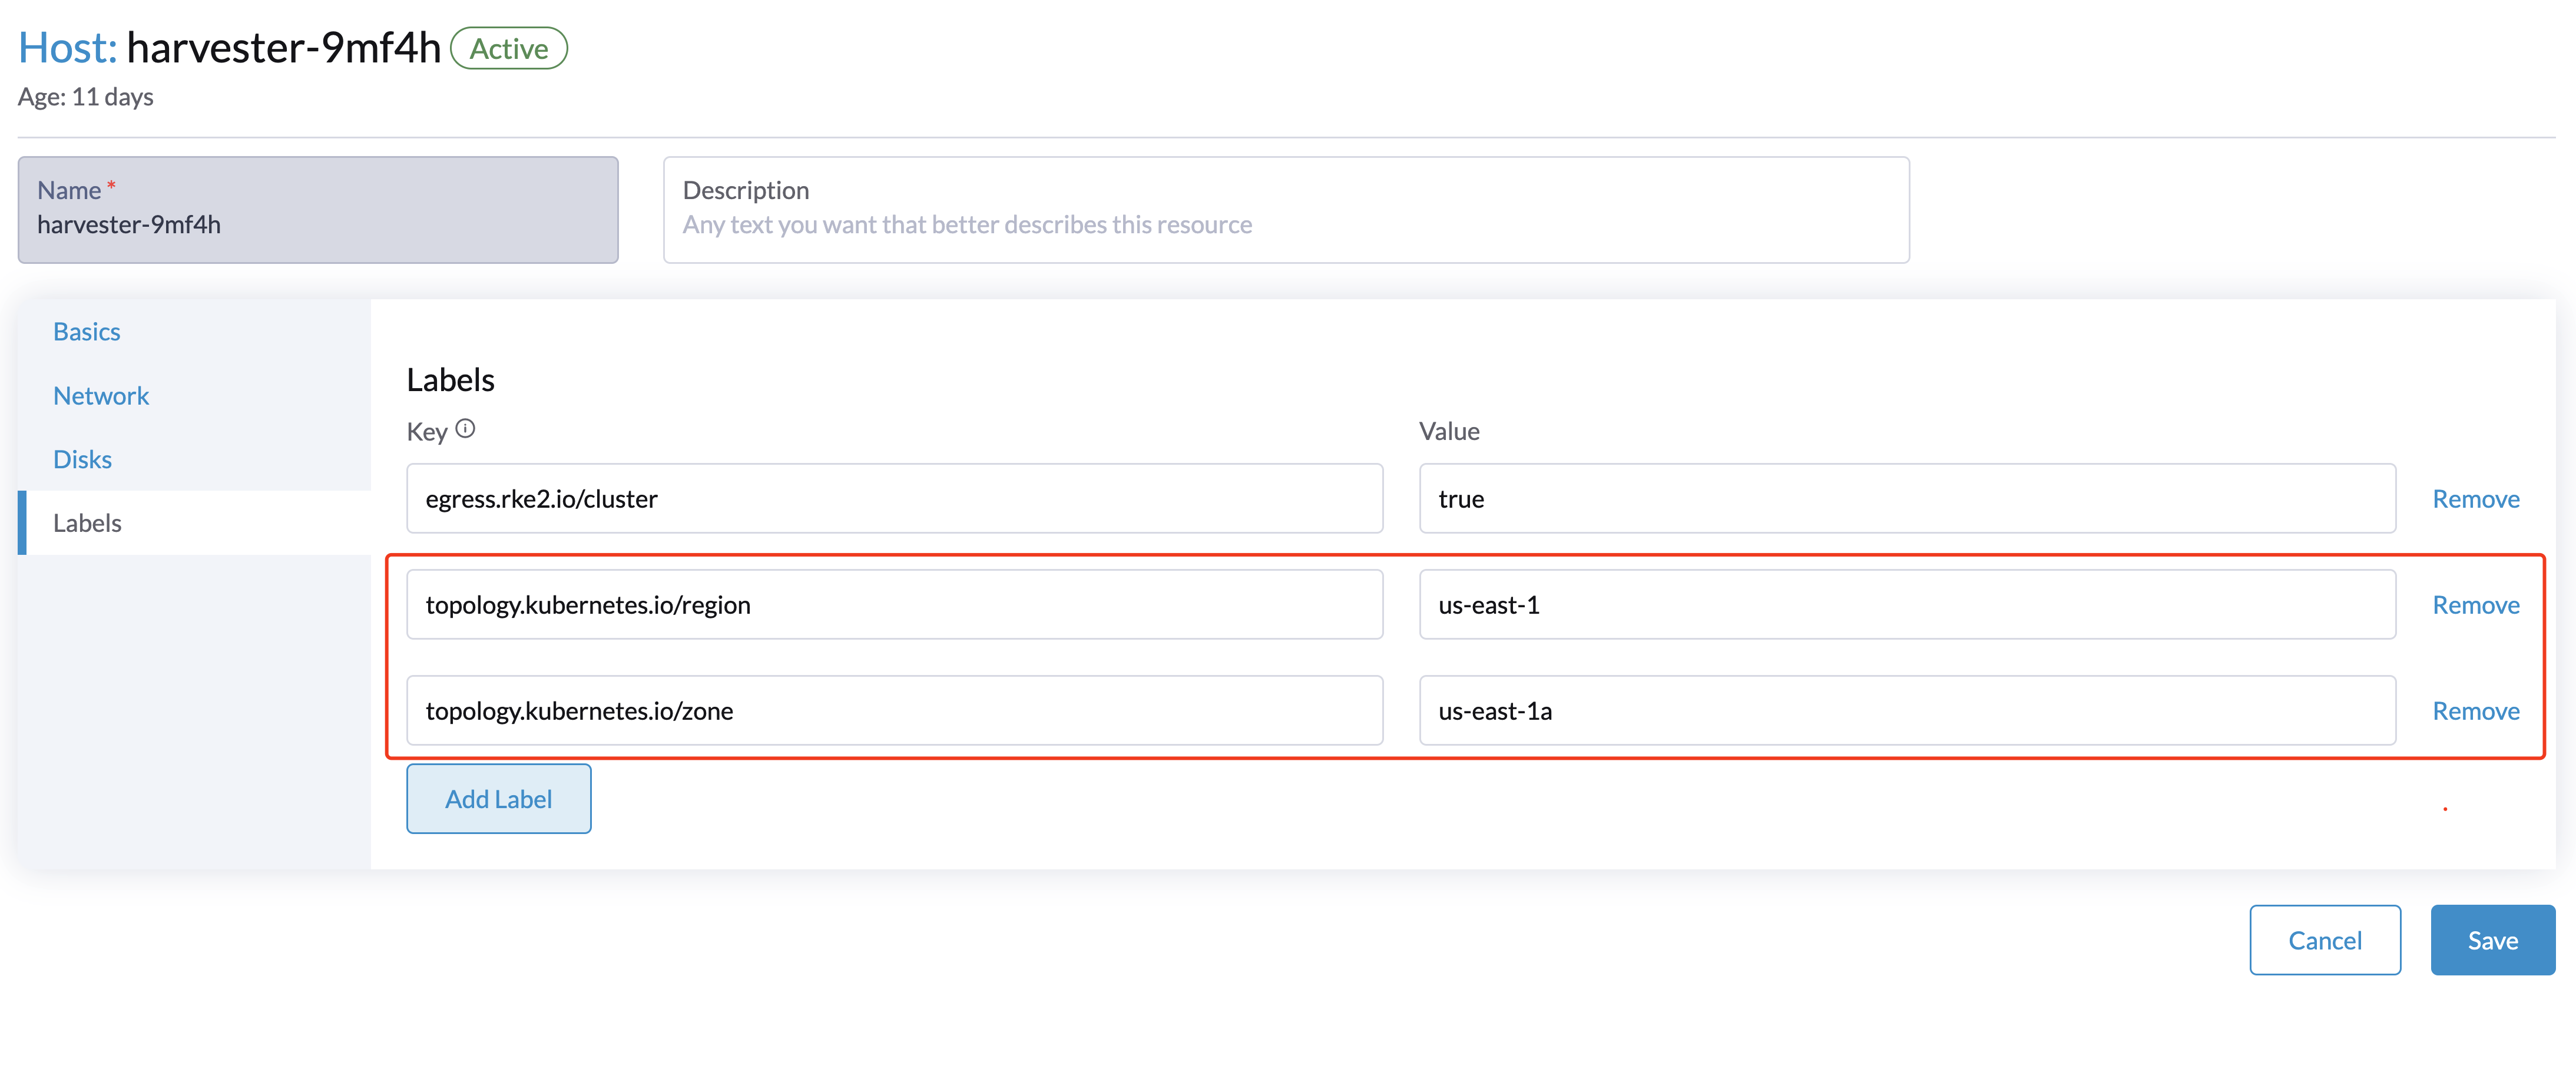
Creating a guest Kubernetes cluster using the Harvester node driver and it is recommended to add the node affinity rules, this will help to avoid node drifting to other zones after VM rebuilding.
After the cluster is successfully deployed, confirm that guest Kubernetes node labels are successfully synchronized from the Harvester VM node.
Now deploy workloads on your guest Kubernetes cluster, and you should be able to manage them using the topology spread constraints.