Host Management
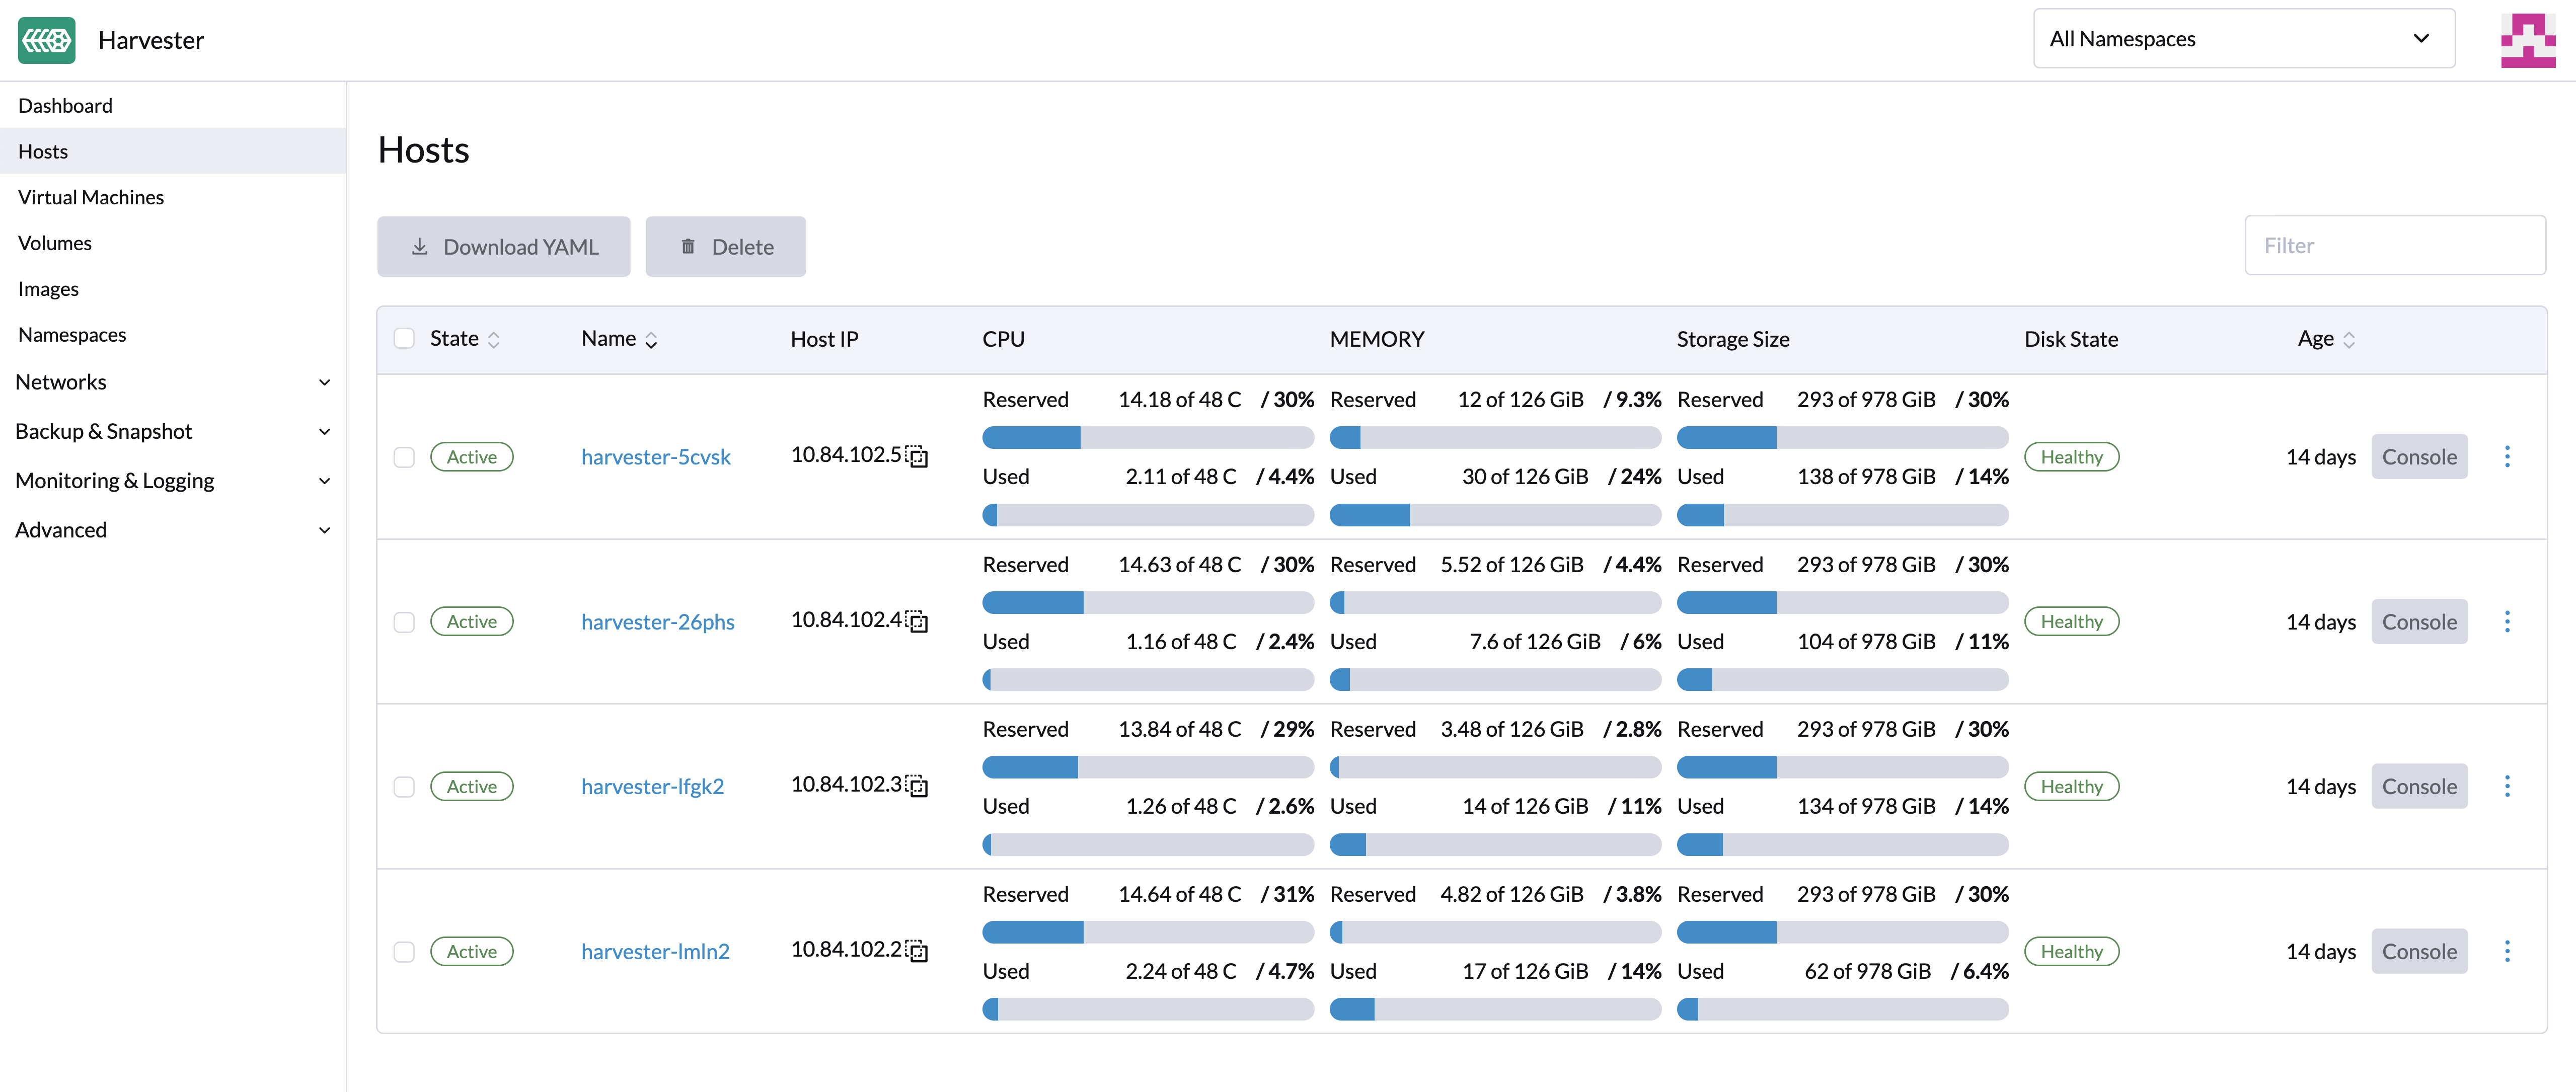
Users can view and manage Harvester nodes from the host page. The first node always defaults to be a management node of the cluster. When there are three or more nodes, the two other nodes that first joined are automatically promoted to management nodes to form a HA cluster.
Because Harvester is built on top of Kubernetes and uses etcd as its database, the maximum node fault toleration is one when there are three management nodes.
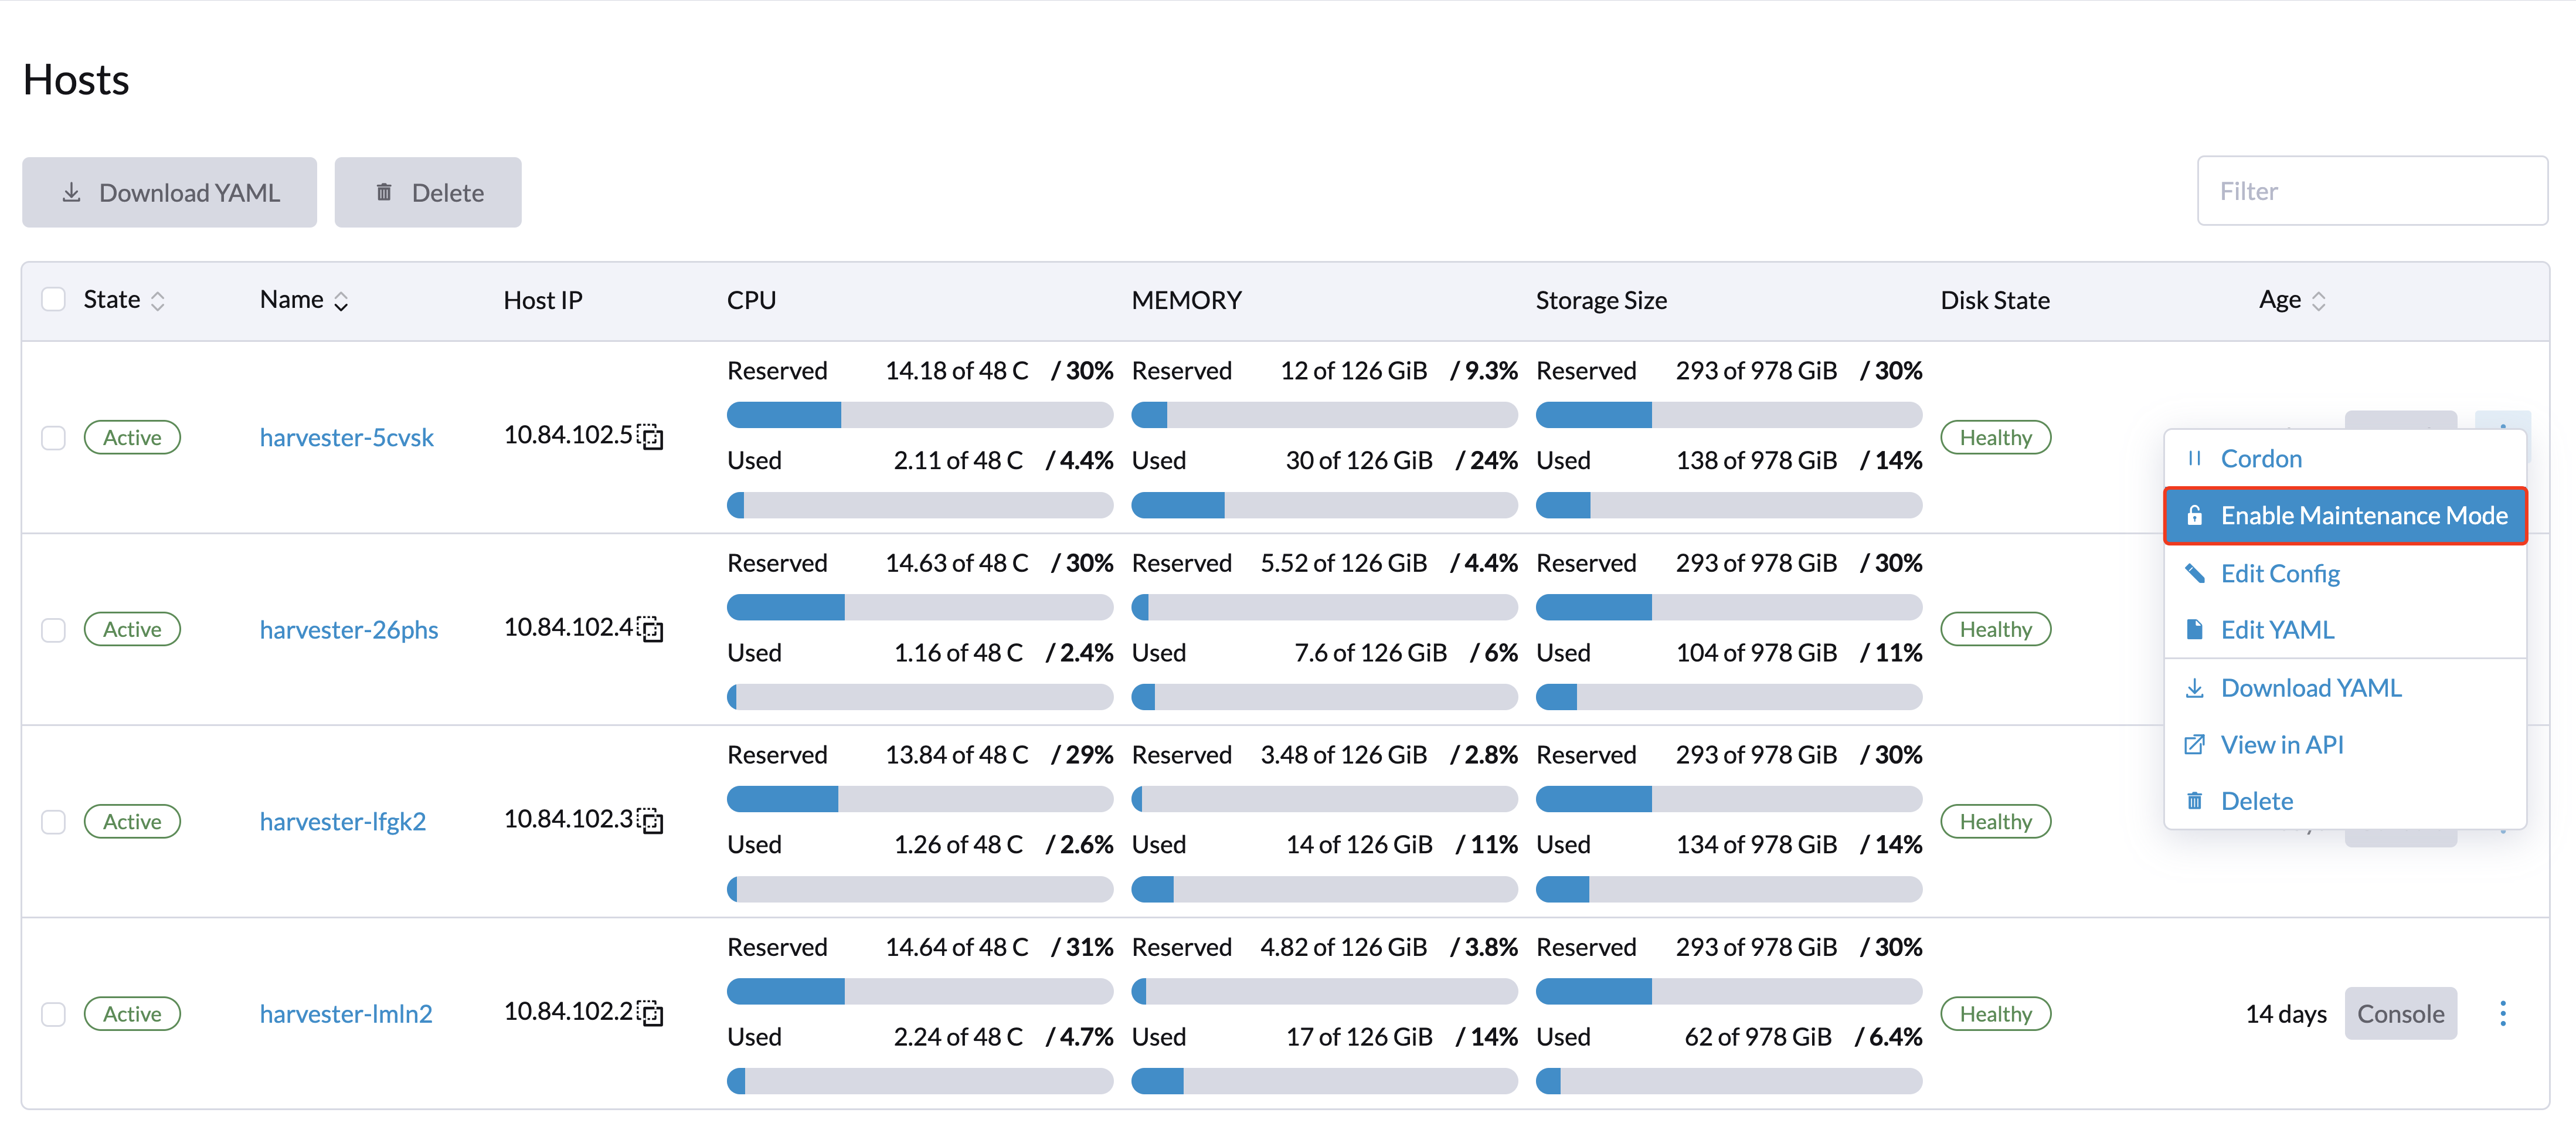
Node Maintenance
For admin users, you can click Enable Maintenance Mode to evict all VMs from a node automatically. It will leverage the VM live migration feature to migrate all VMs to other nodes automatically. Note that at least two active nodes are required to use this feature.
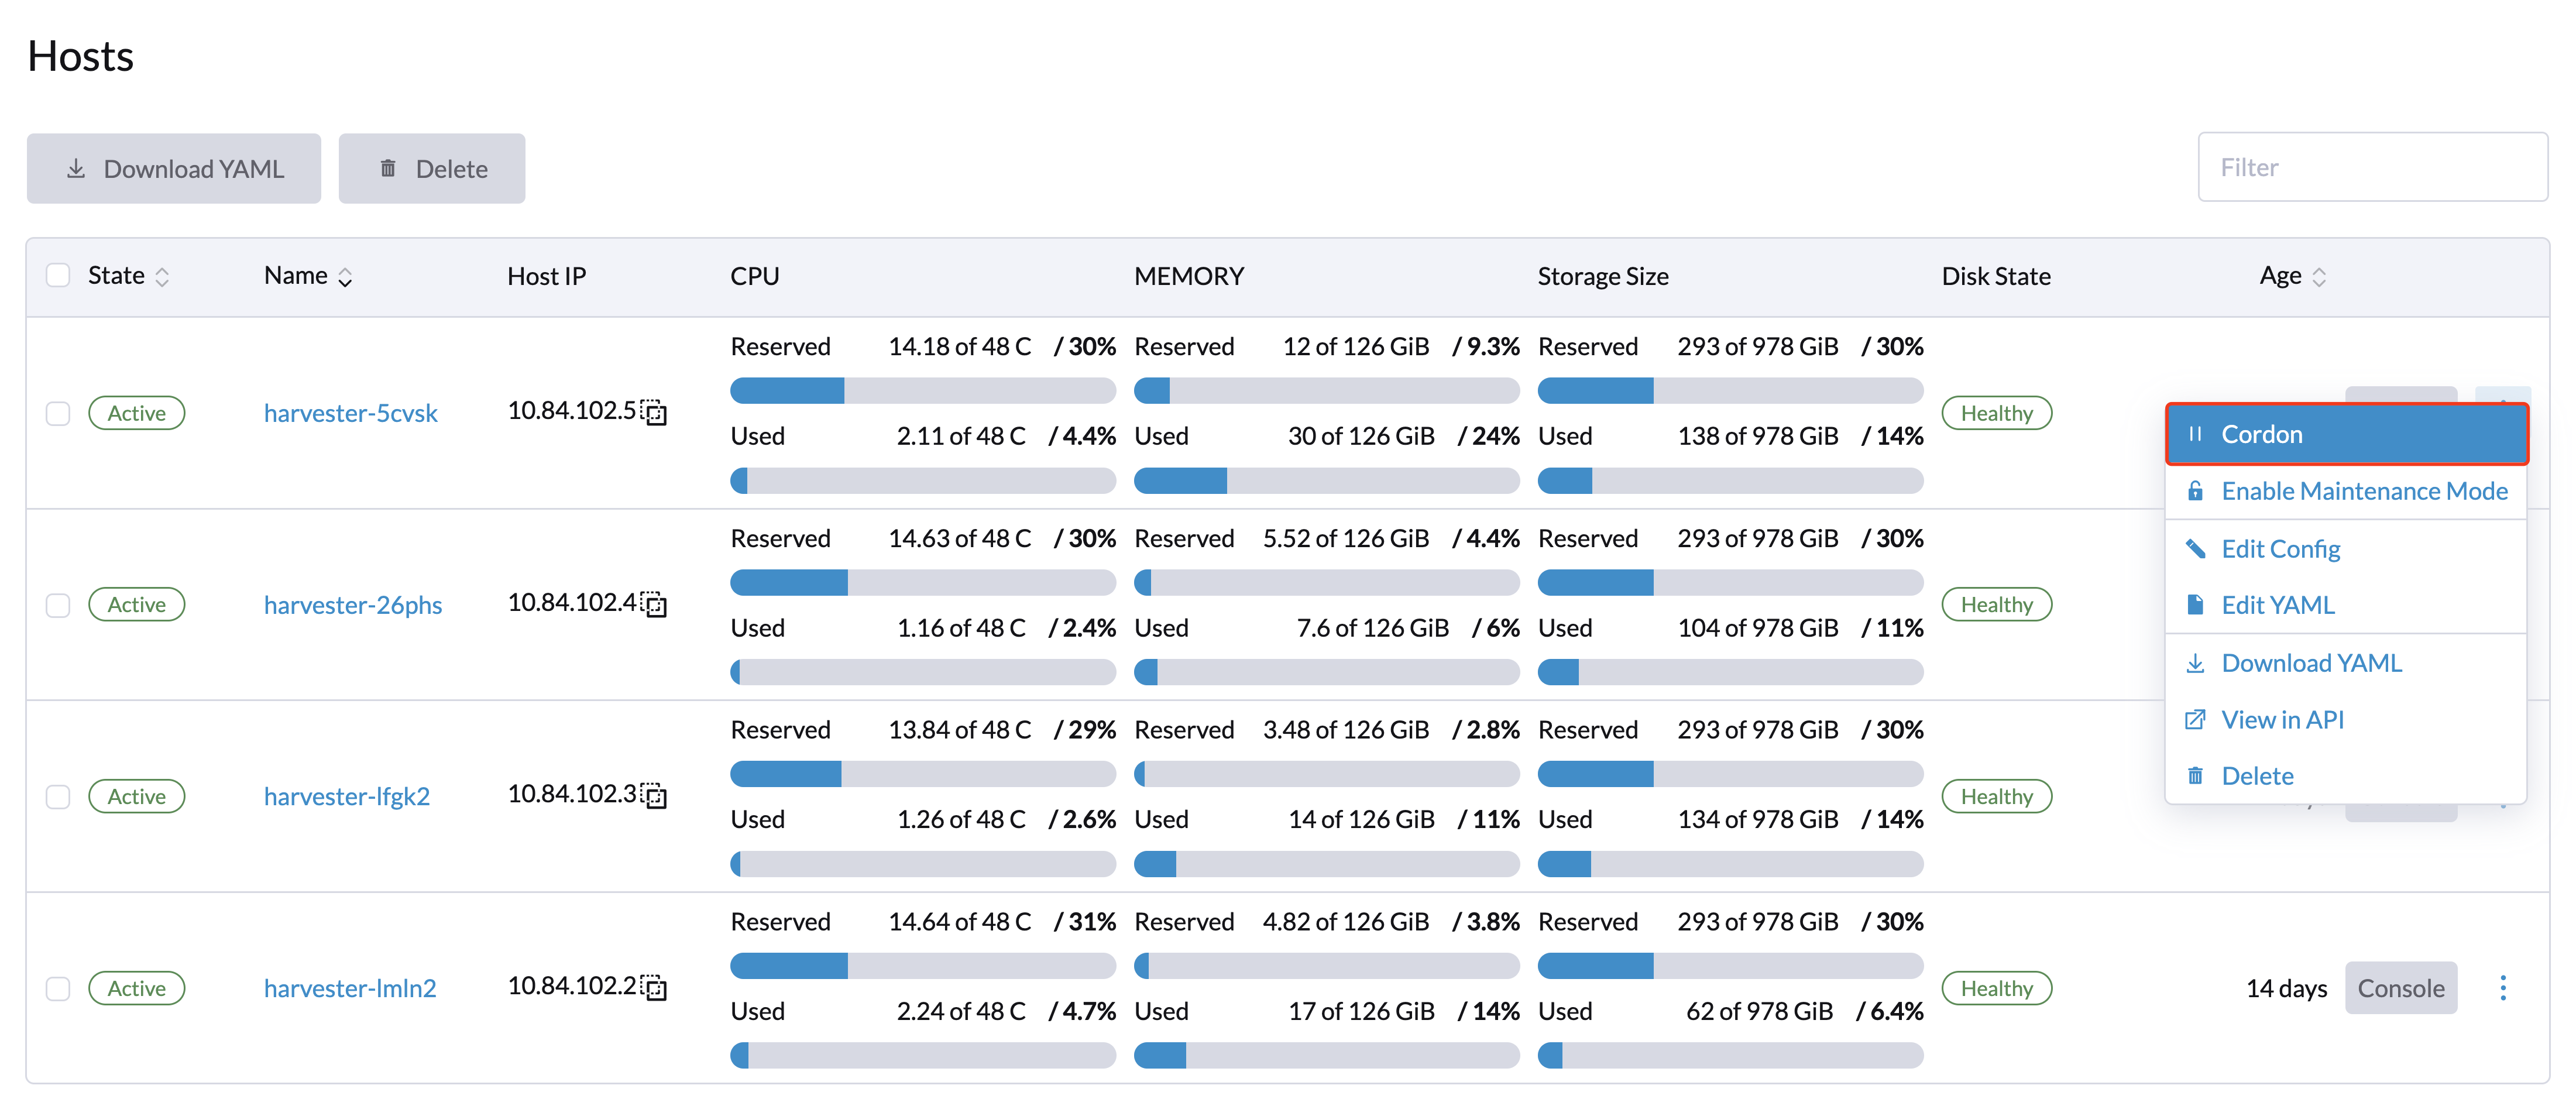
Cordoning a Node
Cordoning a node marks it as unschedulable. This feature is useful for performing short tasks on the node during small maintenance windows, like reboots, upgrades, or decommissions. When you’re done, power back on and make the node schedulable again by uncordoning it.
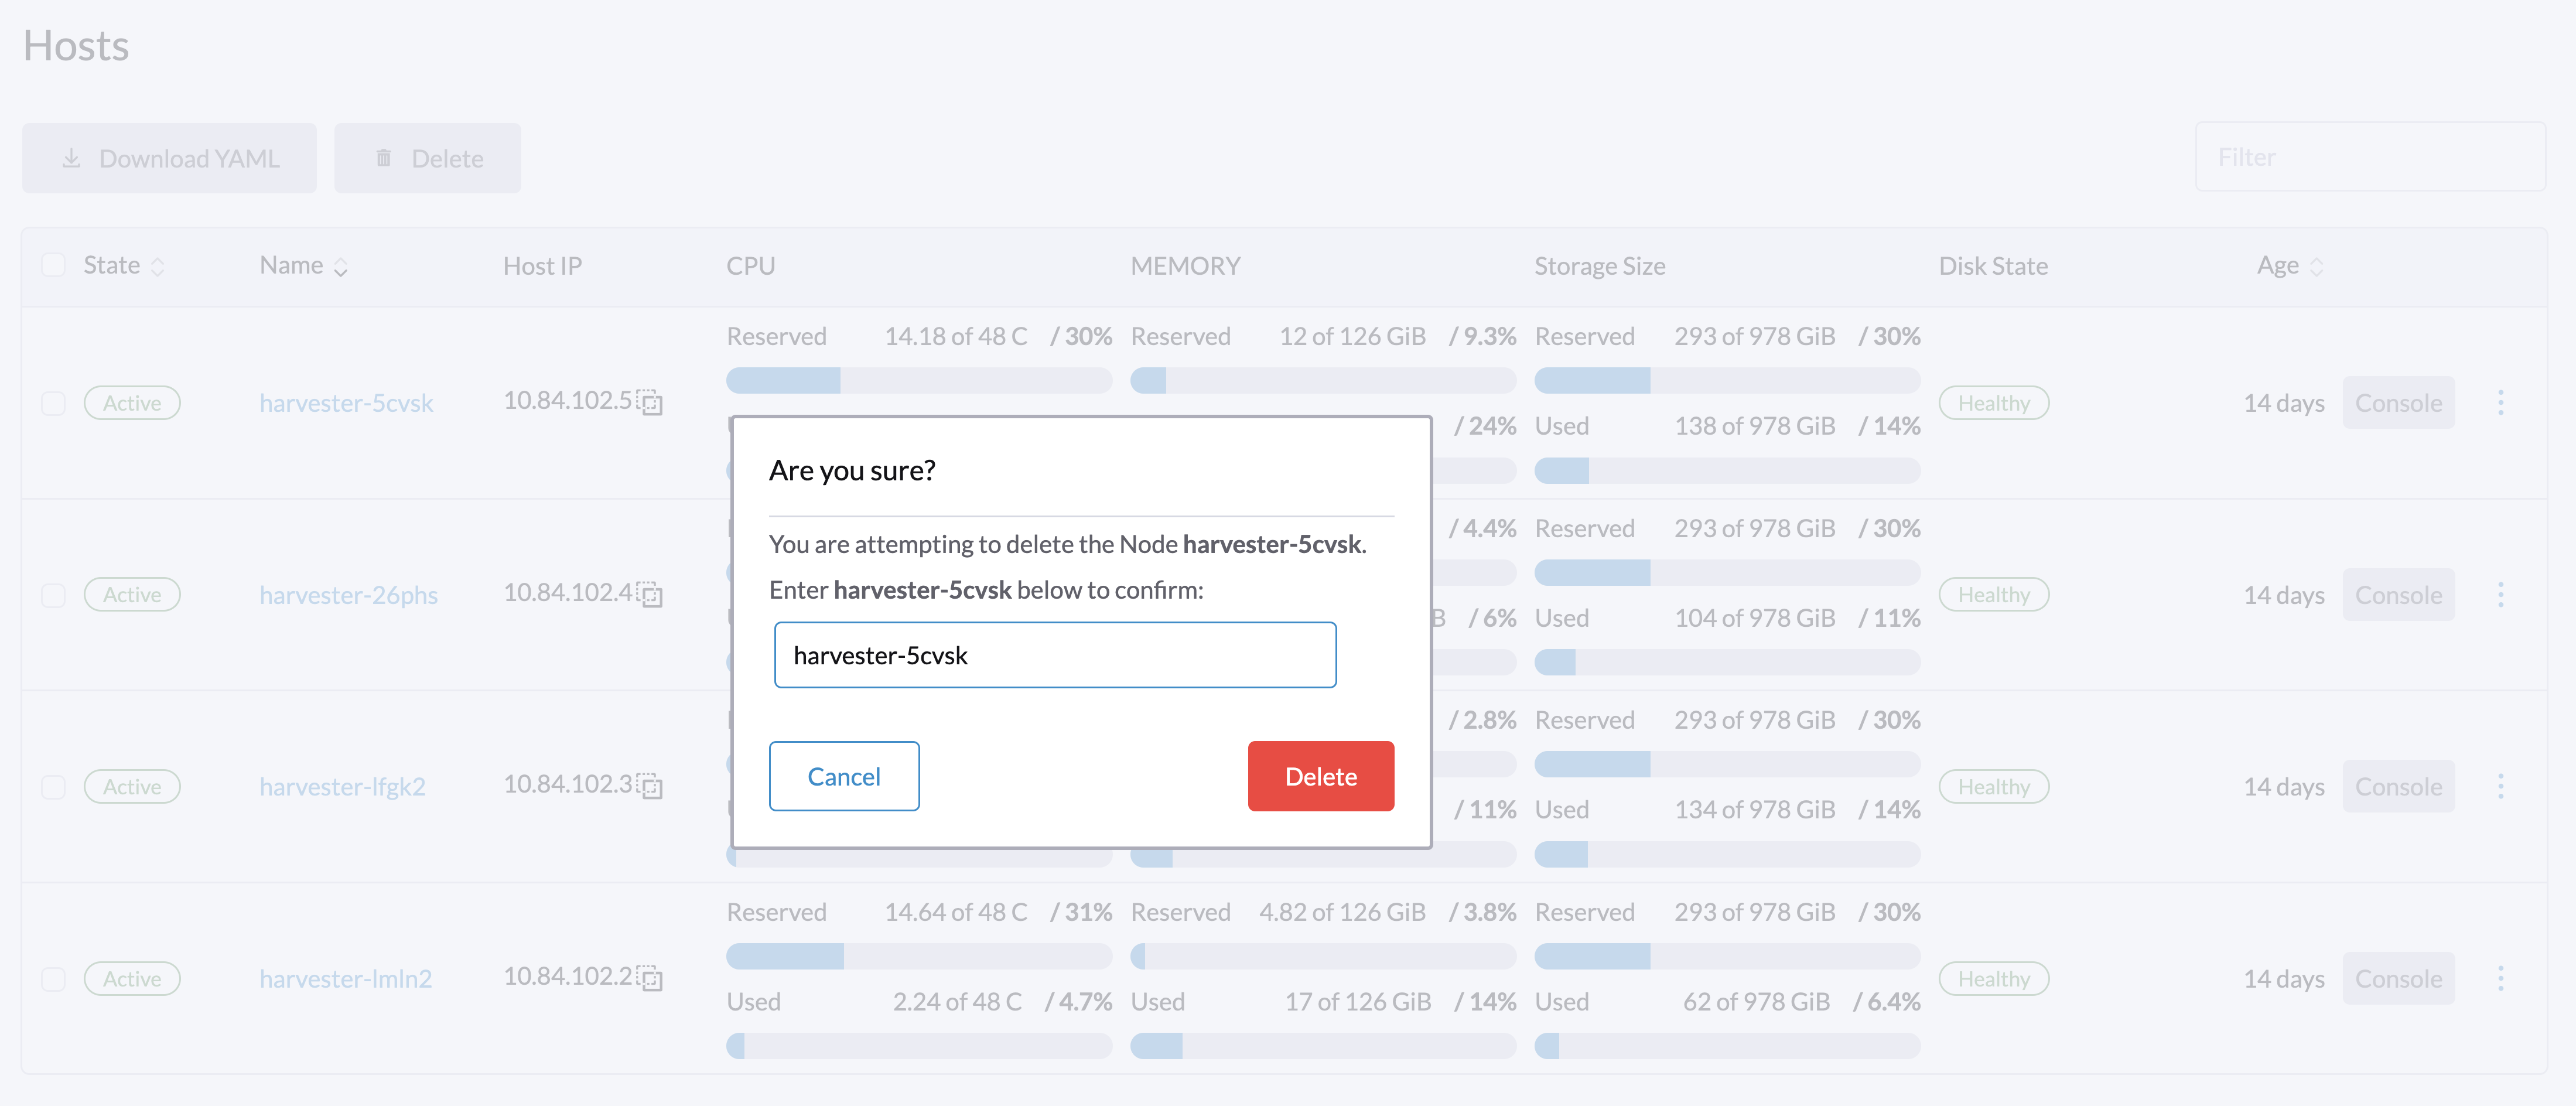
Deleting a Node
Deleting a node is done in two phases:
Delete the node from Harvester
- Go to the Hosts page
- On the node you want to modify, click ⋮ > Delete
Uninstall RKE2 from the node
- Login to the node as root
- Run
rke2-uninstall.shto delete the whole RKE2 service.
You will lose all data of the control plane node after deleting the RKE2 service.
There's a known issue about node hard delete. Once resolved, the last step can be skipped.
Multi-disk Management
Add Additional Disks
Users can view and add multiple disks as additional data volumes from the edit host page.
- Go to the Hosts page.
- On the node you want to modify, click ⋮ > Edit Config.
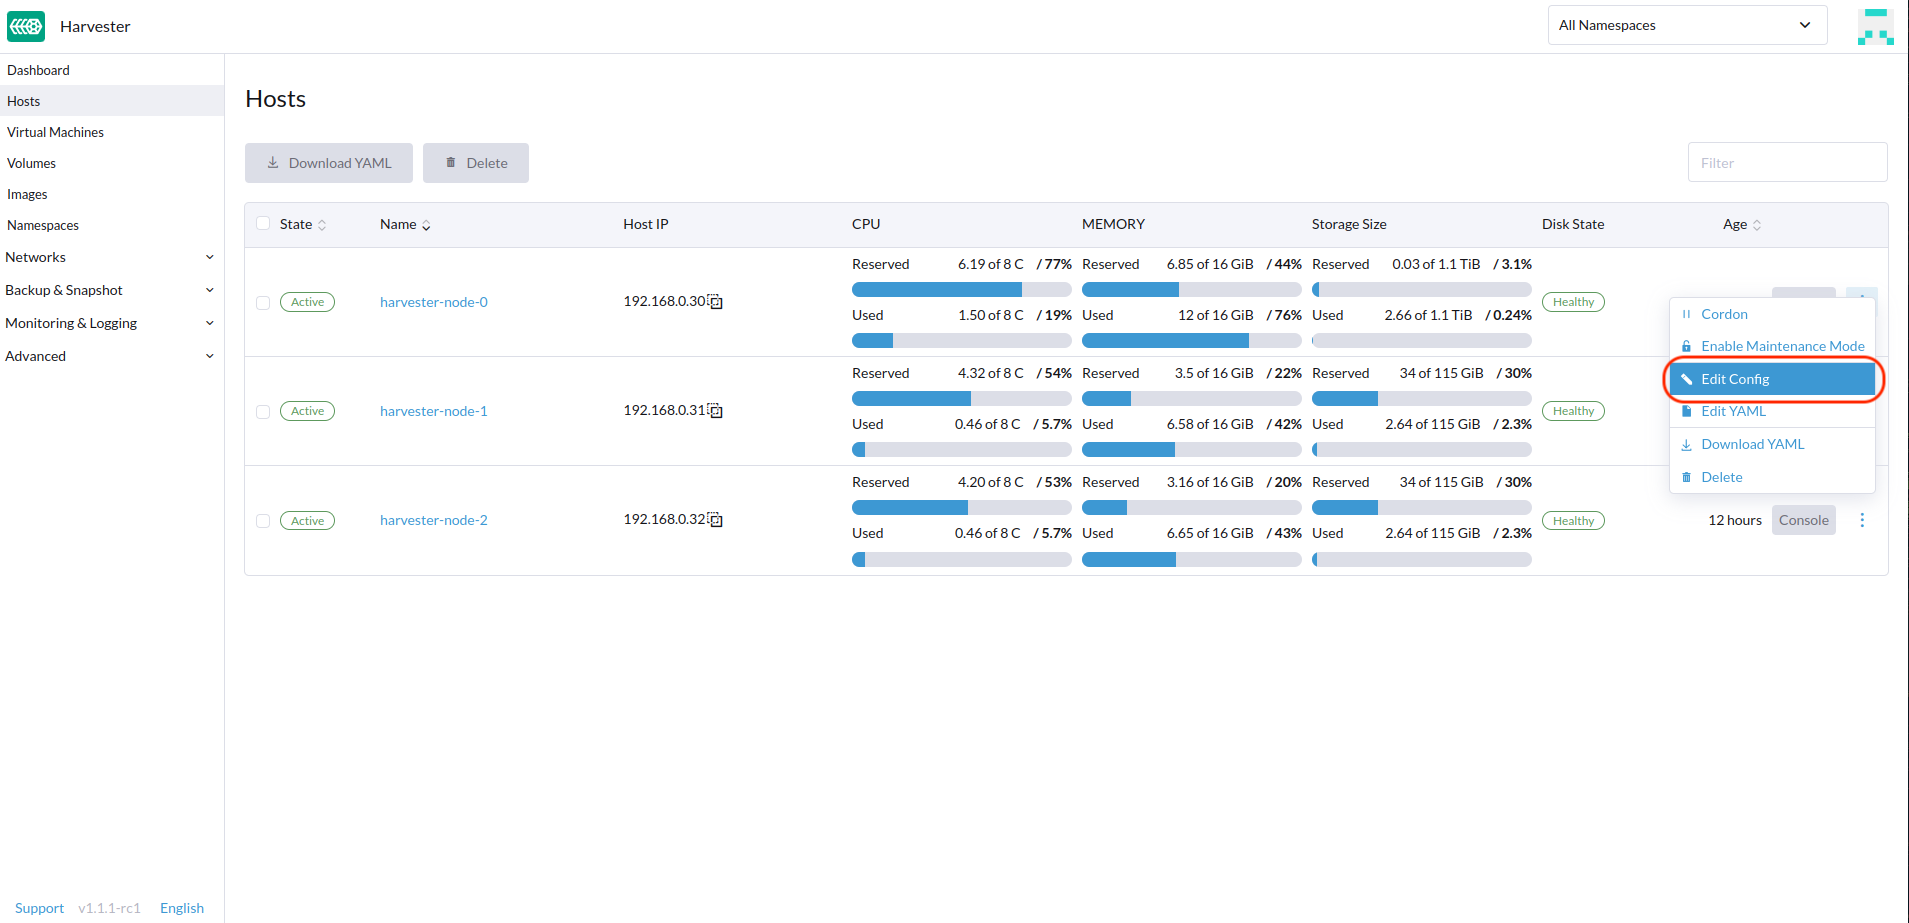
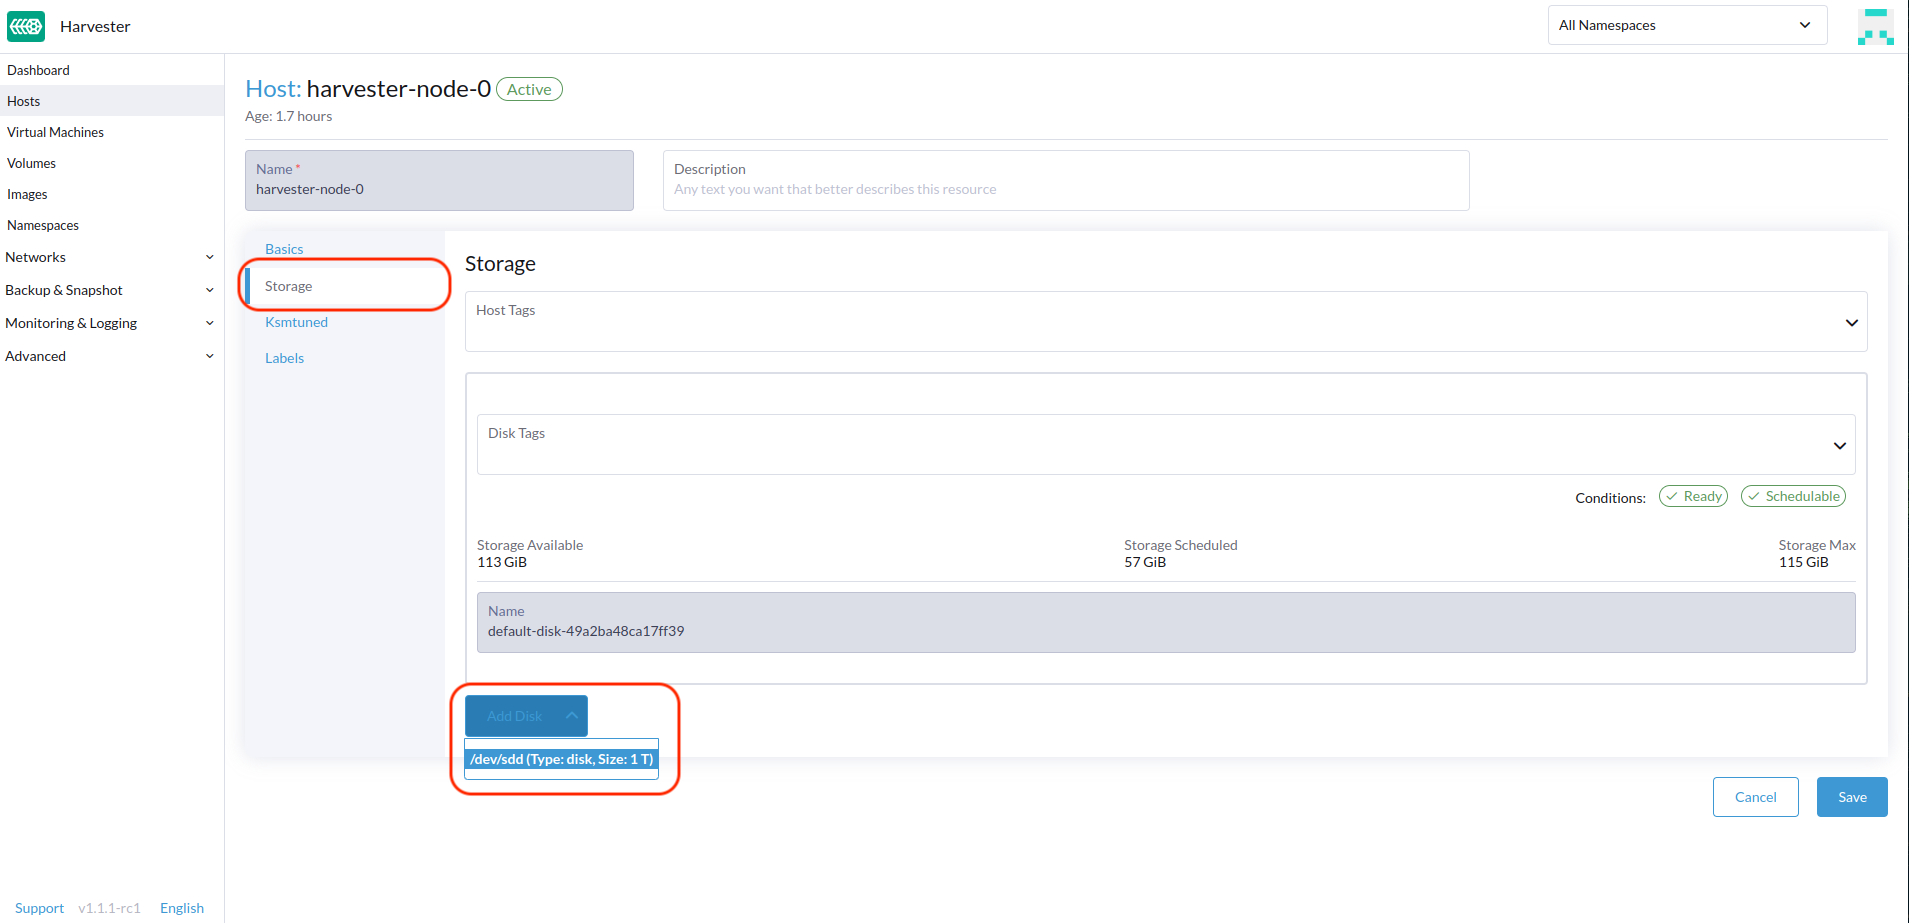
- Select the Storage tab and click Add Disk.
As of Harvester v1.0.2, we no longer support adding partitions as additional disks. If you want to add it as an additional disk, be sure to delete all partitions first (e.g., using fdisk).
- Select an additional raw block device to add as an additional data volume.
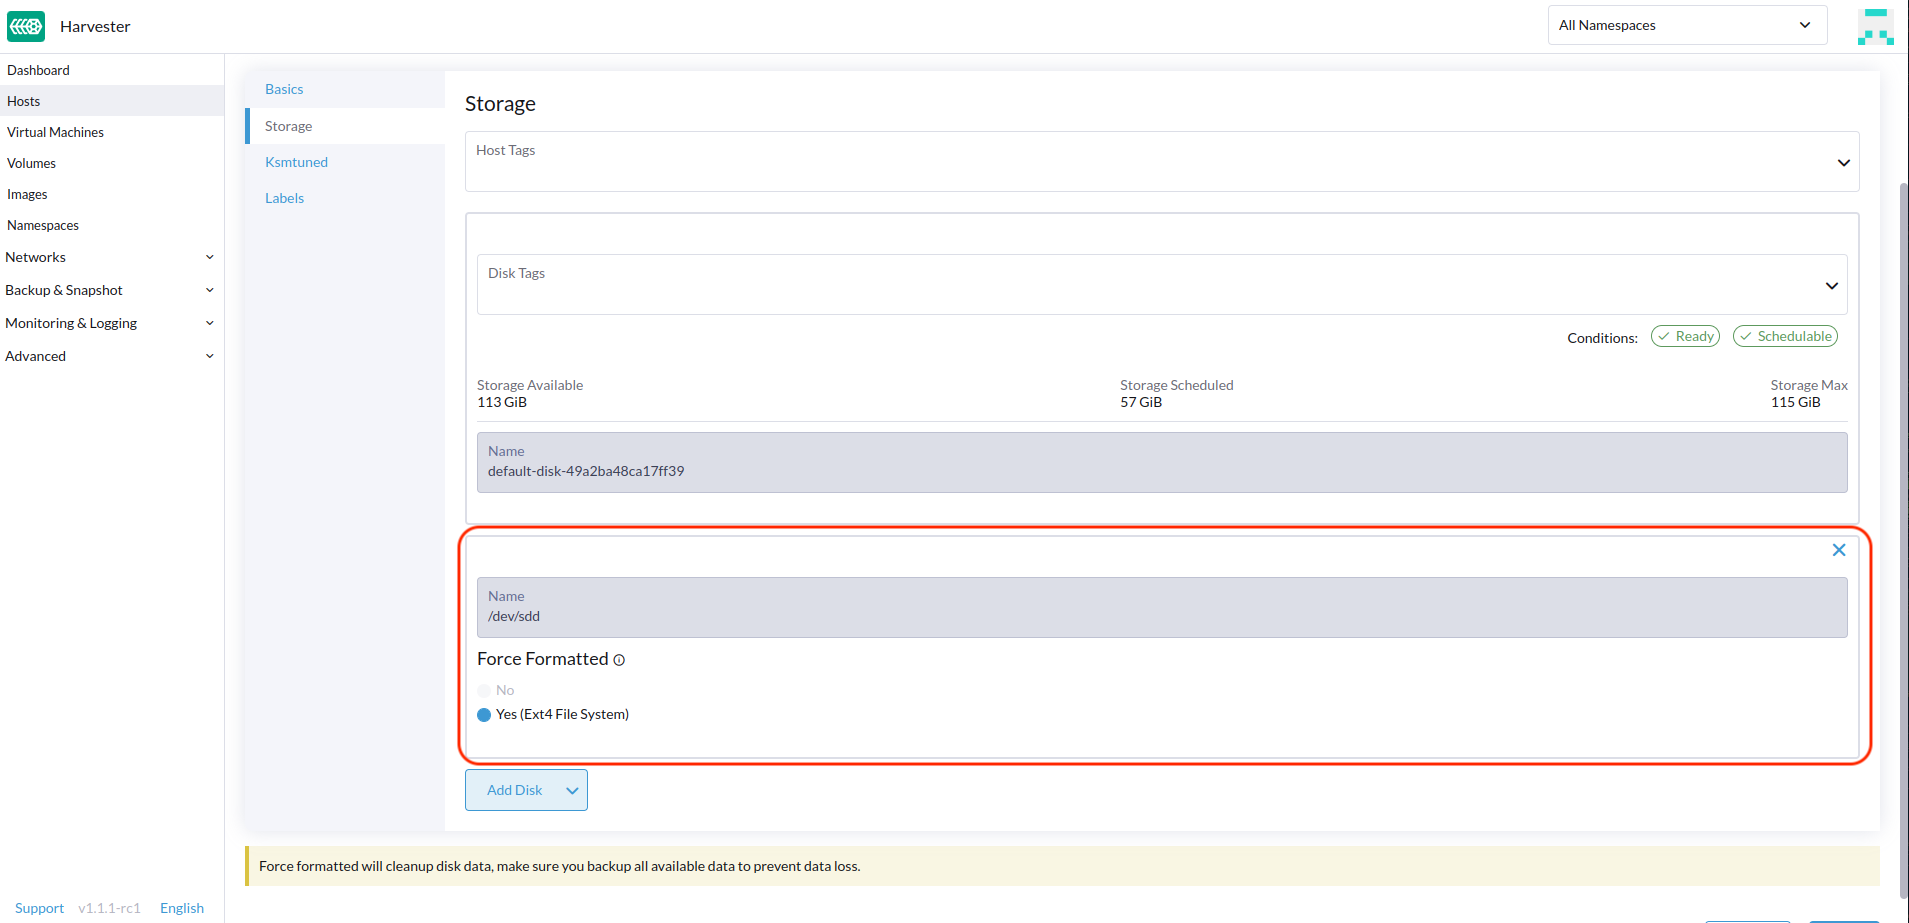
- The
Force Formattedoption is required if the block device has never been force-formatted.
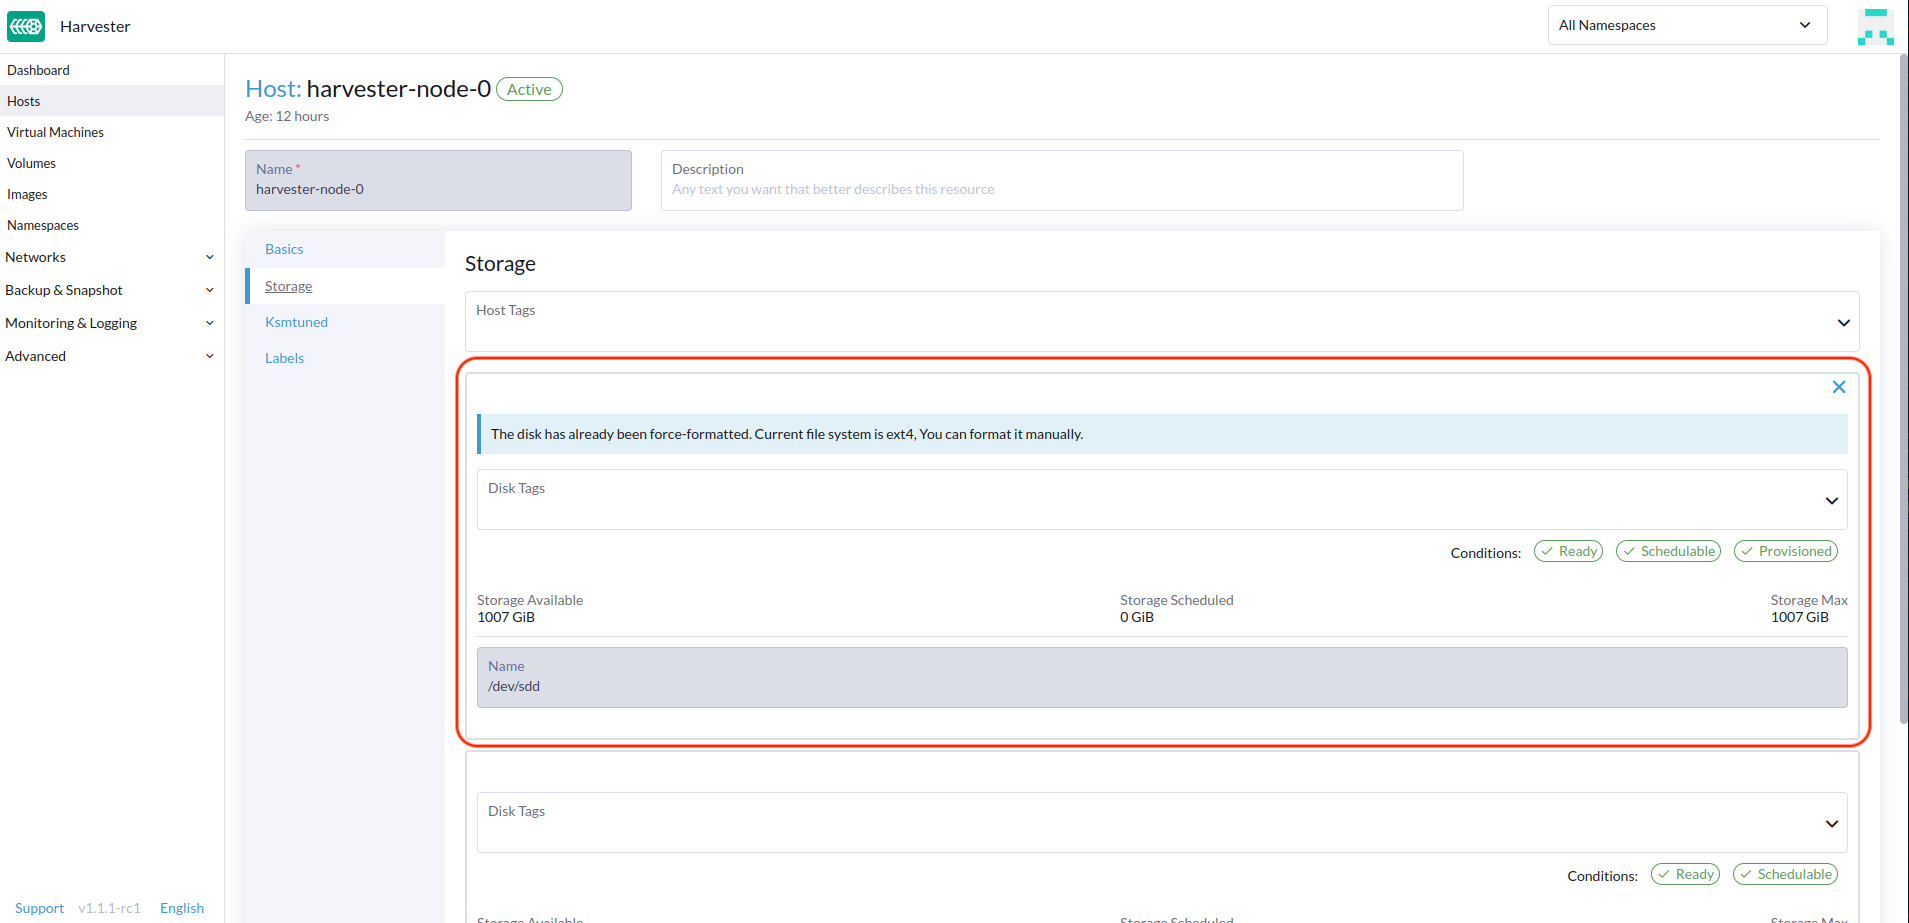
- The
- Last, you can click ⋮ > Edit Config again to check the newly added disk. Meanwhile, you can also add the "Host/Disk" tag (details are described in the next section).
In order for Harvester to identify the disks, each disk needs to have a unique WWN. Otherwise, Harvester will refuse to add the disk.
If your disk does not have a WWN, you can format it with the EXT4 filesystem to help Harvester recognize the disk.
If you are testing Harvester in a QEMU environment, you'll need to use QEMU v6.0 or later. Previous versions of QEMU will always generate the same WWN for NVMe disks emulation. This will cause Harvester to not add the additional disks, as explained above.
Storage Tags
The storage tag feature enables only certain nodes or disks to be used for storing Longhorn volume data. For example, performance-sensitive data can use only the high-performance disks which can be tagged as fast, ssd or nvme, or only the high-performance nodes tagged as baremetal.
This feature supports both disks and nodes.
Setup
The tags can be set up through the Harvester UI on the host page:
- Click
Hosts->Edit Config->Storage - Click
Add Host/Disk Tagsto start typing and hit enter to add new tags. - Click
Saveto update tags. - On the StorageClasses page, create a new storage class and select those defined tags on the
Node SelectorandDisk Selectorfields.
All the existing scheduled volumes on the node or disk won’t be affected by the new tags.
When multiple tags are specified for a volume, the disk and the nodes (that the disk belongs to) must have all the specified tags to become usable.
Remove disks
Before removing a disk, you must first evict Longhorn replicas on the disk.
The replica data would be rebuilt to another disk automatically to keep the high availability.
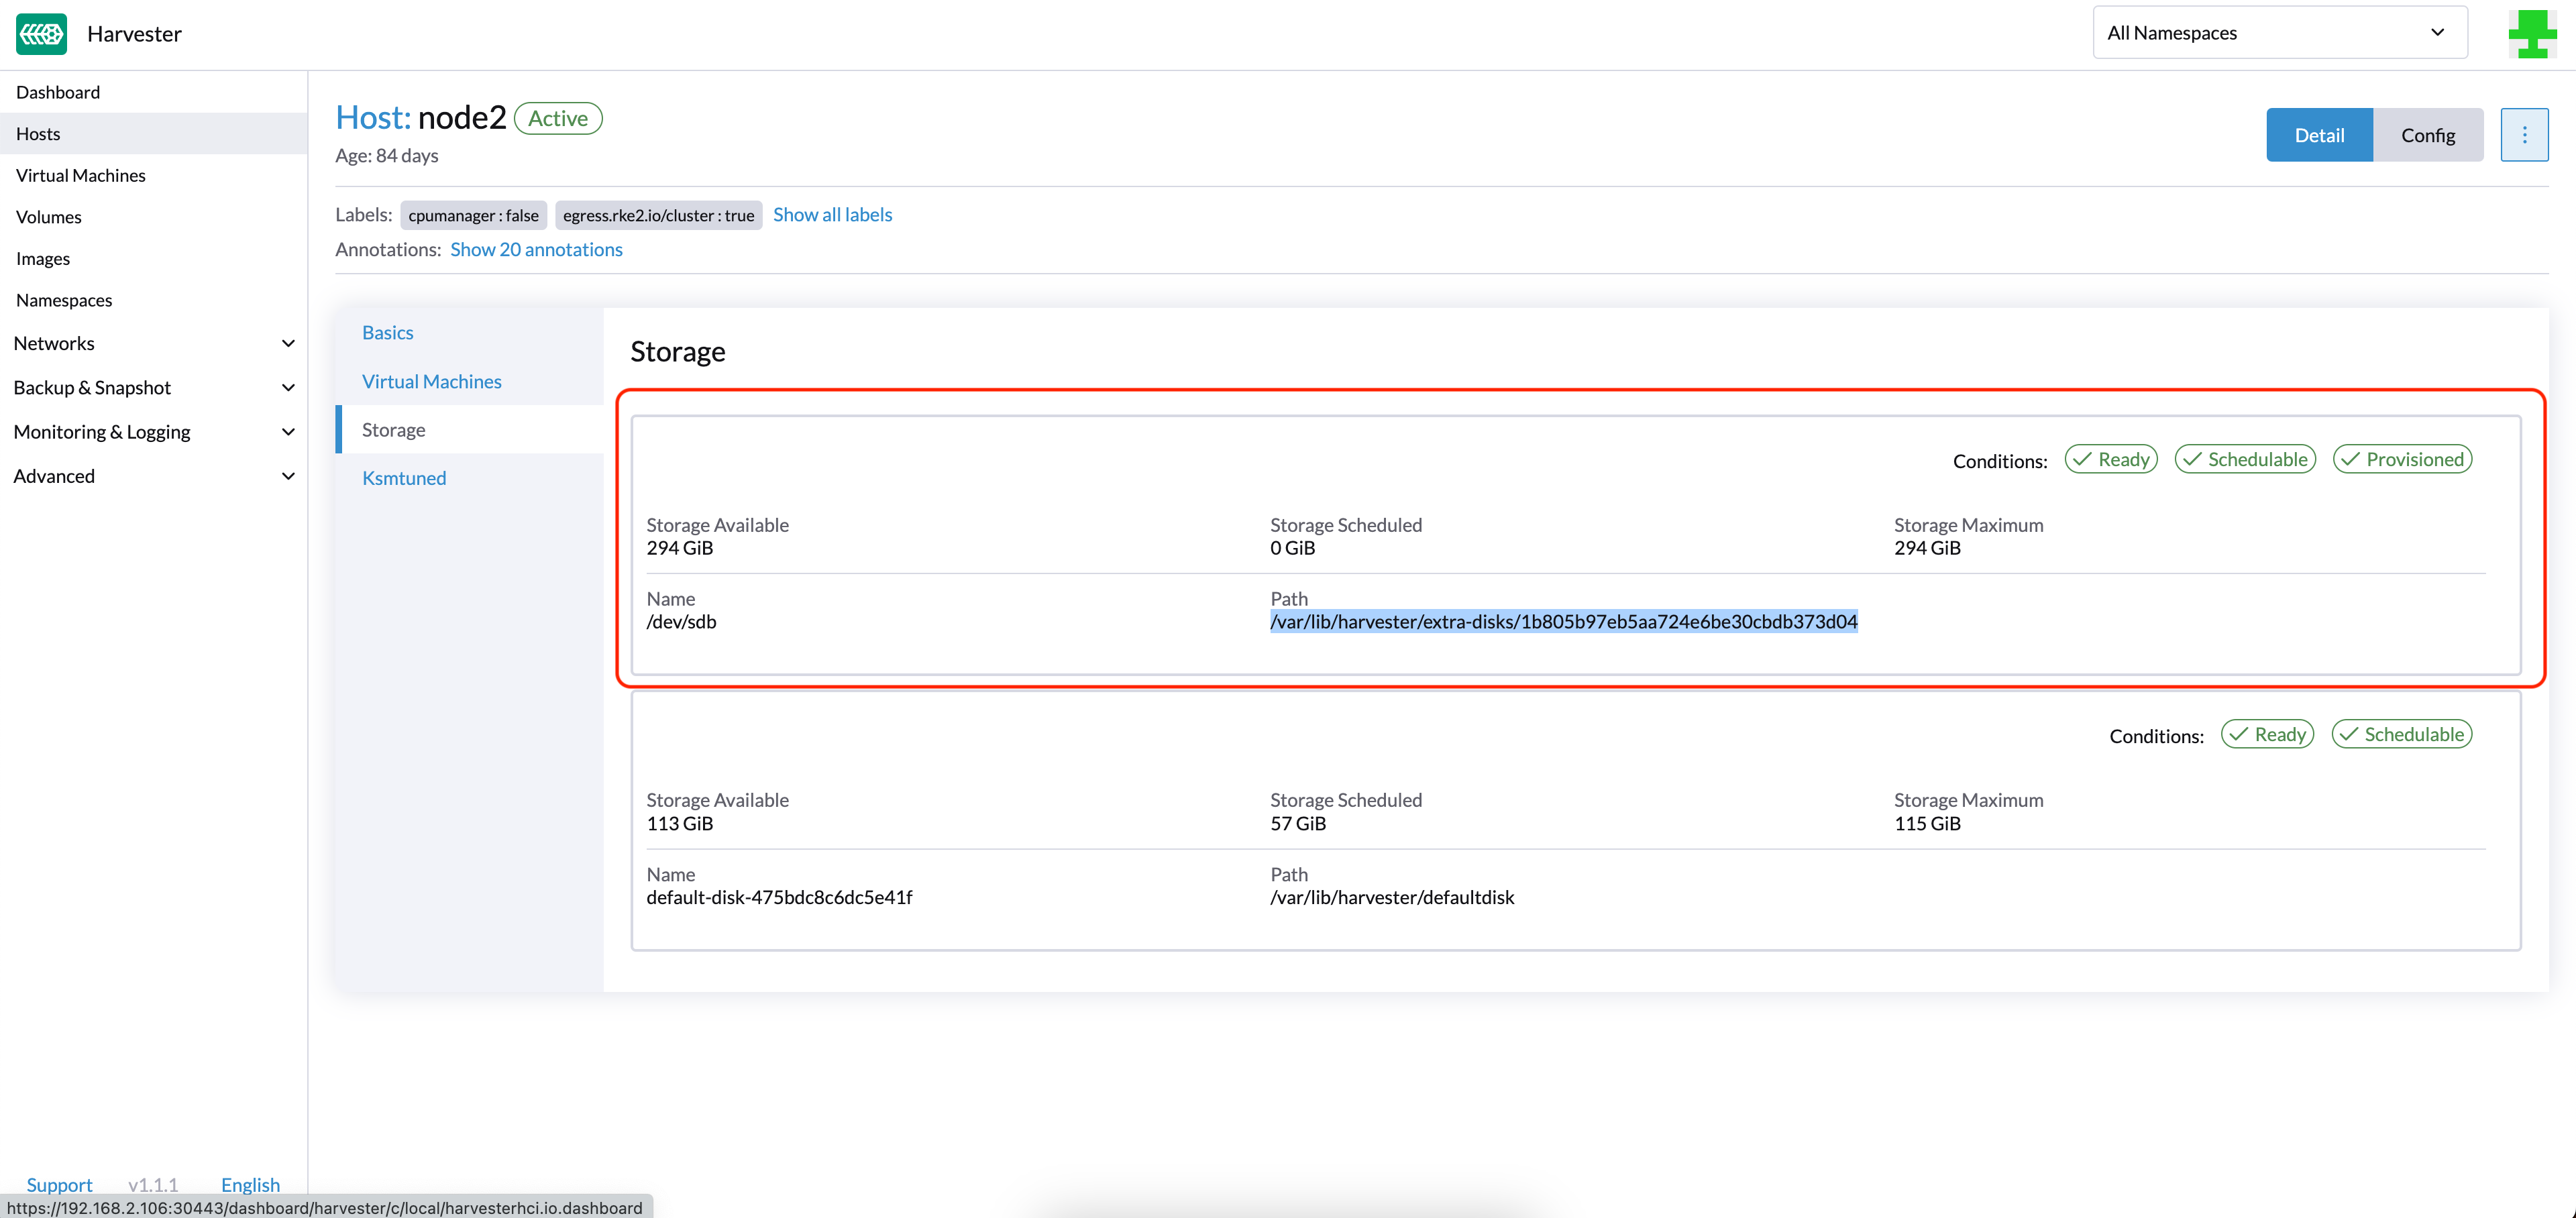
Identify the disk to remove (Harvester dashboard)
- Go to the Hosts page.
- On the node containing the disk, select the node name and go to the Storage tab.
- Find the disk you want to remove. Let's assume we want to remove
/dev/sdb, and the disk's mount point is/var/lib/harvester/extra-disks/1b805b97eb5aa724e6be30cbdb373d04.
Evict replicas (Longhorn dashboard)
- Please follow this session to enable the embedded Longhorn dashboard.
- Visit the Longhorn dashboard and go to the Node page.
- Expand the node containing the disk. Confirm the mount point
/var/lib/harvester/extra-disks/1b805b97eb5aa724e6be30cbdb373d04is in the disks list.

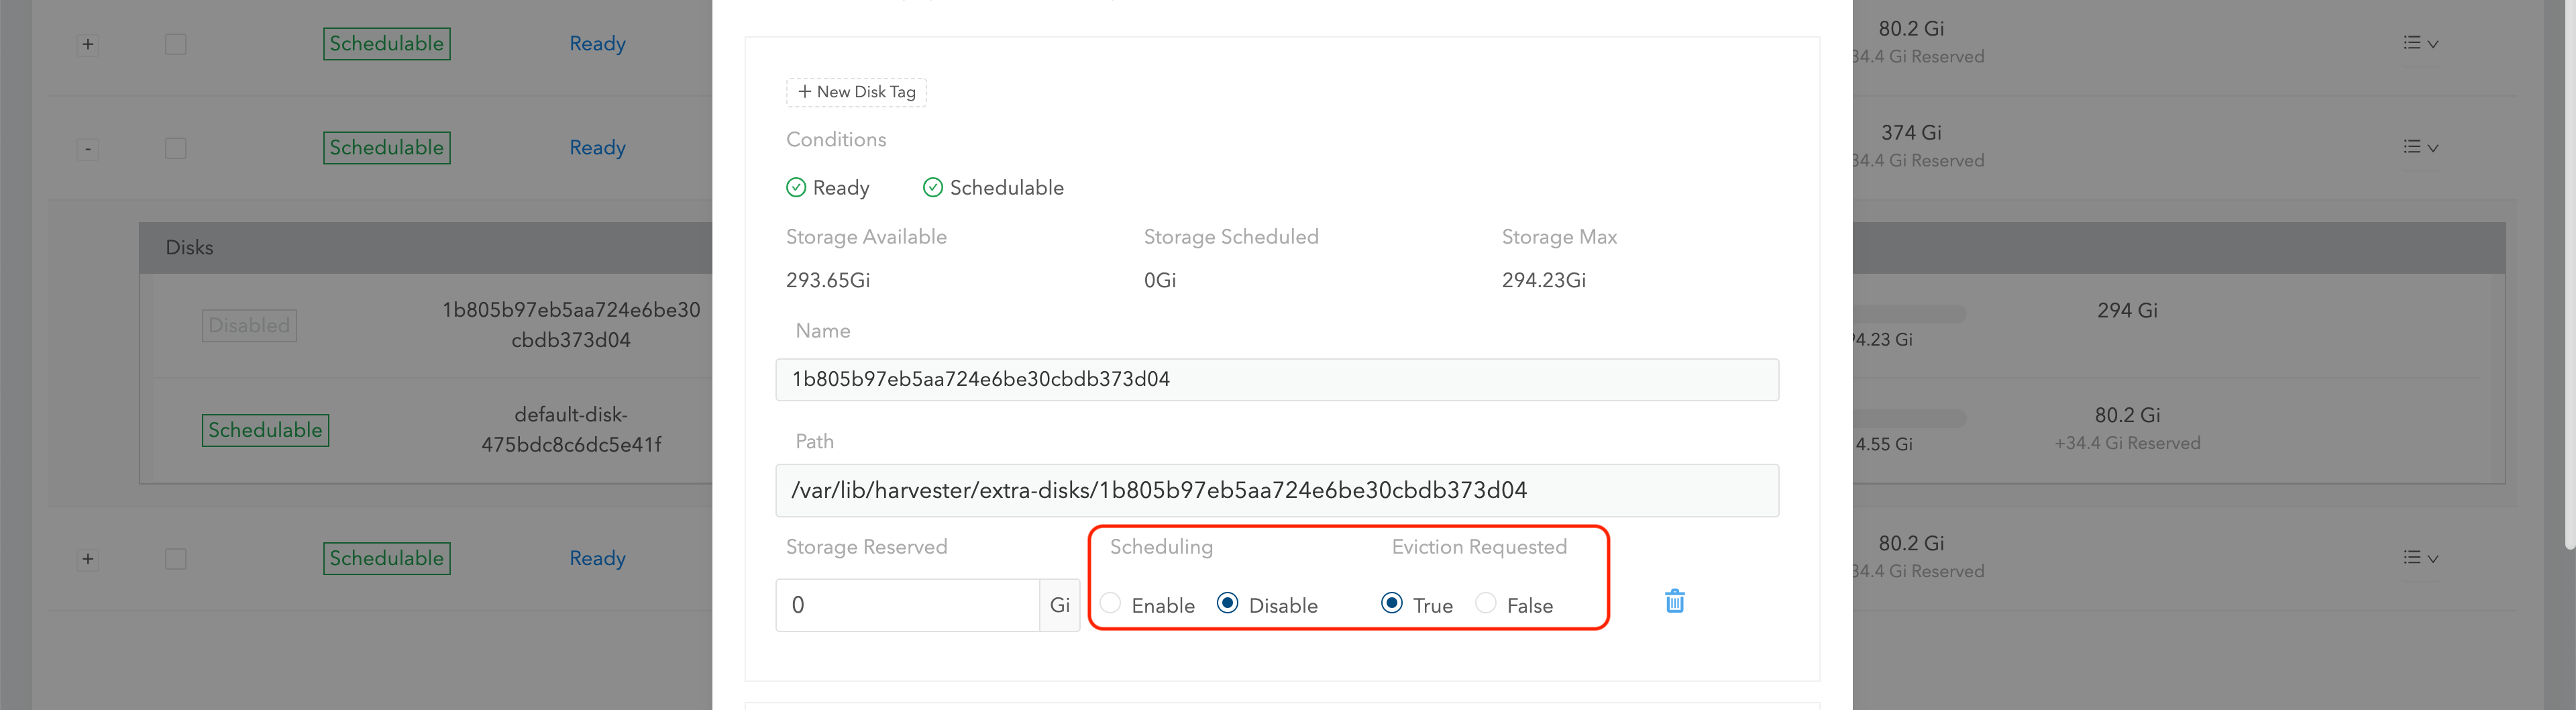
- Select Edit node and disks.

- Scroll to the disk you want to remove.
- Set
SchedulingtoDisable. - Set
Eviction RequestedtoTrue. - Select Save. Do not select the delete icon.
- The disk will be disabled. Please wait until the disk replica count becomes
0to proceed with removing the disk.

Remove the disk (Harvester dashboard)
- Go to the Hosts page.
- On the node containing the disk, select ⋮ > Edit Config.
- Go to the Storage tab and select x to remove the disk.
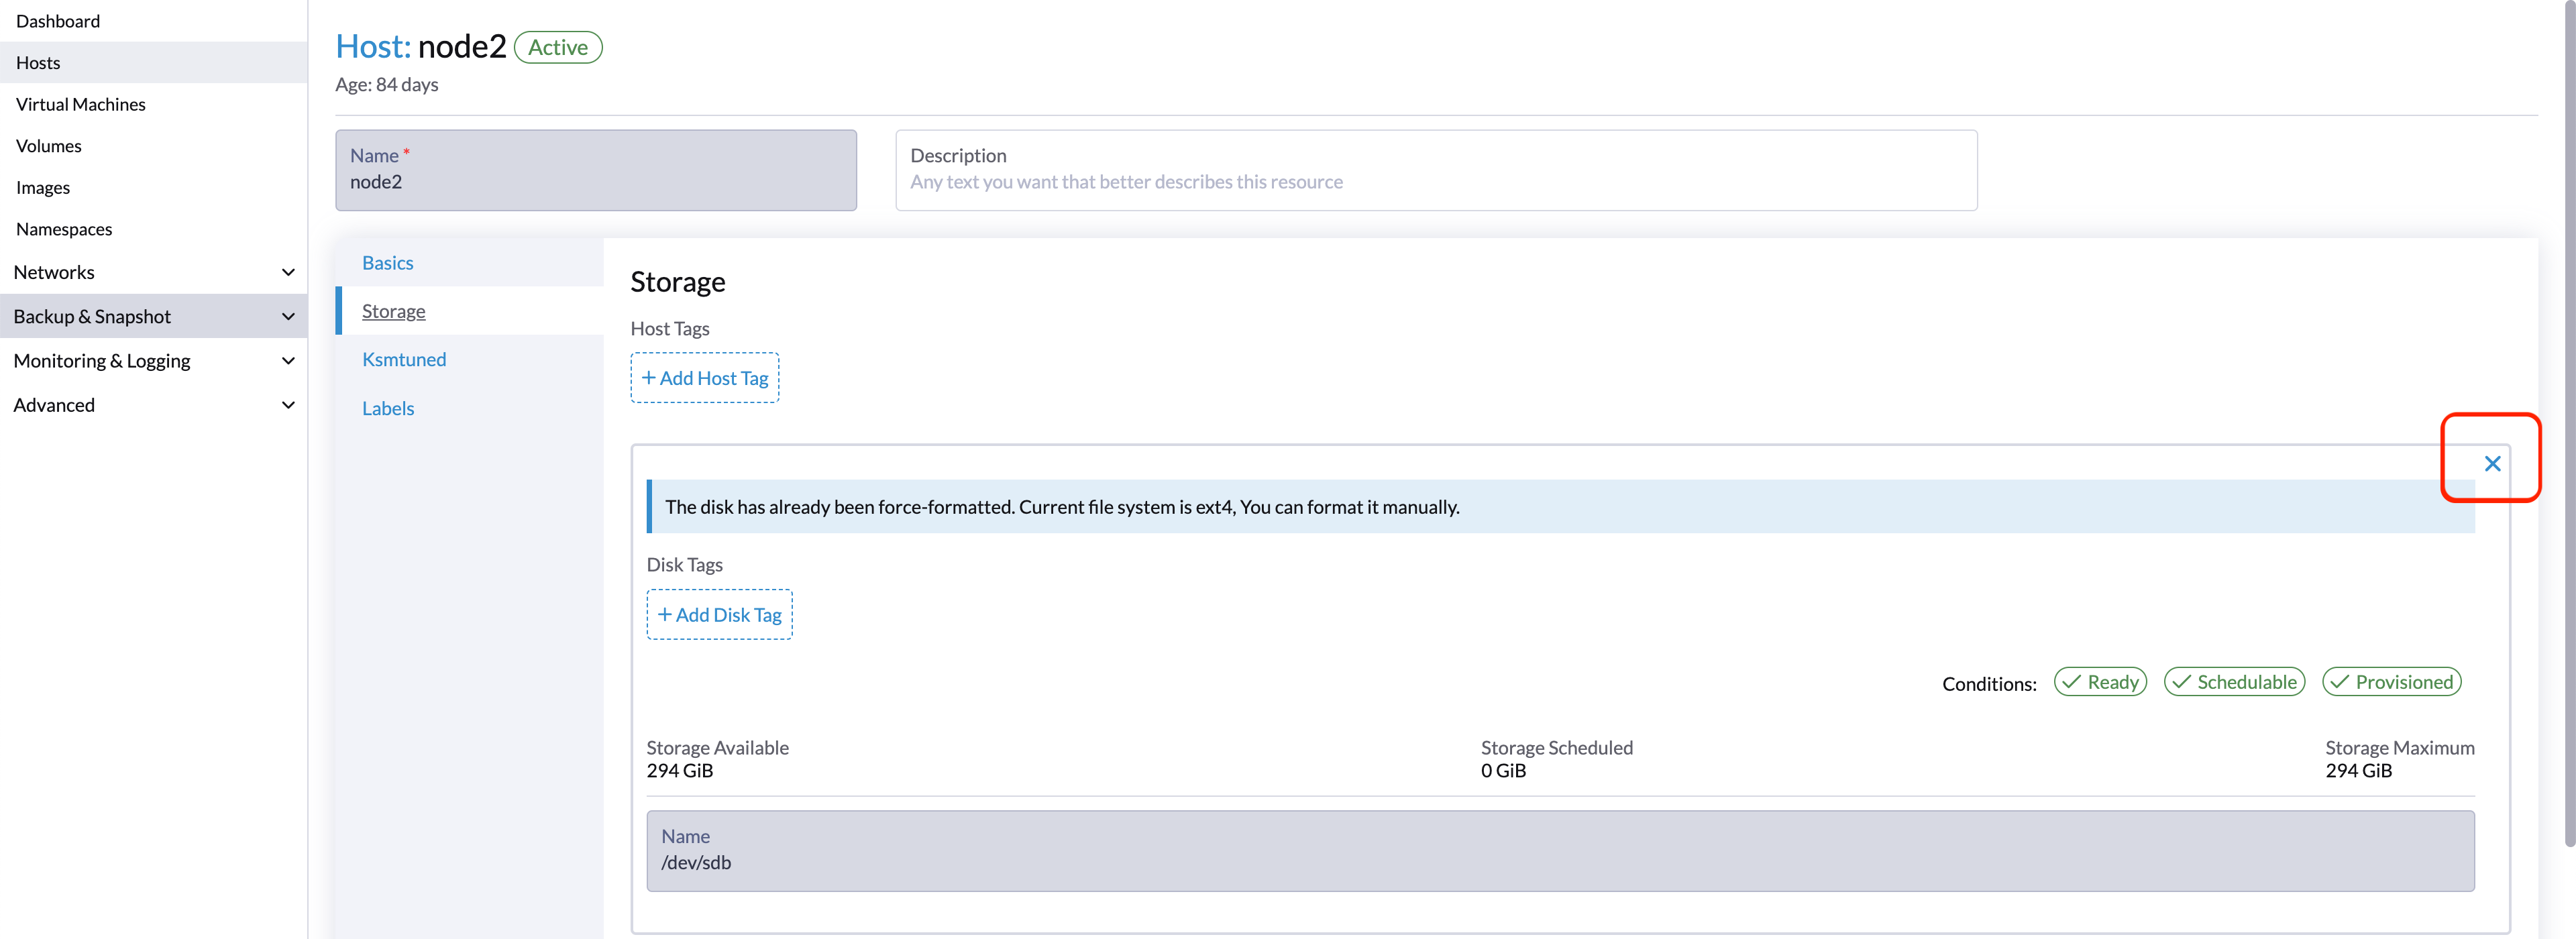
- Select Save to remove the disk.
Ksmtuned Mode
Available as of v1.1.0
Ksmtuned is a KSM automation tool deployed as a DaemonSet to run Ksmtuned on each node. It will start or stop the KSM by watching the available memory percentage ratio (i.e. Threshold Coefficient). By default, you need to manually enable Ksmtuned on each node UI. You will be able to see the KSM statistics from the node UI after 1-2 minutes.(check KSM for more details).
Quick Run
- Go to the Hosts page.
- On the node you want to modify, click ⋮ > Edit Config.
- Select the Ksmtuned tab and select Run in Run Strategy.
- (Optional) You can modify Threshold Coefficient as needed.
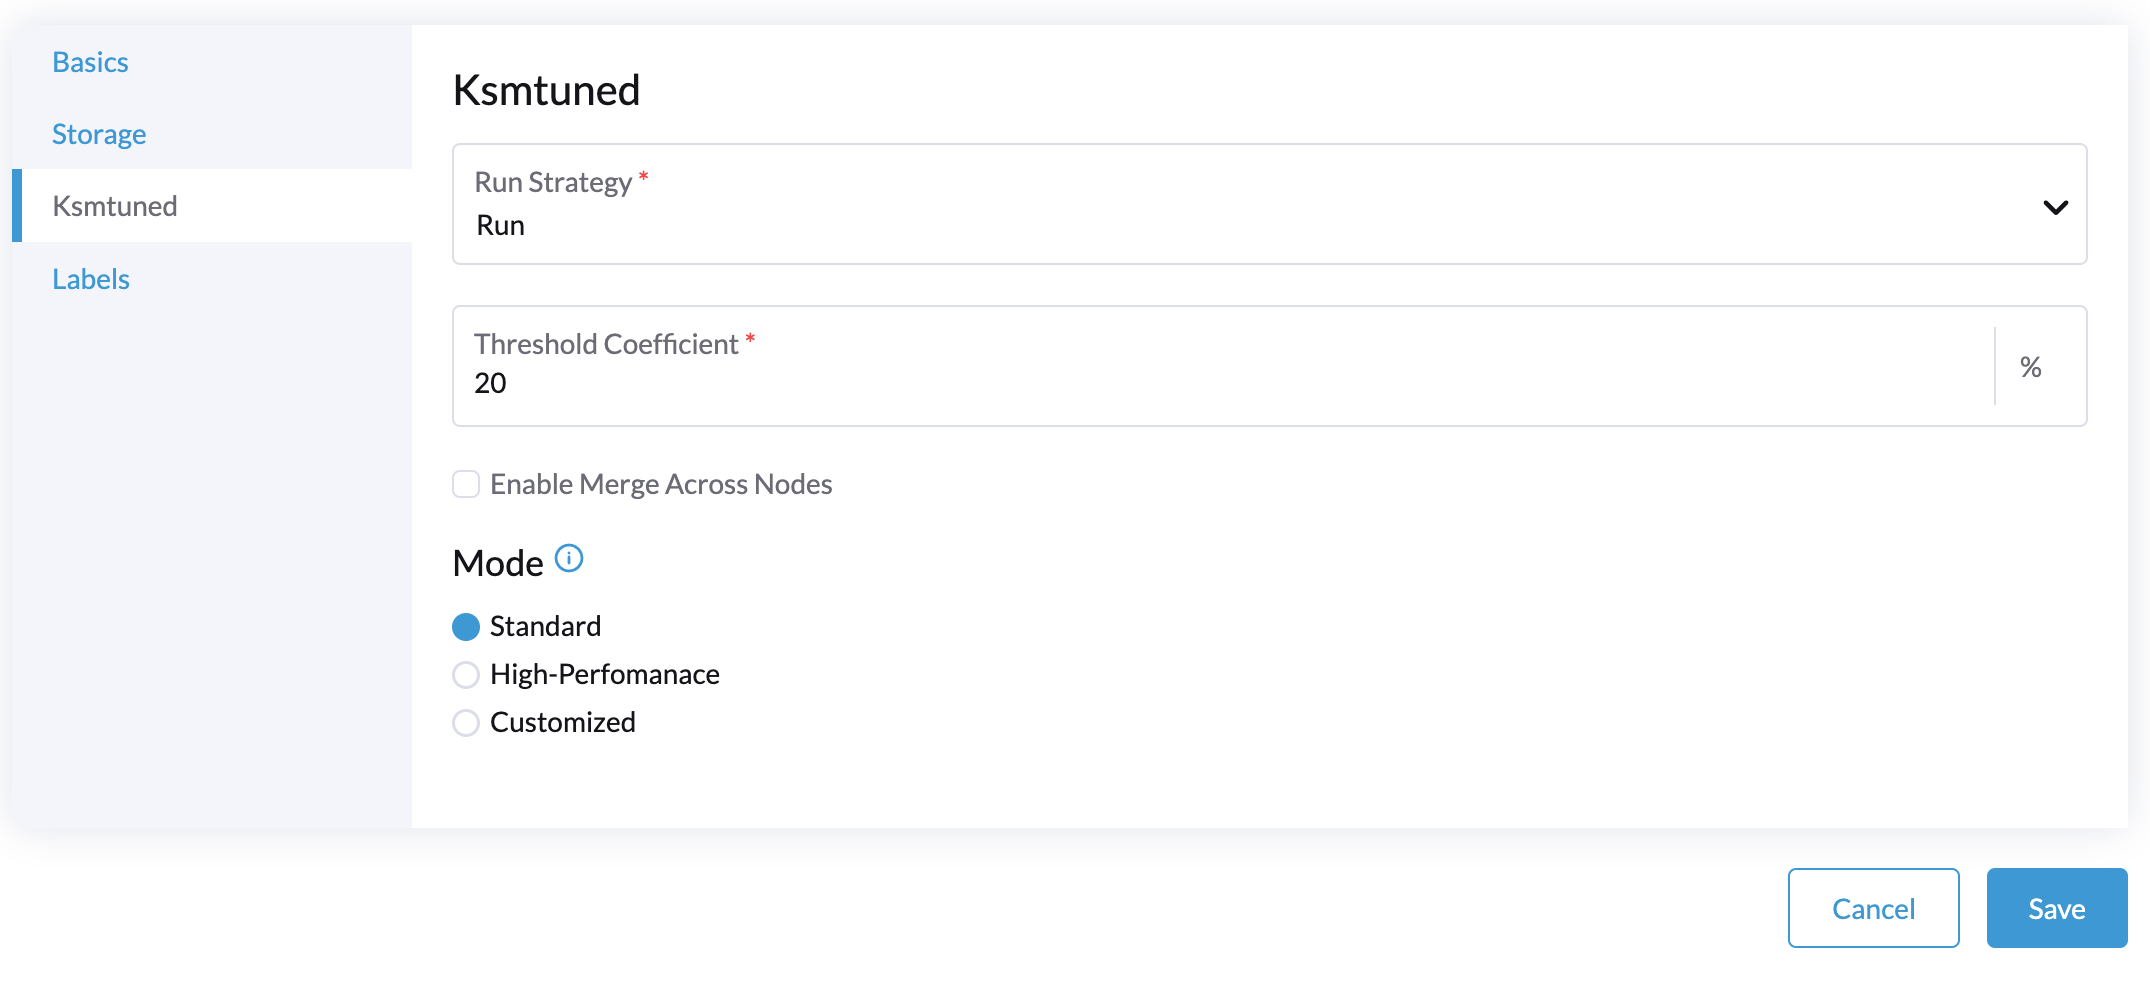
- Click Save to update.
- Wait for about 1-2 minutes and you can check its Statistics by clicking Your Node > Ksmtuned tab.

Parameters
Run Strategy:
- Stop: Stop Ksmtuned and KSM. VMs can still use shared memory pages.
- Run: Run Ksmtuned.
- Prune: Stop Ksmtuned and prune KSM memory pages.
Threshold Coefficient: configures the available memory percentage ratio. If the available memory is less than the threshold, KSM will be started; otherwise, KSM will be stopped.
Merge Across Nodes: specifies if pages from different NUMA nodes can be merged.
Mode:
- Standard: The default mode. The control node ksmd uses about 20% of a single CPU. It uses the following parameters:
Boost: 0
Decay: 0
Maximum Pages: 100
Minimum Pages: 100
Sleep Time: 20
- High-performance: Node ksmd uses 20% to 100% of a single CPU and has higher scanning and merging efficiency. It uses the following parameters:
Boost: 200
Decay: 50
Maximum Pages: 10000
Minimum Pages: 100
Sleep Time: 20
- Customized: You can customize the configuration to reach the performance that you want.
Ksmtuned uses the following parameters to control KSM efficiency:
| Parameters | Description |
|---|---|
| Boost | The number of scanned pages is incremented each time if the available memory is less than the Threshold Coefficient. |
| Decay | The number of scanned pages is decremented each time if the available memory is greater than the Threshold Coefficient. |
| Maximum Pages | Maximum number of pages per scan. |
| Minimum Pages | The minimum number of pages per scan, also the configuration for the first run. |
| Sleep Time (ms) | The interval between two scans, which is calculated with the formula (Sleep Time * 16 * 1024* 1024 / Total Memory). Minimum: 10ms. |
For example, assume you have a 512GiB memory node that uses the following parameters:
Boost: 300
Decay: 100
Maximum Pages: 5000
Minimum Pages: 1000
Sleep Time: 50
When Ksmtuned starts, initialize pages_to_scan in KSM to 1000 (Minimum Pages) and set sleep_millisecs to 10 (50 * 16 * 1024 * 1024 / 536870912 KiB < 10).
KSM starts when the available memory falls below the Threshold Coefficient. If it detects that it is running, pages_to_scan increments by 300 (Boost) every minute until it reaches 5000 (Maximum Pages).
KSM will stop when the available memory is above the Threshold Coefficient. If it detects that it is stopped, pages_to_scan decrements by 100 (Decay) every minute until it reaches 1000 (Minimum Pages).