Troubleshooting
Overview
Here are some tips to troubleshoot a failed upgrade:
- Check version-specific upgrade notes. You can click the version in the support matrix table to see if there are any known issues.
- Dive into the upgrade design proposal. The following section briefly describes phases within an upgrade and possible diagnostic methods.
Diagnose the upgrade flow
A Harvester upgrade process contains several phases.
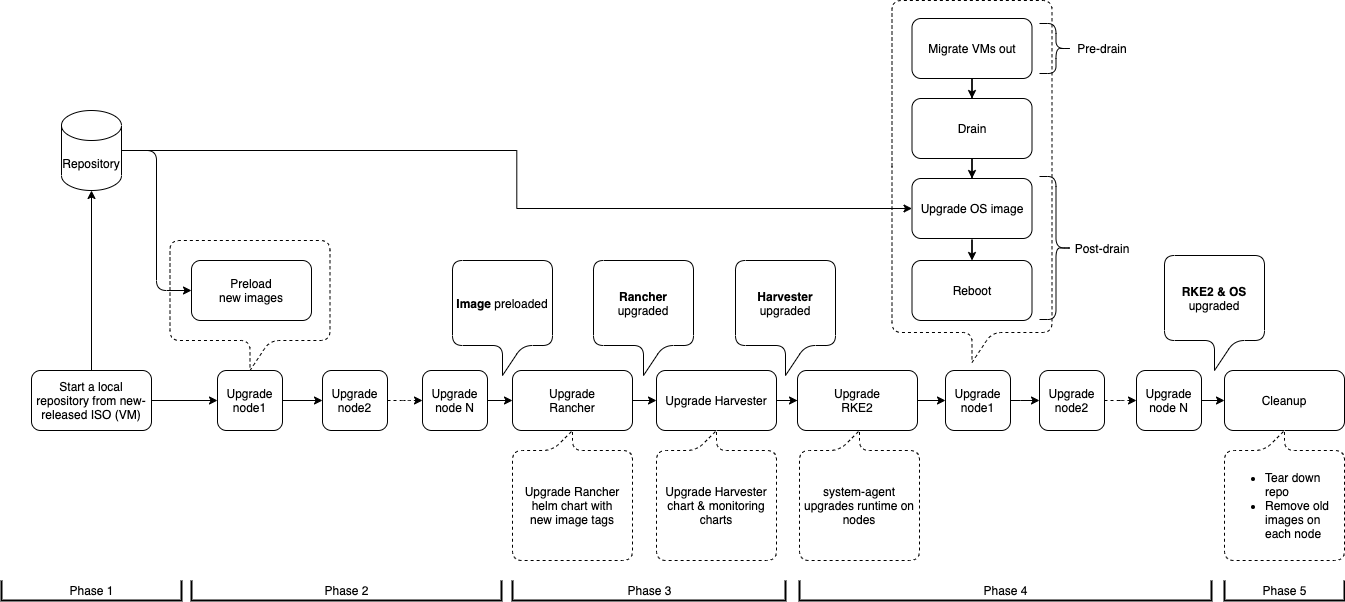
Phase 1: Provision upgrade repository VM.
The Harvester controller downloads a Harvester release ISO file and uses it to provision a VM. During this phase you can see the upgrade status windows show:
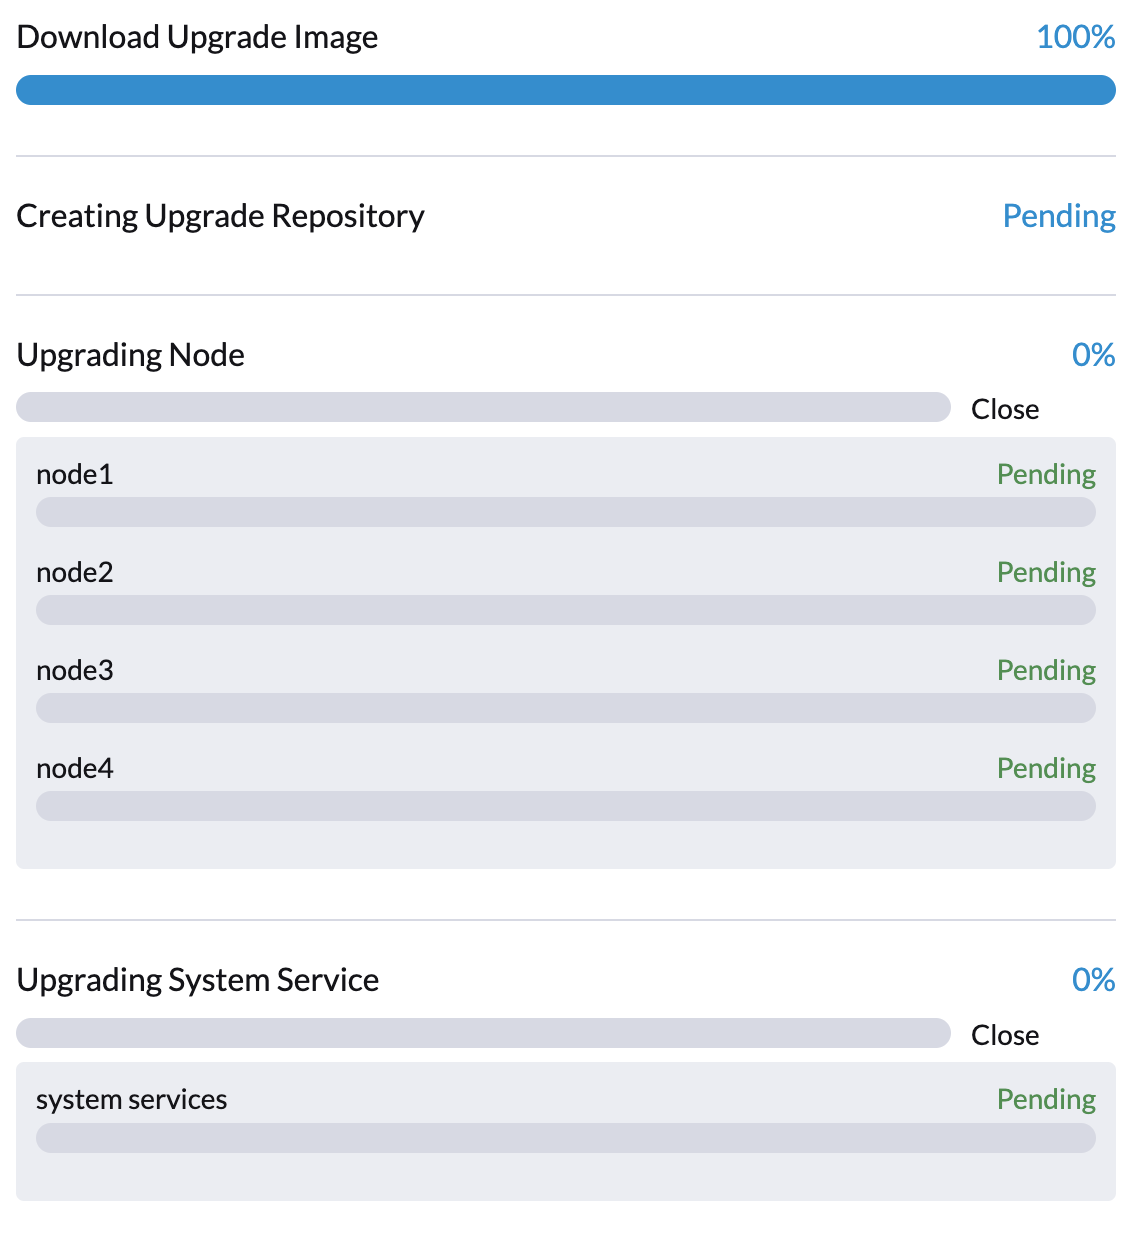
The time to complete the phase depends on the user's network speed and cluster resource utilization. We see failures in this phase due to network speed. If this happens, the user can start over the upgrade again.
We can also check the repository VM (named with the format upgrade-repo-hvst-xxxx) status and its corresponding pod:
$ kubectl get vm -n harvester-system
NAME                              AGE    STATUS     READY
upgrade-repo-hvst-upgrade-9gmg2   101s   Starting   False

$ kubectl get pods -n harvester-system | grep upgrade-repo-hvst
virt-launcher-upgrade-repo-hvst-upgrade-9gmg2-4mnmq     1/1     Running     0          4m44s
Phase 2: Preload container images
The Harvester controller creates jobs on each Harvester node to download images from the repository VM and preload them. These are the container images required for the next release.
During this stage you can see the upgrade status windows shows:

It will take a while for all nodes to preload images. If the upgrade fails at this phase, the user can check job logs in the cattle-system namespace:
$ kubectl get jobs -n cattle-system | grep prepare
apply-hvst-upgrade-9gmg2-prepare-on-node1-with-2bbea1599a-f0e86   0/1           47s        47s
apply-hvst-upgrade-9gmg2-prepare-on-node4-with-2bbea1599a-041e4   1/1           2m3s       2m50s

$ kubectl logs jobs/apply-hvst-upgrade-9gmg2-prepare-on-node1-with-2bbea1599a-f0e86 -n cattle-system
...
It's also safe to start over the upgrade if an upgrade fails at this phase.
Phase 3: Upgrade system services
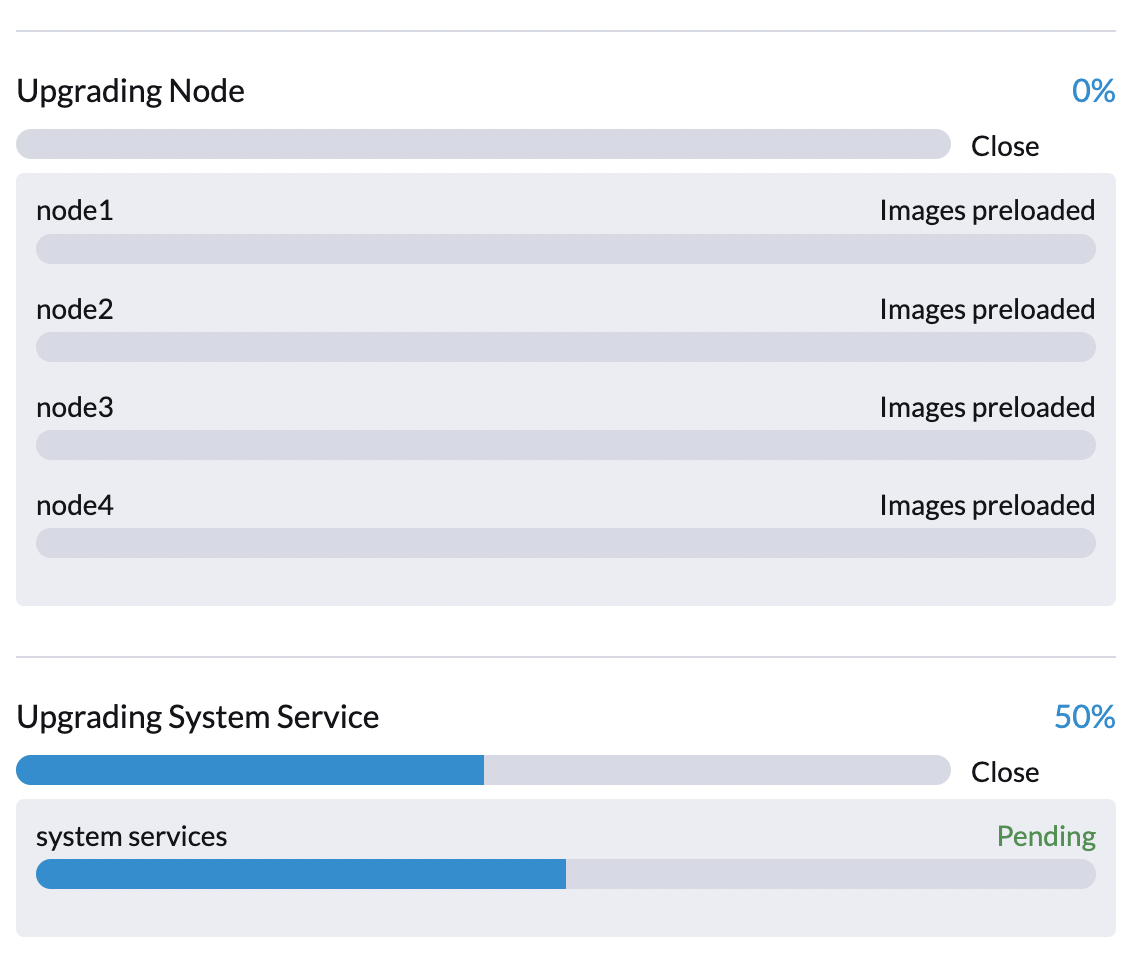
In this phase, Harvester controller upgrades component Helm charts with a job. The user can check the apply-manifest job with the following command:
$ kubectl get jobs -n harvester-system -l harvesterhci.io/upgradeComponent=manifest
NAME                                 COMPLETIONS   DURATION   AGE
hvst-upgrade-9gmg2-apply-manifests   0/1           46s        46s

$ kubectl logs jobs/hvst-upgrade-9gmg2-apply-manifests -n harvester-system
...
Phase 4: Upgrade nodes
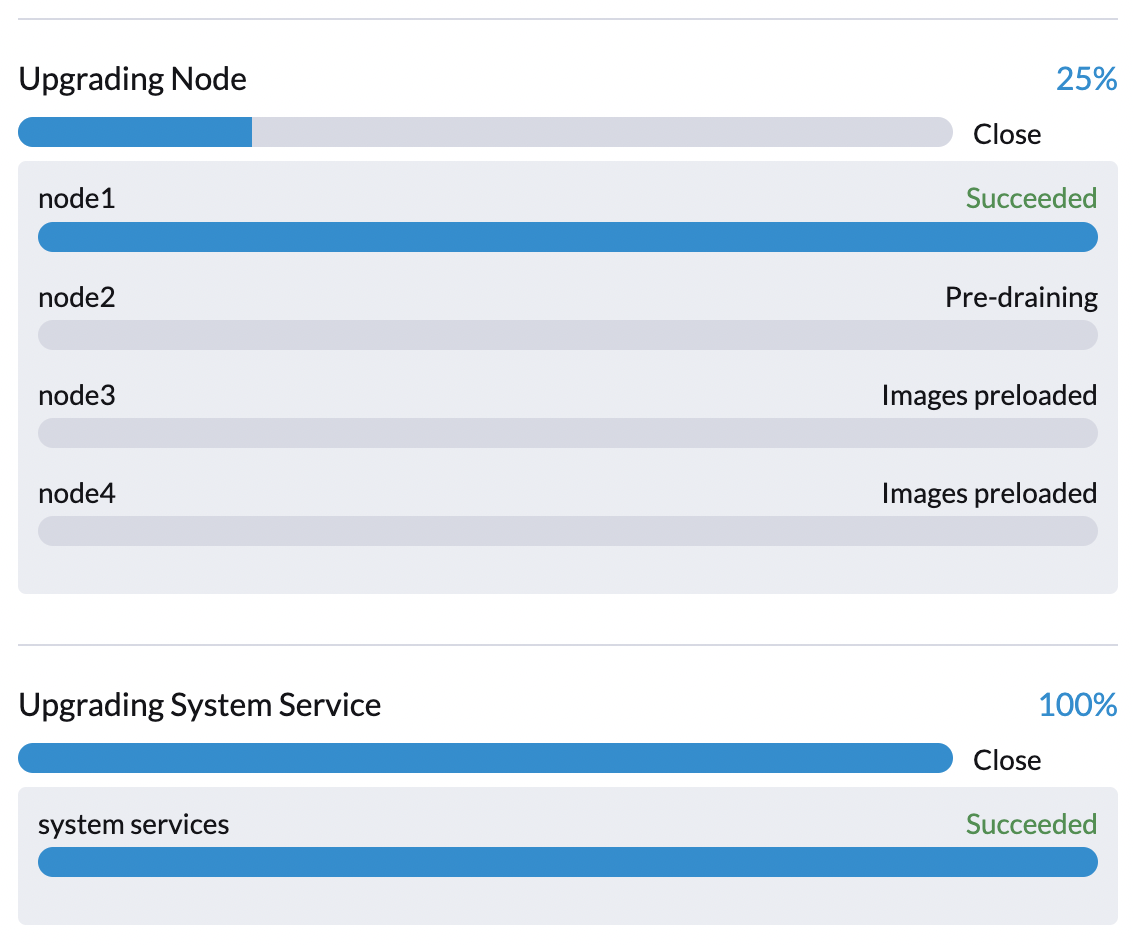
The Harvester controller creates jobs on each node (one by one) to upgrade nodes' OSes and RKE2 runtime. For multi-node clusters, there are two kinds of jobs to update a node:
- pre-drain job: live-migrate or shutdown VMs on a node. When the job completes, the embedded Rancher service upgrades RKE2 runtime on a node.
- post-drain job: upgrade OS and reboot.
For single-node clusters, there is only one single-node-upgrade type job for each node (named with the format hvst-upgrade-xxx-single-node-upgrade-<hostname>).
The user can check node jobs by:
$ kubectl get jobs -n harvester-system -l harvesterhci.io/upgradeComponent=node
NAME                                  COMPLETIONS   DURATION   AGE
hvst-upgrade-9gmg2-post-drain-node1   1/1           118s       6m34s
hvst-upgrade-9gmg2-post-drain-node2   0/1           9s         9s
hvst-upgrade-9gmg2-pre-drain-node1    1/1           3s         8m14s
hvst-upgrade-9gmg2-pre-drain-node2    1/1           7s         85s

$ kubectl logs -n harvester-system jobs/hvst-upgrade-9gmg2-post-drain-node2
...
Please do not start over an upgrade if the upgrade fails at this phase.
Phase 5: Clean-up
The Harvester controller deletes the upgrade repository VM and all files that are no longer needed.
Common operations
Start over an upgrade
Log in to a control plane node.
List
UpgradeCRs in the cluster:# become root
$ sudo -i
# list the on-going upgrade
$ kubectl get upgrade.harvesterhci.io -n harvester-system -l harvesterhci.io/latestUpgrade=true
NAME AGE
hvst-upgrade-9gmg2 10mDelete the Upgrade CR
$ kubectl delete upgrade.harvesterhci.io/hvst-upgrade-9gmg2 -n harvester-systemClick the upgrade button in the Harvester dashboard to start an upgrade again.
Download upgrade logs
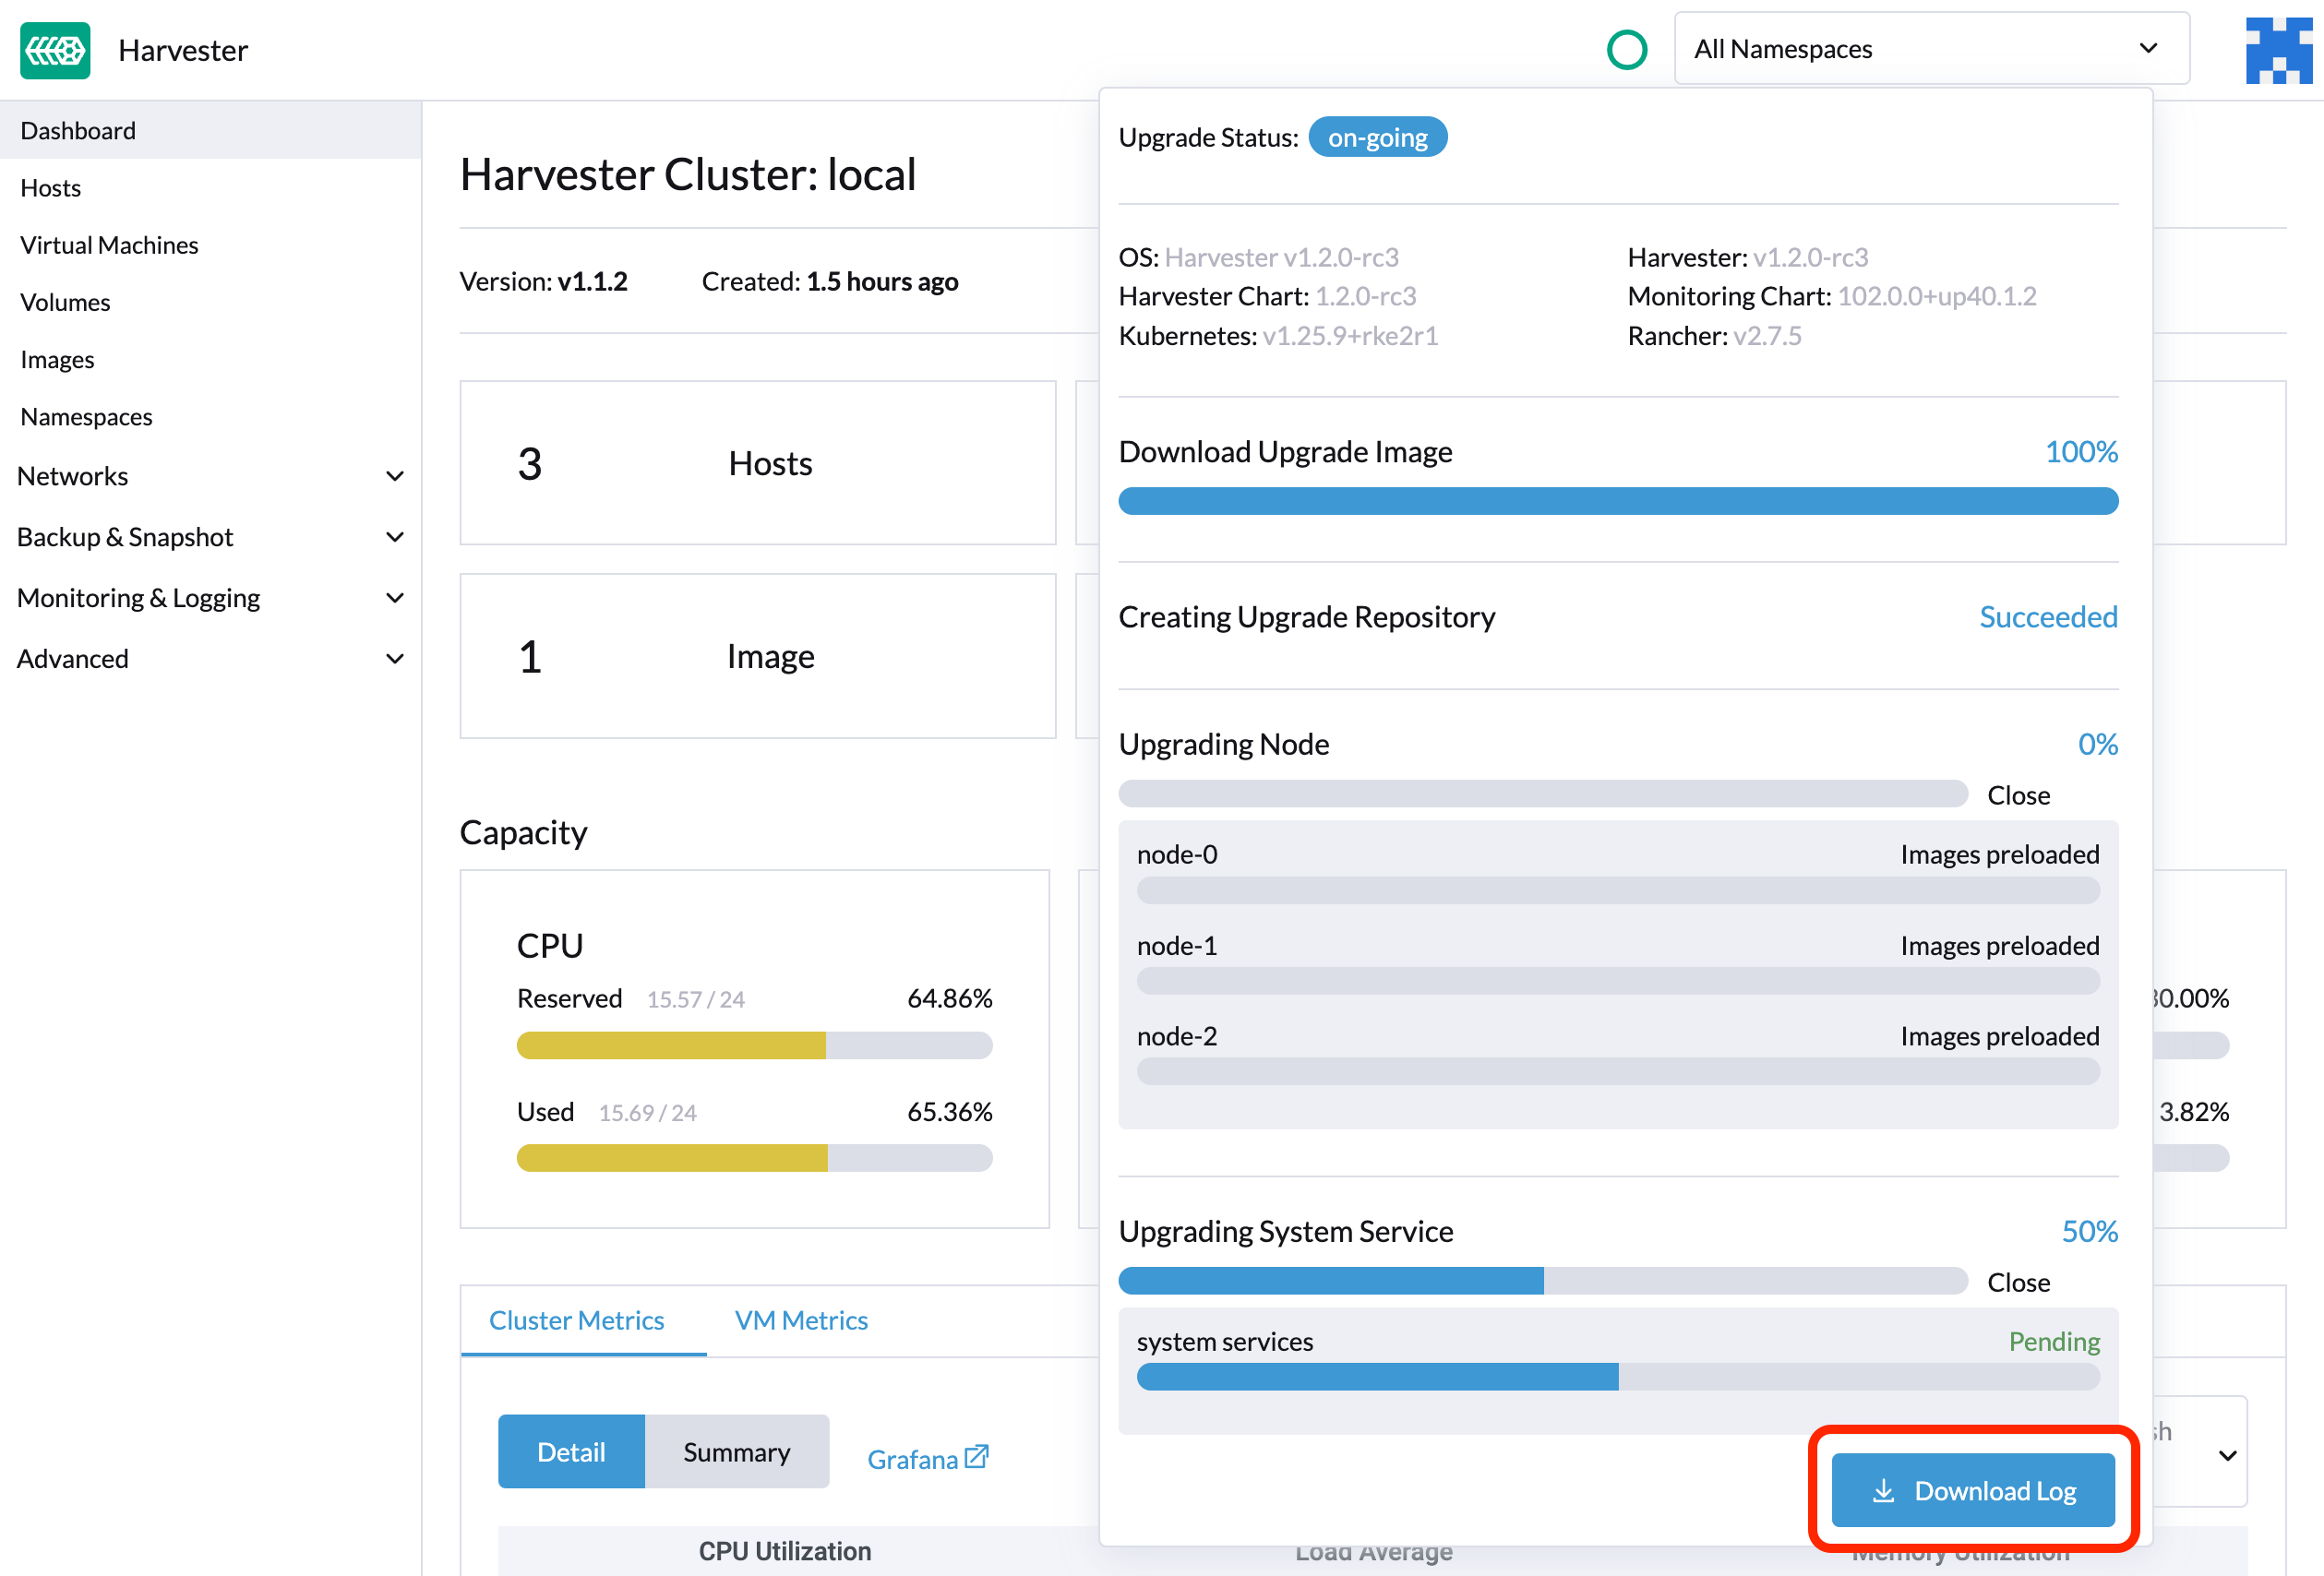
We have designed and implemented a mechanism to automatically collect all the upgrade-related logs and display the upgrade procedure. By default, this is enabled. You can also choose to opt out of such behavior.

You can click the Download Log button to download the log archive during an upgrade.
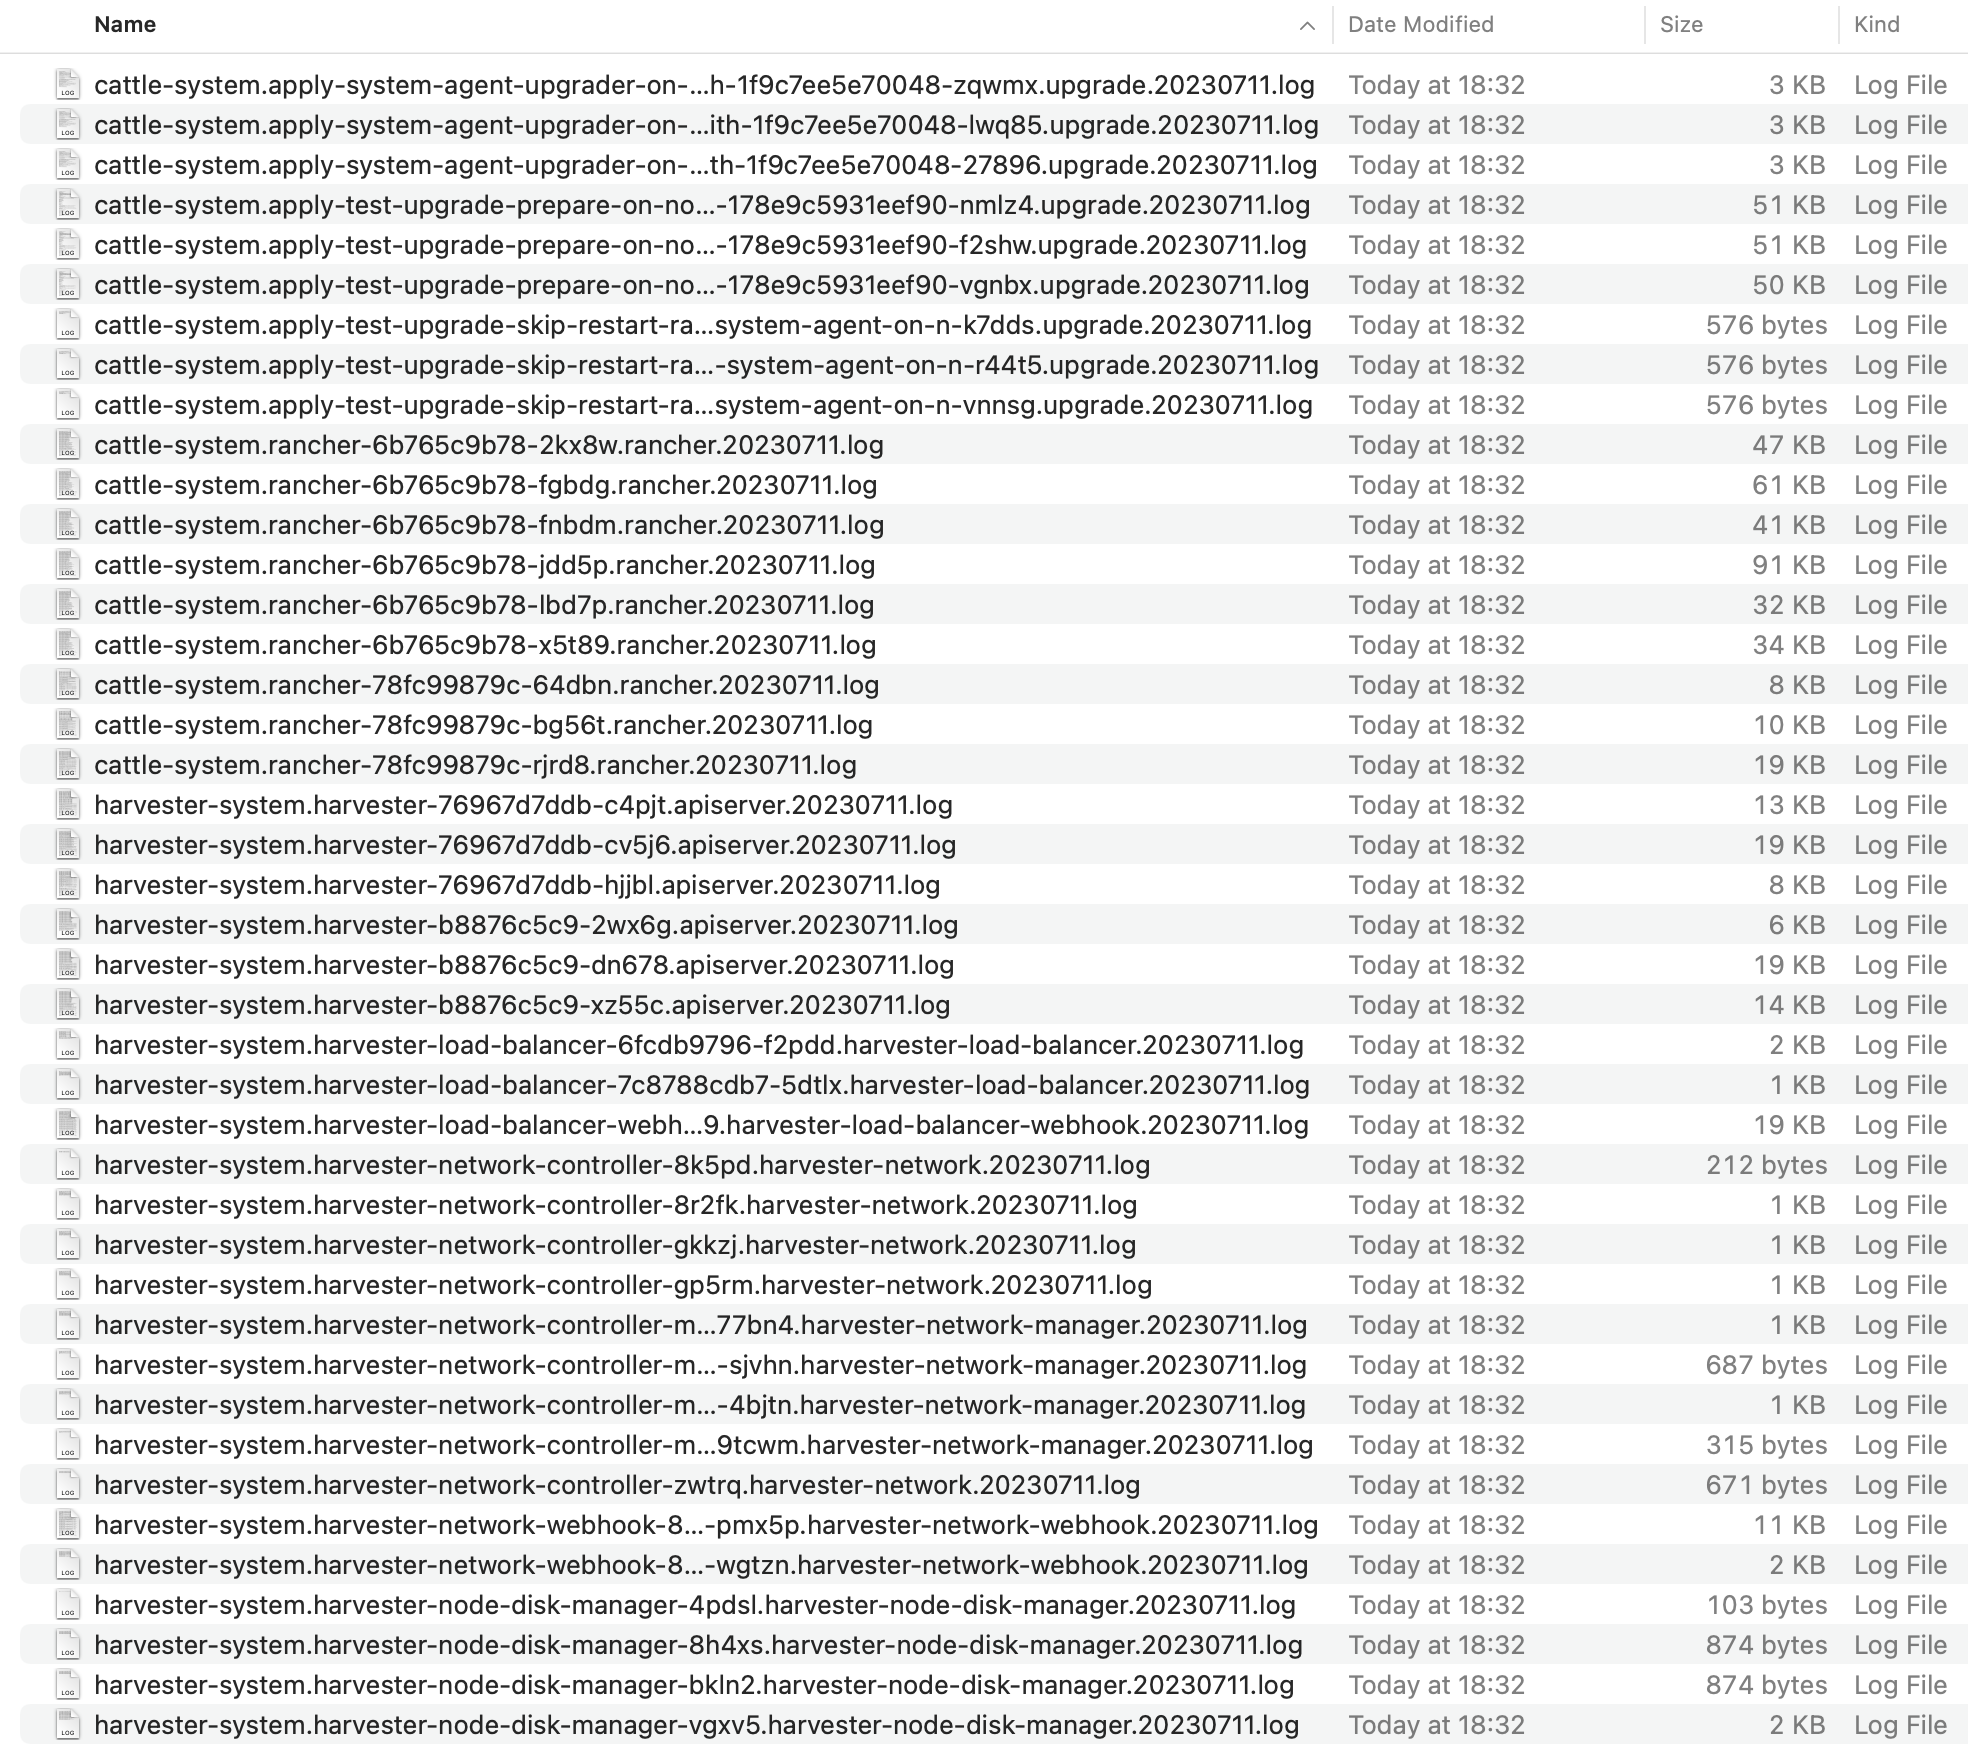
Log entries will be collected as files for each upgrade-related Pod, even for intermediate Pods. The support bundle provides a snapshot of the current state of the cluster, including logs and resource manifests, while the upgrade log preserves any logs generated during an upgrade. By combining these two, you can further investigate the issues during upgrades.
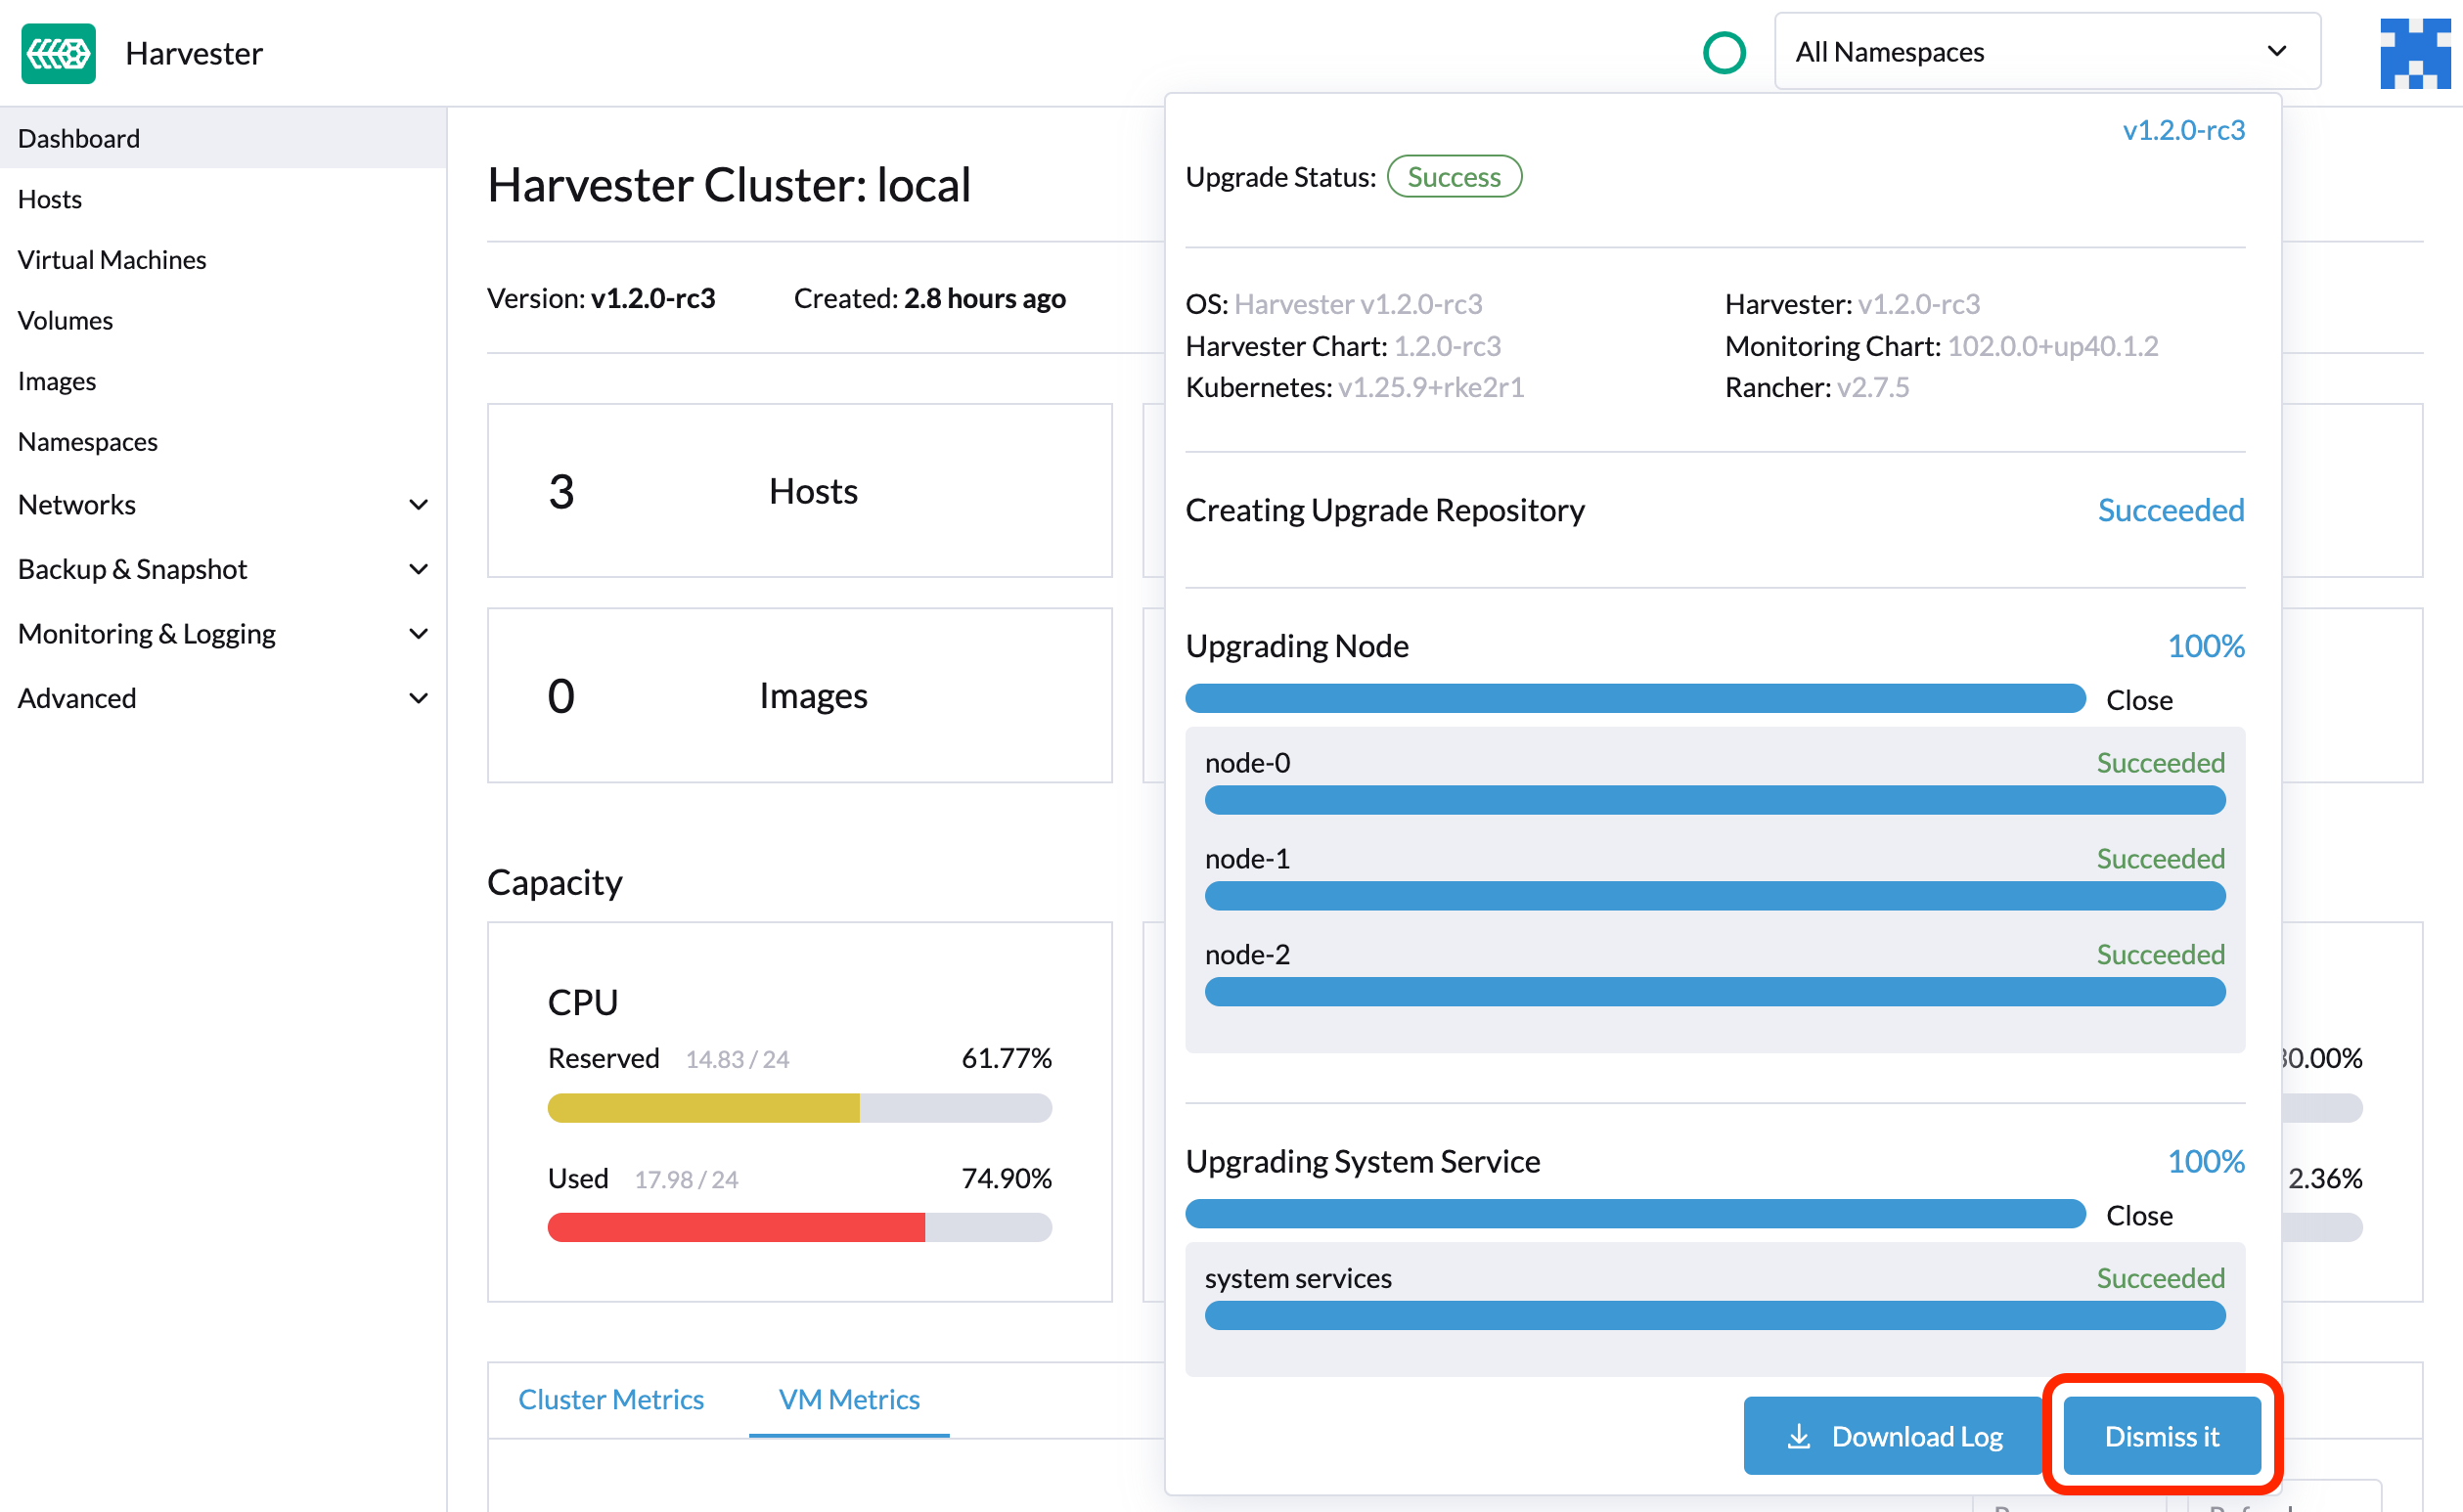
After the upgrade ended, Harvester stops collecting the upgrade logs to avoid occupying the disk space. In addition, you can click the Dismiss it button to purge the upgrade logs.
For more details, please refer to the upgrade log HEP.
The storage volume for storing upgrade-related logs is 1GB by default. If an upgrade went into issues, the logs may consume all the available space of the volume. To work around such kind of incidents, try the following steps:
- Detach the
log-archiveVolume by scaling down thefluentdStatefulSet anddownloaderDeployment.
# Locate the StatefulSet and Deployment
$ kubectl -n harvester-system get statefulsets -l harvesterhci.io/upgradeLogComponent=aggregator
NAME                                               READY   AGE
hvst-upgrade-xxxxx-upgradelog-infra-fluentd   1/1     43s

$ kubectl -n harvester-system get deployments -l harvesterhci.io/upgradeLogComponent=downloader
NAME                                            READY   UP-TO-DATE   AVAILABLE   AGE
hvst-upgrade-xxxxx-upgradelog-downloader   1/1     1            1           38s


# Scale down the resources to terminate any Pods using the volume
$ kubectl -n harvester-system scale statefulset hvst-upgrade-xxxxx-upgradelog-infra-fluentd --replicas=0
statefulset.apps/hvst-upgrade-xxxxx-upgradelog-infra-fluentd scaled

$ kubectl -n harvester-system scale deployment hvst-upgrade-xxxxx-upgradelog-downloader --replicas=0
deployment.apps/hvst-upgrade-xxxxx-upgradelog-downloader scaled
- Find out and expand the
log-archivevolume size via the Longhorn dashboard. For more details, please refer to the volume expansion guide.
# Here's how to find out the actual name of the target volume
$ kubectl -n harvester-system get pvc -l harvesterhci.io/upgradeLogComponent=log-archive -o jsonpath='{.items[].spec.volumeName}'
pvc-63355afb-ce61-46c4-8781-377cf962278a
- Recover the
fluentdStatefulSet anddownloaderDeployment.
$ kubectl -n harvester-system scale statefulset hvst-upgrade-xxxxx-upgradelog-infra-fluentd --replicas=1
statefulset.apps/hvst-upgrade-xxxxx-upgradelog-infra-fluentd scaled

$ kubectl -n harvester-system scale deployment hvst-upgrade-xxxxx-upgradelog-downloader --replicas=1
deployment.apps/hvst-upgrade-xxxxx-upgradelog-downloader scaled